This post may contain affiliate sales links. Please see my full disclosure policy for details

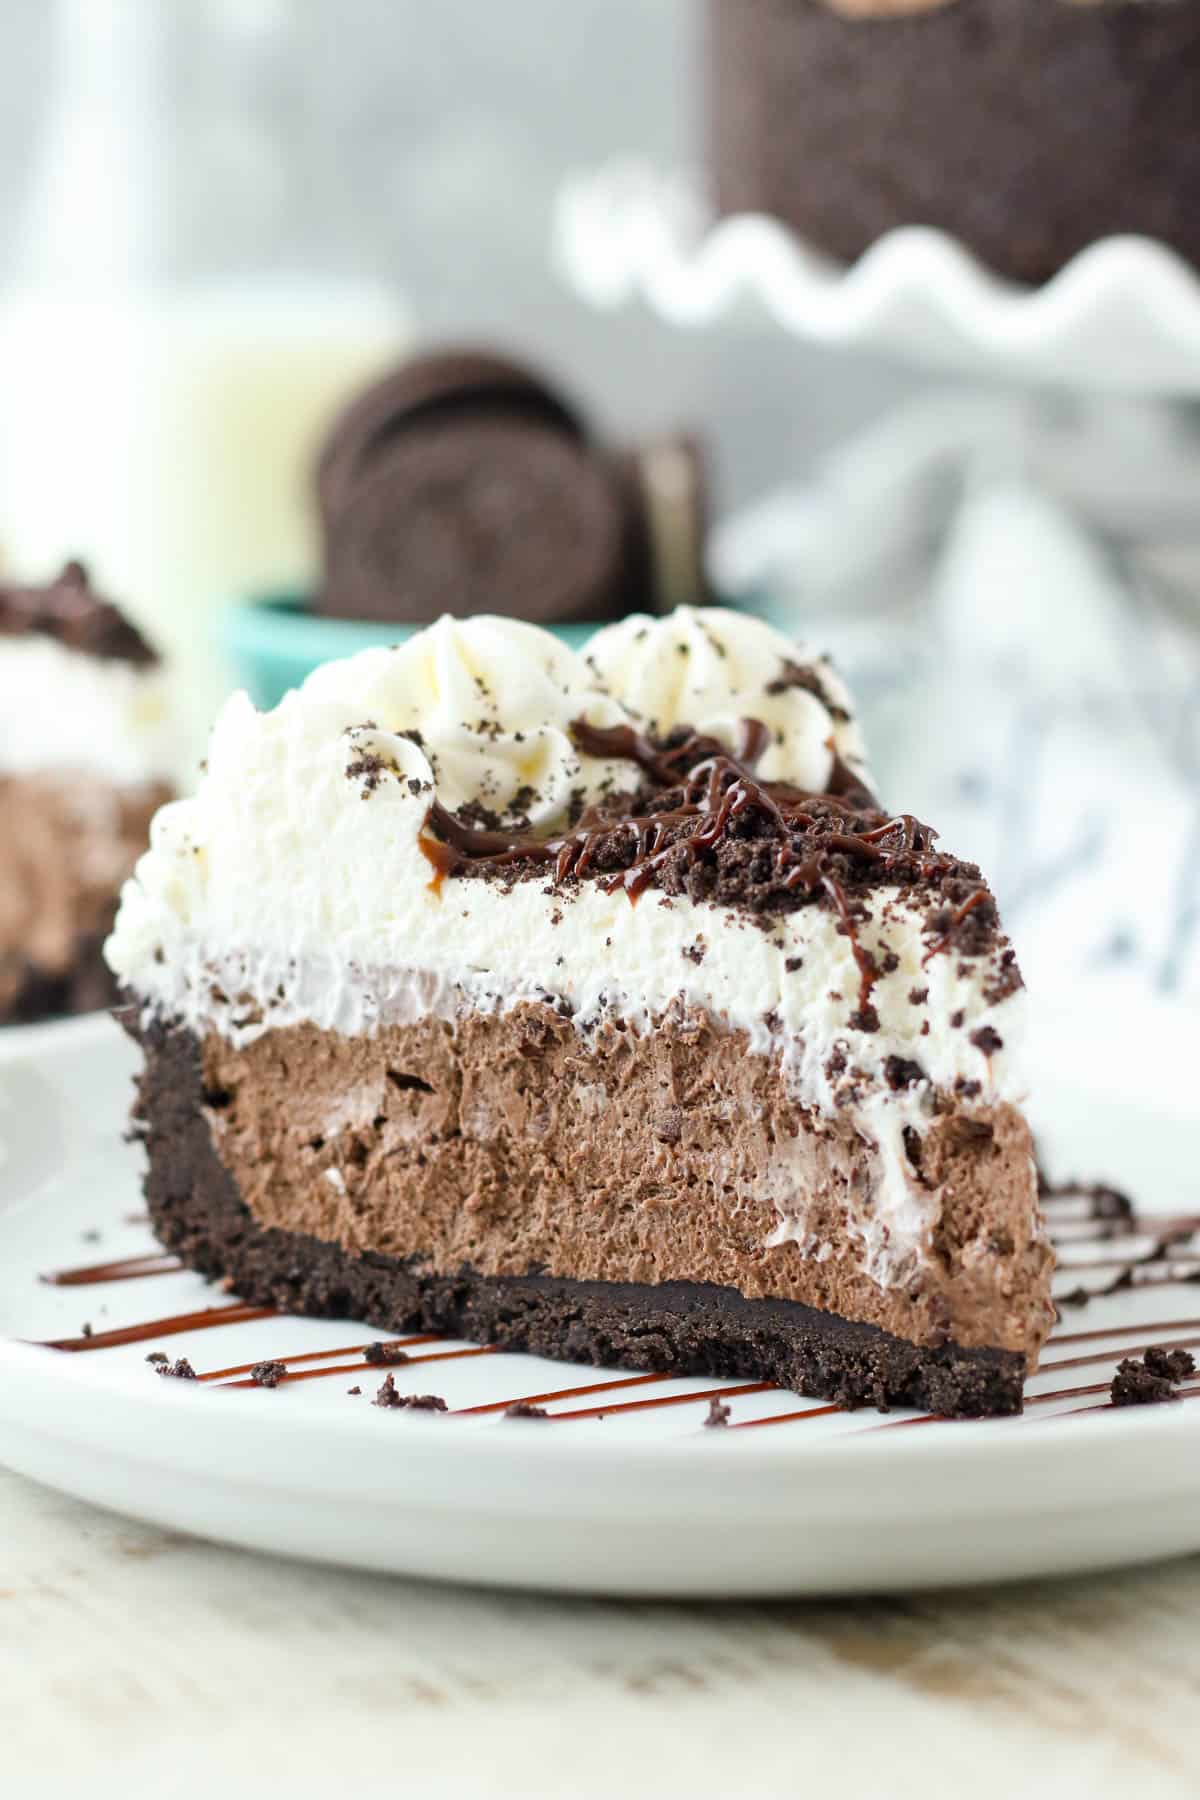
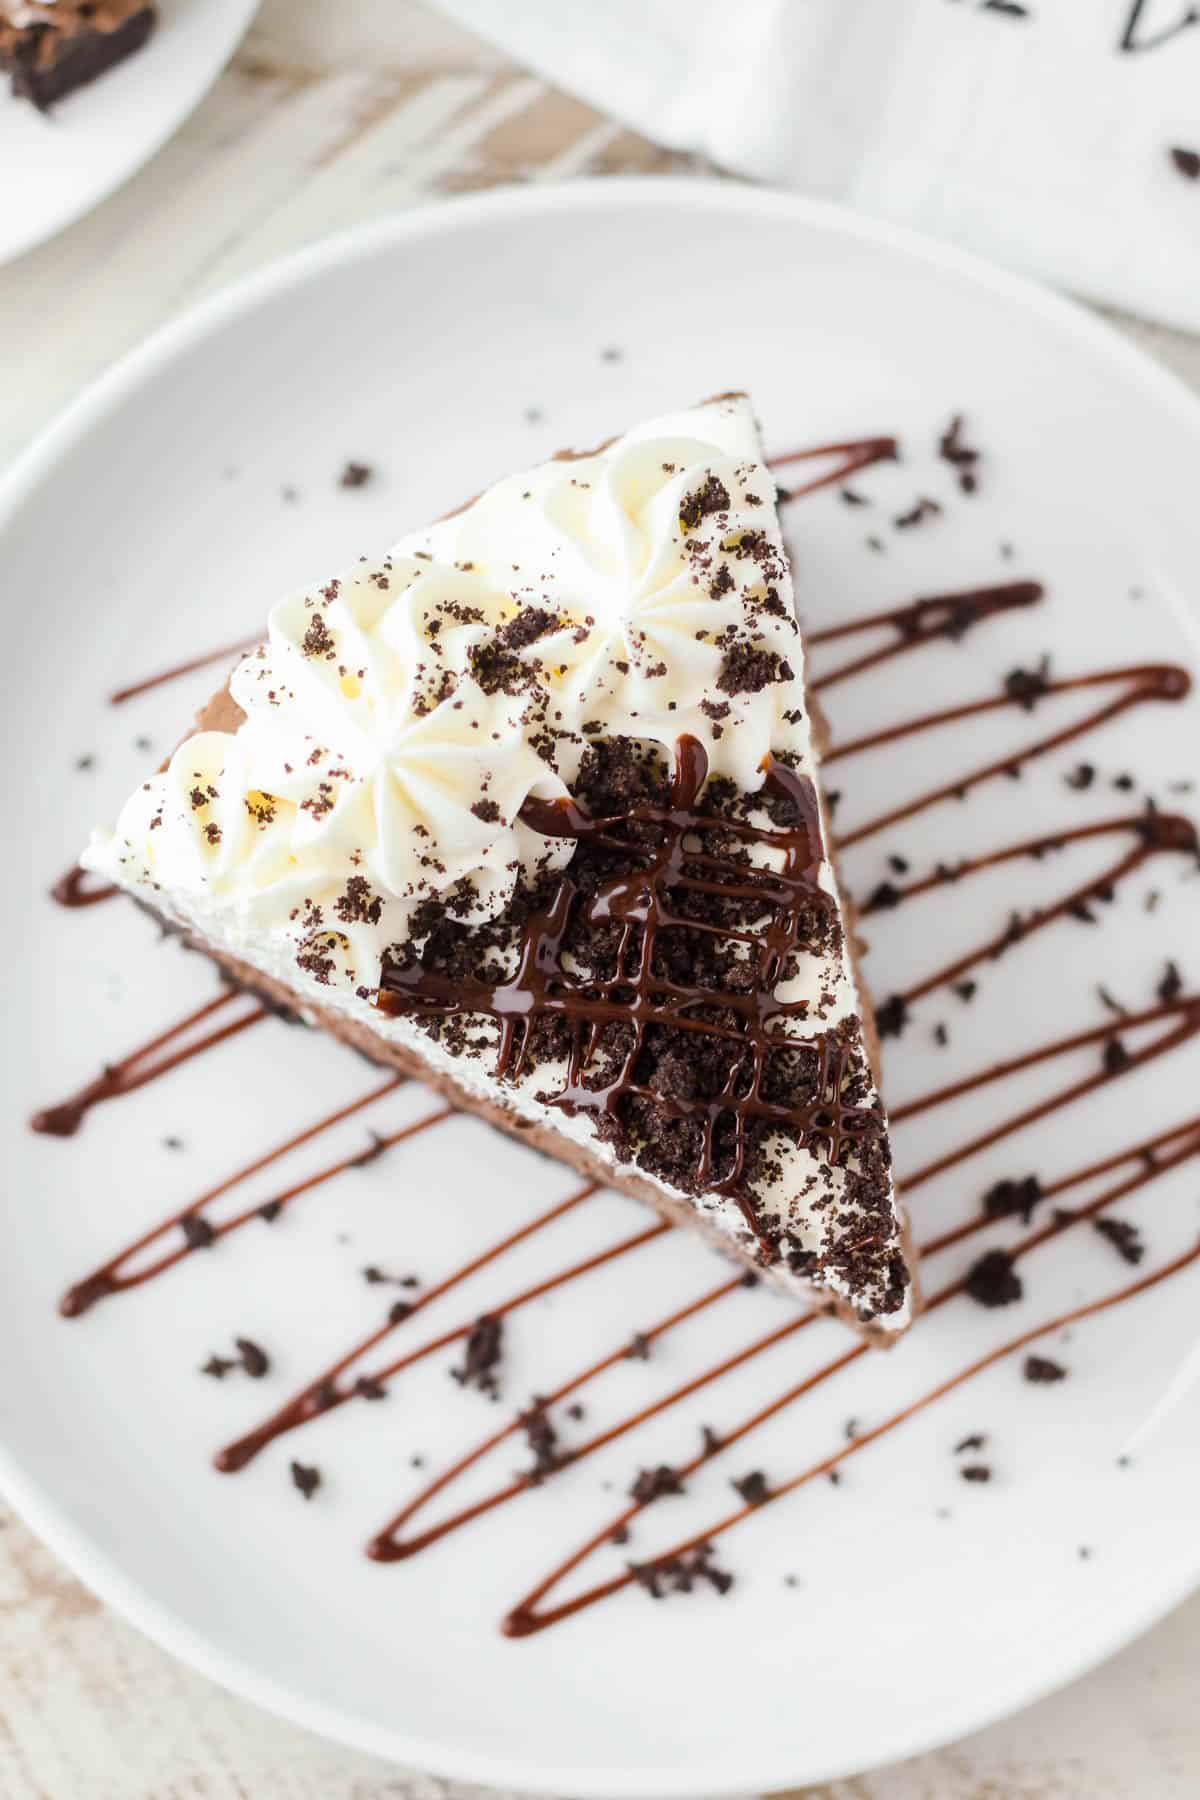
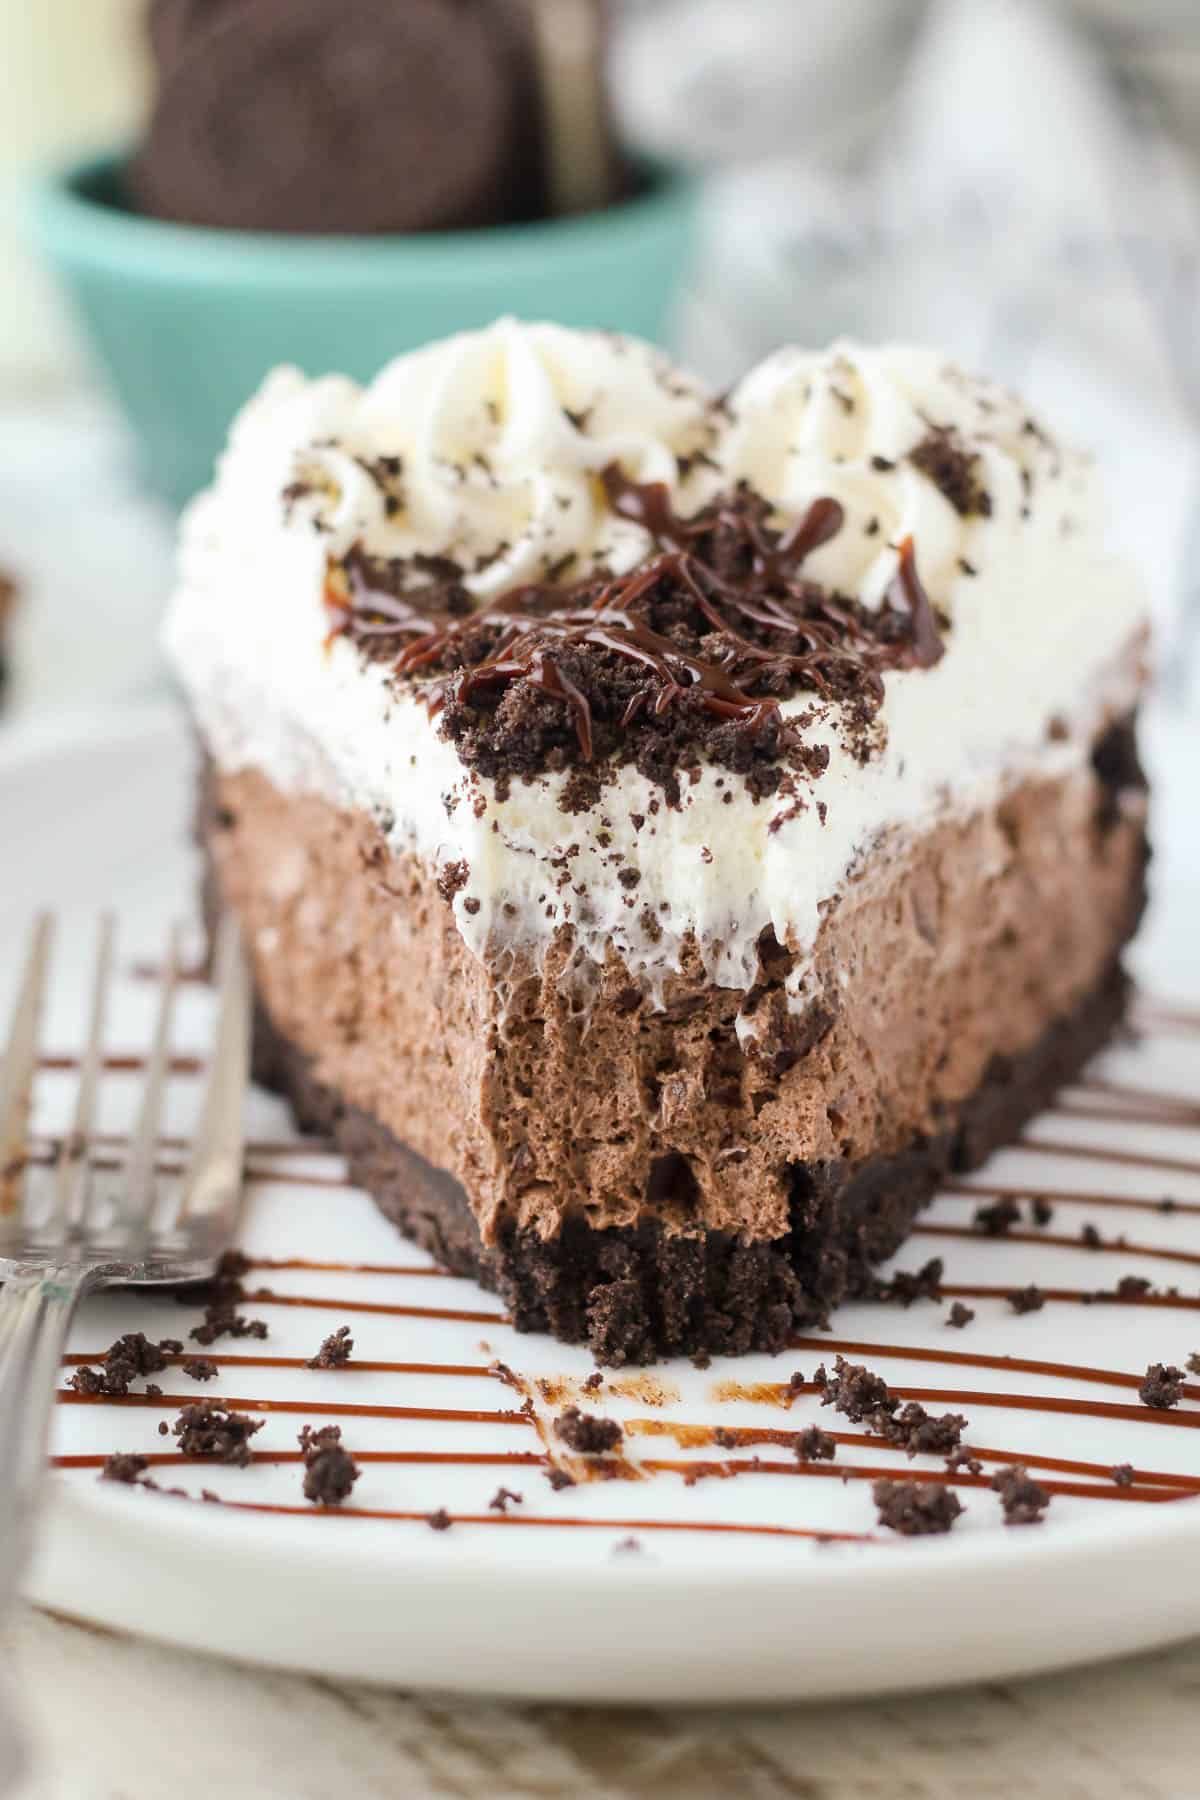
This No-Bake Chocolate Marshmallow Pie is decadence piled into an Oreo crust. It’s filled with a fluffy chocolate marshmallow mousse, then topped with homemade whipped cream, crushed Oreos, and hot fudge sauce.
Chocolate Marshmallow Pie is an Easy No-Bake Dessert
I am a total sucker for no-bake desserts, especially during the summer months or busy holiday season when the oven is preoccupied.
Other names I considered for this No-Bake Chocolate Marshmallow Pie:
- Dreamy Chocolate Pie
- Shove It In My Face Pie
- Heavenly Pie
- Eat the Whole Dang Thing Pie
Naturally, I settled on the one that describes what the pie actually is. But trust me when I say, all of those things ring true. Chocolate Pie is seriously one of my favorite desserts, and I’ve made a traditional chocolate cream pie with a whipped cream topping, and a homemade pudding pie, but this no-bake option will give either one of these a run for it’s month.
This no-bake chocolate pie is made with a buttery Oreo crust filled with a fluffy chocolate marshmallow mousse and topped with homemade whipped cream, crushed Oreos, and hot fudge sauce. That sounds pretty heavenly and dreamy to me!
A Couple of Key Ingredients
Here are a few things to keep in mind as you put together your ingredients. See the recipe card at the bottom of the post for a full list of ingredients and instructions!
- Oreos – You’ll need 1 whole package of Oreos for this recipe. You don’t need to remove the filling!
- Cream Cheese – Look for full-fat cream cheese blocks. These will yield the best texture and flavor.
- Chocolate Bar – Use a good quality chocolate bar, like Ghirardelli or Lindt. It’s worth it I promise! That chocolatey flavor is what makes this pie extra delicious.
- Marshmallow Cream– I look for Jet-Puffed Marshmallow Creme which works best.
How to Make Chocolate Marshmallow Pie
Aside from the chill time, this no-bake pie is so quick to make! Just 30 minutes of hands-on time is needed.
- Make the crust: Use a food processor or blender to grind the Oreos into a fine crumb. Combine with melted butter, then press the mixture into the bottom of a greased 9-inch springform pan. Set in the fridge to set. If you need further visual, here’s a helpful tutorial on how I prepare my springform pans.
- Melt the chocolate: Before starting, adjust the power level on the microwave to 50% to prevent the chocolate from burning. Break the chocolate into pieces and melt in 30-second increments until the chocolate is melted.
- Make the whipped cream: Chill the mixing bowl for a few minutes, then beat the heavy cream until it thickens to soft peaks, then add in cocoa powder and beat until stiff peaks form. Set aside.
- Make the filling: In a separate bowl, beat together cream cheese and sugar until it’s free of lumps, then add in the melted chocolate and marshmallow cream and beat until well combined. Then fold in the prepared whipped cream and chopped chocolate. Stir it all together until smooth.
- Assemble and chill: Transfer the filling to the assembled Oreo crust, then place in the fridge for 3-4 hours or until set.
- Add the topping: In a chilled bowl, beat heavy cream until thickened. Add in powdered sugar and beat until stiff peaks form. Spread over the pie, then garnish with Oreos and hot fudge, and serve.

How Do You Thicken Chocolate Pie Filling?
The key to creating a thicker, sturdier pie filling is all in the whip cream. It’s essential that you whip the cream until stiff peaks form. If the whipped cream is too runny to start, the pie filling won’t have enough structure to set up in the fridge.
Also be sure you’re using the correct cream cheese. A block of full-fat cream cheese is recommended.
Recipe Tips and Notes
- Use a springform pan. A springform pan makes it super easy to remove the pie without damaging it. However, a pie plate can also be used.
- Chill the crust. I like to stick the crust either in the fridge or freezer while I prep the filling. This helps it firm up so it’s less likely to fall apart when you add the filling.
- Melt chocolate at 50% power. This helps prevent it from seizing up. If you’re unsure how to change the power on the microwave, do a quick Google search.
How to Store
Once assembled, this marshmallow pie will last covered in the fridge for 2-3 days, so go ahead and prepare it in advance if needed. If you do need to prepare more than a day ahead of time, assemble and chill the pie, and hold off adding the topping until the day you plan to serve for best results.
Print
No-Bake Chocolate Marshmallow Pie
- Prep Time: 30 minutes
- Chill Time: 4 hours
- Total Time: 4 hours 30 minutes
- Yield: 8 slices
Description
This No-Bake Chocolate Marshmallow Pie is decadently piled into an Oreo crust. It’s filled with a fluffy chocolate marshmallow mousse, then topped with homemade whipped cream, crushed Oreos, and hot fudge sauce.
Ingredients
For the Crust:
- 1 package (14oz) Oreos (save 2 Oreos for garnish)
- 1/2 cup unsalted butter, melted
For the Filling:
- Two 4 ounces (113g) dark chocolate bars (of your choosing)
- 1 cup (236ml) heavy whipping cream, cold
- 3 tablespoons (15g) cocoa powder
- 8 ounces (226g) full-fat cream cheese, at room temperature
- 2 tablespoons (24g) granulated sugar
- 1 jar (7oz) Jet-Puffed Marshmallow Crème
For the Topping:
- 1 cup (236ml) heavy whipping cream
- 1/2 cup (65g) powdered sugar
- Hot fudge sauce for drizzle, optional
- 2 crushed Oreos for garnish, optional
Instructions
For the Crust:
- Prepare a 9-inch springform pan by lightly greasing the edges of the pan with cooking spray, and then wiping gently with a paper towel. Line the bottom of the pan with parchment paper.
- Grind the cookies into a fine crumb using a food processor or blender.
- In a small bowl, melt the butter in the microwave for 30 to 45 seconds. Pour the melted butter over the cookie crumbs and stir until the crumbs are well coated.
- Pour the crumbs into your springform pan and press firmly into the bottom and up on the sides to create a thick crust. Refrigerate the crust while you are preparing the filling.
For the Filling:
- Break apart one 4-ounce chocolate bar into small pieces. Melt in the microwave for 60-90 seconds, checking every 30 seconds until the chocolate is melted, stir until smooth.
- Prepare the whipped cream. Place a metal mixing bowl in the freezer or fridge for 5-10 minutes to chill. Beat the heavy whipping cream in the chilled bowl using an electric mixer at high speed until the cream thickens to stiff peaks. Add the cocoa powder, slowly incorporate and continue beating at high speed until stiff peaks form. Set aside.
- In a large mixing bowl, combine the cream cheese and granulated sugar, beating until smooth and free of lumps. Next, add the melted chocolate and mix until combined, scraping down the bowl as needed. Proceed to add the marshmallow crème and continue mixing until smooth. Fold the prepared whipped cream into the cream cheese filling and stir to combine.
- Chop one 4-ounce chocolate bar into small pieces and fold it into the filling. Pour the filling in the prepared crust and spread evenly. Refrigerate for 3-4 hours until the filling is set.
For the Topping:
- Prepare another batch of the whipped cream. Chill the bowl first. Beat the heavy whipping cream in the bowl and use an electric mixer to beat the heavy cream on medium-high speed until soft peaks start to form. Slowly add the powdered sugar and continue beating at high speed until stiff peaks form. Spread over the chilled pie, or use a piping bag to decorate. Garnish with crushed Oreos and drizzle with hot fudge sauce. Serve chilled.

Notes
Storing: Once assembled, this marshmallow pie will last covered in the fridge for 2-3 days
- Category: Pie
- Method: No-Bake
- Cuisine: American


Could I convert this into a 9×13 pan?
Yes, but I would at least double it
Hoping you see this in time! I accidentally got marshmallow fluff instead of crème. Helppp lol
Not sure, I haven’t tried it but it could work??
What could I use instead of the cream cheese?
unfortunately there is not a good alternative
Looking forward to try this on my family always looking for something new for the family
This looks so delicious and I have been assigned a chefs choice chocolate dessert for Thanksgiving. Can I make this one or two days in advance except for the whipped cream on top? I can’t wait to try this?
Yes! It’s the perfect make-ahead dessert! I would say it’s the best when served within 2 days, so go ahead and let it sit in the fridge and add the whipped cream and chocolate topping the day you plan to serve. You may also consider baking the Oreo crust for 8-10 minutes on 350 and letting it cool before adding the filling, which will also help hold up the crust even better!
When the pandemic started, my kids & I had a library book that we couldn’t return (since libraries were closed) and we read one book dozens of times that had a cherry chocolate marshmallow pie in it. My 3 year old constantly asked if I could make it & not knowing that that pie even existed, I pushed it off until I stumbled upon this recipe. It was incredibly delicious and fun to make. It’s been 7 months since we had it & my daughter still joyfully talks about it. Sometimes a pie is more than just a dessert. It brought so much happiness to my child and we’re going to make it for our quarantined Valentine’s Day party.
What a special story Rachel, thank you so much for sharing!
Hi Julianne! Made this for Thanksgiving instead of our usual chocolate pudding pie and I have to tell you……..everyone preferred this. This is a great recipe. It is light and reminds us of french silk pies. The marshmallow flavor and texture are just fab. Thank you for developing this recipe.
Amazing Dezi!! Thank you for sharing!
Another DELICIOUS recipe from the No-Bake Dessert Queen! This is a keeper. I especially loved the tiny chunks of chocolate in the chocolate marshmallow layer. It added some great texture. Thanks for another great recipe!
Thank you so much Kristin. I do LOVE this recipe!
I am so happy you were here!! And this pie. OMG I WANT.