This post may contain affiliate sales links. Please see my full disclosure policy for details
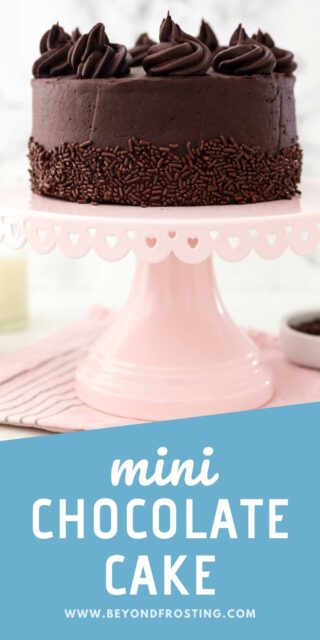

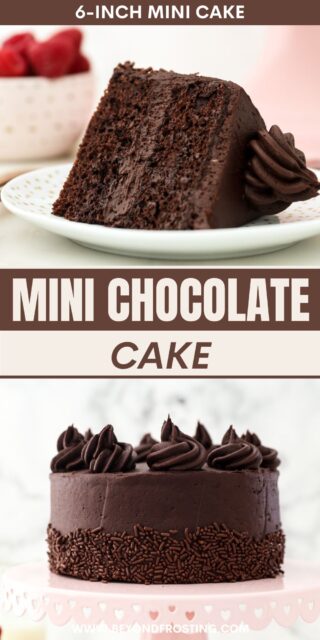
Indulge a little with this small chocolate cake! It’s a decadent mini chocolate cake made from moist 6-inch cake layers filled with fudgy chocolate frosting. There’s plenty of cocoa goodness in every bite!

TABLE OF CONTENTS
- Small Chocolate Cake With Chocolate Frosting
- Why You’ll Love This Mini Chocolate Cake Recipe
- Ingredient Notes
- How to Make a Small Chocolate Cake
- Recipe Tips
- More Ways to Decorate
- Can I Make This Cake In Another Pan?
- Can I Prepare This Small Cake in Advance?
- How to Store a Mini Chocolate Cake
- More Chocolate Cake Recipes
- Get the Recipe
Small Chocolate Cake With Chocolate Frosting
How cute is this wee chocolate cake?! Decadent chocolate cake layers and creamy chocolate frosting come together in a 6” version of my popular chocolate drip cake. It has all the luxury of moist chocolate cake, downsized to fit on one plate.
This small chocolate cake is the perfect size if you’re catering to 2-4 chocolate lovers. Every bite is filled with rich cocoa flavor, enhanced with a few secret ingredients for the fudgiest chocolate cake. Find out all the indulgent details below!
Why You’ll Love This Mini Chocolate Cake Recipe
- Smaller portions. If you’re trying to eat smaller portions, this small chocolate cake doesn’t sacrifice any of the decadence. One slice is enough to satisfy even the most chocolate-crazy folks.
- Small groups. A mini cake is the perfect dessert for a smaller crowd. Think intimate gatherings, date night (I see you, Valentine’s Day!), and dinner parties for just a few people.
- Less leftovers. If you’re not in the mood for a bunch of leftovers, why go all out with a party-sized cake? This recipe makes just enough that you can have your fudgy chocolate cake, and eat ALL of it, too.

Ingredient Notes
There are plenty of good reasons to make a mini chocolate cake rather than a full-sized one, including the simple ingredients. I’ve included the important ones below. Be sure to scroll down to the recipe card for the full list, amounts, and recipe details.
- Oil – Vegetable oil replaces the butter in this cake, for an ultra-moist crumb.
- Sour Cream – You can also use Greek yogurt or plain yogurt instead.
- Cocoa Powder – I use Hershey’s Special Dark, but any unsweetened natural cocoa powder will work in this recipe. See my guide on the different types of cocoa powder.
- Brewed Coffee – You won’t taste the coffee, but hot brewed espresso helps to intensify the chocolate flavor in chocolate cakes and baked goods. Use freshly brewed instant espresso and not the granules. If you’re avoiding caffeine, use milk instead.
- Frosting – For this mini cake, I include the recipe for my favorite chocolate buttercream frosting. But you can frost this cake using just about any frosting you’d like.
How to Make a Small Chocolate Cake
You’ll love the simplicity of this recipe. It’s smooth sailing from the cake batter to the assembly! Let’s start with a short step-by-step on how to make the mini cake layers:
- Combine the wet ingredients. First, you’ll cream together the sugar, oil, eggs, and vanilla, followed by the sour cream.
- Add the dry ingredients. Sift the dry ingredients into a separate bowl, and then gradually mix them into the wet ingredients, alternating with the brewed coffee until combined.


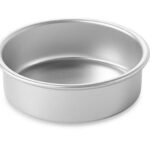
- Bake. Next, pour the batter into two greased and floured 6” cake pans (mix cocoa powder into the flour for a darker color). Bake the cakes at 350ºF for 20-24 minutes.


Make the Chocolate Frosting
After your cake is out of the oven, you’ll need to let it cool completely. Meanwhile, whip up a fresh batch of chocolate buttercream:
- Beat the butter. Starting with cold cubed butter, give it a good whip with your mixer for 3-5 minutes, until it easily spreadable.
- Add cocoa powder and vanilla. Next, sift in the cocoa powder, add the vanilla extract, and beat until combined.
- Add sugar and heavy cream. Lastly, add powdered sugar and a spoonful of heavy cream. Starting slowly, beat the ingredients together, and then whip the frosting again to get it soft and airy.
Assemble and Frost the Cake
Now, your small chocolate cake is ready for assembling and frosting. I’ll get you started with a quick overview. Refer to the recipe card, and also check out my tutorials on how to use a piping bag and how to use piping tips for detailed instructions.
- Trim the domes. Level the cakes by trimming off any high domes using a serrated knife or a cake leveler.


- Frost the first layer. Starting the with bottom cake layer, use a piping bag to pipe a layer of chocolate frosting over the cake, working from the outside edge inward.
- Add the next layer. Smooth out the frosting with an offset spatula or a knife, and carefully place the second cake layer over top.
- Frost the cake. Finally, pipe frosting over the top and sides of the cake, and smooth it out with a spatula or icing smoother.
- Decorate. Get creative with the remaining frosting! I used a large closed-star tip to make cute little swirls and added a skirt of chocolate sprinkles as pictured. See the section below for more decorating ideas.
Recipe Tips
Making a mini chocolate cake from scratch isn’t as challenging as you might think! Even if you’re a beginner baker, this recipe comes together relatively easily. Take note of these extra tips:
- Grease the pans well. Line the bottom of your baking pans with parchment paper or grease and flour the edges. This prevents the cake from sticking to the pans.
- Don’t overfill the pans. This recipe makes enough batter to fill two 6” cake pans about halfway (1 ¼ cups per pan). Make sure to leave enough space for the cakes to rise, so they don’t overflow as they bake.
- Check the cake for doneness. Stick a toothpick into the center of the cake. If it comes out clean without any streaks of batter, the cake is done.
- Level the cake layers. Once your cakes have cooled, use a cake leveler or serrated knife to remove the domes on top. This makes flat, even layers for easy assembly and prevents a lopsided cake!
- Need extra guidance? See my easy tutorial on how to make a layer cake for detailed step-by-step instructions for making and frosting a perfect layer cake.

More Ways to Decorate
You can be as fancy or as simple as you like when it comes to decorating. Try these easy ideas and variations:
- Different frosting. This cake would be delicious topped with chocolate fudge frosting or peanut butter frosting. For a mocha-inspired cake, try coffee frosting. But, really, any homemade frosting works here, or you can even use store-bought.
- Garnishes. Zhuzh up your small chocolate cake with a garnish of chocolate shavings, rainbow sprinkles, nonpareils, or toasted coconut.
- Birthday cake. For the perfect mini birthday cake, frost this cake with rainbow chip frosting and decorate with colorful buttercream swirls and rosettes. Check out how to color buttercream and borrow the cake-decorating techniques used for my unicorn cupcakes.
- Fresh fruit. Top your cake with fresh strawberries, blueberries, raspberries, or a berry medley. Don’t forget the whipped cream!
- Ganache. Add a luxurious drizzle of chocolate ganache or try this whipped ganache frosting.
- More decorating ideas. Check out this buttercream flower cake and my easy Cookie Monster cake for more fun decorating inspiration.
Can I Make This Cake In Another Pan?
If you don’t feel like stacking cake layers, no worries! There are other options. Here’s how to make this small chocolate cake recipe in different pans:
- Single-Layer Cake – Use an 8” pan (either square or round). Refer to the recipe card notes on adapting the amount of frosting for a single-layer cake.
- Cupcakes – Pour the batter into lightly greased cupcake liners rather than a cake pan. This recipe makes 12 cupcakes.
Can I Prepare This Small Cake in Advance?
Yes! Prepare and bake the cake layers, wrap the cooled cake layers in a double layer of plastic wrap, and place them into the freezer. When you’re ready to assemble, defrost the cake layers in the fridge and whip up a batch of frosting. Serve the cake at room temperature for best results. See the section below for more storage details.
How to Store a Mini Chocolate Cake
- To Store. The frosted cake can be stored airtight on the counter for up to 2 days, or you can keep it in the fridge for 3-4 days.
- Freeze. This small chocolate cake is freezer-friendly for up to 2 months. Keep the cake in an airtight, freezer-safe container and defrost the frozen cake overnight in the fridge. Take the cake out to serve at room temperature for best results.
More Chocolate Cake Recipes
- Chocolate Zucchini Cake
- Oreo Chocolate Cake
- Chocolate Peanut Butter Cake
- Ferrero Rocher Cake
- Better Than Sex Cake

Small Chocolate Cake
- Prep Time: 45 minutes
- Cook Time: 20 minutes
- Total Time: 1 hour 5 minutes
- Yield: 6
Description
Indulge in this small chocolate cake recipe that’s big on fudgy cocoa flavor! This is an easy dessert made from moist 6-inch chocolate cake layers filled with decadent chocolate frosting.
Ingredients
For the Chocolate Cake
- 3/4 cup (143g) granulated sugar
- 1/4 cup (59ml) vegetable oil
- 2 large eggs
- 2 teaspoons (10ml) vanilla extract
- 1/4 cup (59ml) sour cream (substitute with Greek or plain yogurt)
- 1 1/4 cups (150g) all-purpose flour, sifted
- 1/4 cup (20g) cocoa powder (Hershey’s Special Dark is my favorite)
- 1 1/4 teaspoons (4.6g) baking powder
- 1/4 teaspoon baking soda
- 1/2 teaspoon salt
- 2/3 cup (157ml) hot brewed coffee (or milk)
For the Chocolate Frosting
- 1 cup (226g) unsalted butter, cold or slightly softened
- 1/2 cup (50g) cocoa powder, sifted
- 2 1/4 cups (293g) powdered sugar
- 2 teaspoons vanilla extract
- 1–2 tablespoons (15-30ml) heavy whipping cream or milk
Instructions
For the Cake
- Preheat the oven to 350°F. Line two 6-inch pans with parchment paper or grease and flour the edges.
- In a large mixing bowl, combine the sugar, vegetable oil, eggs and vanilla extract. Beat on medium speed until the eggs and oil are well incorporated and the batter is lighter in color. Next, mix in the sour cream and beat until well combined.
- In a separate bowl, sift together the dry ingredients. Alternate adding half of the dry ingredients and half of the coffee at a time. Mix until well combined, then use a spatula to scrape down the sides of the bowl and stir the batter to ensure it’s well mixed.
- Divide the batter evenly between the two pans, about 1 1/4 cups batter per pan. Bake at 350°F for 20-24 minutes. Test the cake for doneness by inserting a toothpick into the center of the cake. If the toothpick comes out clean, the cake is done. Cool completely prior to frosting.
For the Frosting
- Cut the butter into pieces, 1 tablespoon each. Using the paddle attachment, whip the butter for 3-5 minutes, scraping down the bowl occasionally. Beat until the butter is whipped, fluffy and easily spreadable.
- Sift the cocoa powder into a mixing bowl, then add the vanilla extract. Turn the mixer to slow speed and beat until the cocoa power and extract are mixed into the butter.
- Add the powdered sugar and 1 tablespoon of heavy cream and mix on medium-low speed until fully incorporated. Then, increase the speed to medium-high and beat for another 2-3 minutes to whip additional air into the frosting. If the frosting still seems thick, add an additional 1/2-1 tablespoon heavy cream.
For the Assembly
- Use a cake leveler or serrated knife to cut the domes off the top of the cake. Place a dollop of frosting on your cake board and place the bottom layer of cake on top of that.
- Fill a large piping bag with the frosting and cut off the end of the piping bag about 1/2 inch up. Pipe a layer of frosting on top of the first layer, starting at the outside edge and working your way into the middle. Spread evenly with an offset spatula. Place the next layer on top.
- Use the piping bag to fill in the sides of the cake with frosting. Use an offset spatula or icing smoother to wipe away the excess frosting. Decorate with the remaining frosting using a large closed star tip (Ateco 846) or garnish with sprinkles or fruit.
Notes
- Ingredient substitutions:
- Sour cream: sub with yogurt, either plain or Greek
- Brewed coffee: sub with milk
- Gluten-free flour: all-purpose flour can be substituted with a measure for measure replacement all-purpose gluten-free flour
- Butter for the frosting: Butter for the frosting can be cold or softened, about 30 minutes at room temperature.
- Single layer 8-inch square or round cake: This can also be made as a single layer 8-inch cake. Bake for 25-28 minutes. Reduce the frosting: ¾ cups butter, 1/3 cup (37g) cocoa powder. 1 ½ cups (325g) powdered sugar, 1 teaspoons (5ml) pure vanilla extract, 1 tablespoon (15ml ) heavy whipping cream
- This recipe can also be made into 12 cupcakes. Bake for about 15 minutes.
- Storing this cake: You can store frosted cake on the counter for a couple of days if you keep it in an airtight container. If you live somewhere hot and humid, go ahead and keep your cake in the fridge instead. Refrigerated cake will last for 3-4 days. Serve at room temperature.
- Category: Dessert
- Method: Oven
- Cuisine: American


I made this but my frosting came out a light brown. I was surprised did not look at all like picture. What did do wrong? I used ghardelli Dutch process
Hi Molly, each type of of cocoa powder will produce a different color. Generally speaking I use Hershey’s Special dark which will make a darker brown color as opposed to a lighter, more reddish color you’d see with other types of cocoa powder.
I am going to try this today, I have a chocolate recipe, but I want to try another, will let you know how it comes out and taste
Easy to follow recipe and so good. The cake is moist and fluffy and not too sweet. I made a cherry filling and added it between layers and it was so good!
Love that!! Thank you for sharing Anja!
This is my go-to chocolate cake recipe now! I’ve made it several times and it always turns out perfectly. It’s moist and chocolatey, everything I want in a cake. The size is perfect too.
Thank you for the recipe!
That’s wonderful! Thank you so much Robin!!
Excellent recipe, thank you! If I wanted to make this cake full size (two 8 in pans), which of your recipes would you suggest? Or do you have a conversion for this recipe?
Thank you!
Hi Robin, here is the full-size cake recipe, for three 8-inch layers but there’s notes in here about adjusting it to a 2 layer. https://beyondfrosting.com/chocolate-cake-recipe/
Do any of these ingredients for the cake and frosting need to be room temp, like the eggs, butter, sour cream? Also, if I replace the coffee with milk, does the coffee need to be hot?
Hi Ket, I’ve made it both ways. Room temperature ingredients is helpful and I am in the process of updating this on the recipe card. I do recommend heating the milk or coffee, whichever you use
OMG….. this was rich decedent and delicious! © I made it just like your picture for a Birthday celebration for today. I will only make this chocolate version in the future. Thank you so much! 😋
Yeeess! Thank you so much! Love that, it’s out go-to small cake in my house too!
What size pans did you use for this cake 6’2 or 6’3?
The ones I have are 6×2
This cake recipe is so good!! I did use dark chocolate and I used coffee Greek yogurt in the cake and icing! Delicious!!
Yes! That’s wonderful, thank you so much Annette!
Moist, rich and the perfect sized cake for two! A great recipe I will definitely make again!
Amazing! Thank you so much Karen! I am so happy you enjoyed it!
I’m going to try this one today 🤗. Thank you for this.
Milk should be hot?
If using milk, I usually just use room temperature.
Great recipe.. just wanted to know any way that we can substitute the eggs?
Hi Rinika, Sorry I can’t help here. I have not tested the recipe with any egg substitutes and I am not familiar with baking egg free
i should had mentioned that I cut the cake into 4 sections and I end up with a 4 layer cake with whipped cream or cool whip and cherry pie filling between each and every layer; it’s on the order of a Black Forest Cake. The whole outside is covered in whipped whipping cream, or cool whip; topped with chocolate shavings, chocolate sprinkles, or mini chocolate chips – along with stemmed cherries on top.
Sounds delicious!
In place of using round pans, bake cake in 9×13 inch pan; checking your baking time and line your pan the same as instructions above for the round pans.
When out of the oven, turn the cake onto a platter or cooling rack. Once completely cool, cut cake in half and make a square layered cake.
You can do the same by dividing up the batter and using loaf pans; just keep an eye on the baking time.
I have done this when at the time I had no 6in. round cake pans.
Thank you for sharing your tips! This recipe as written would be okay for a 8-inch square pan, but for a 9×13 inch it would be quite thin. If you want to make a 9×13 inch cake, I recommend following the ingredients on this cake.
Hi
Can I use your chocolate cream cheese frosting with this cake recipe?
I’m excited to try this recipe 🙂
Urvashi
Yes of course! That would be delicious!
Can i bake the entire batter in one 6 inch pan and then level it into two with a bread knife.. Actually baking it for the first time and mine is a convection. Only one pan goes at a time.
No, it’s too much batter for a single pan
You’re awesome!!!
Tanks alot. For this generous recipe. Will certainly try it.
You’re welcome!