Description
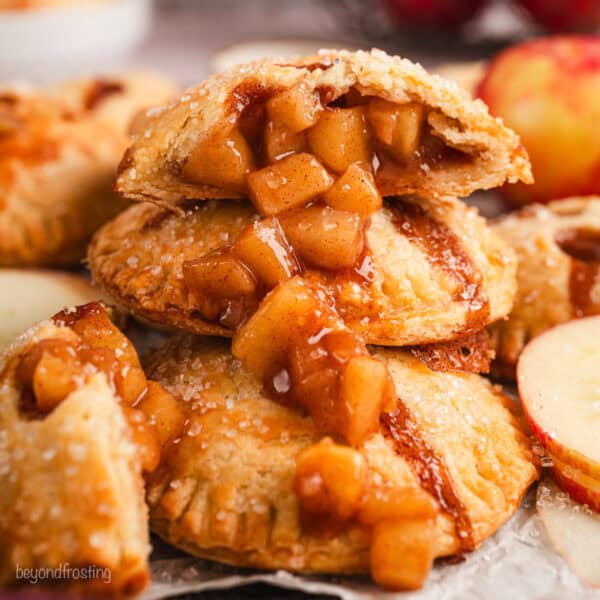
These mini apple hand pies are a fun twist on traditional apple pie that you can eat with your hands! They’re bursting with homemade apple pie filling baked inside a flaky crust. A biscuit cutter makes it super easy to cut out the dough. Just fill, seal, and bake.
Ingredients
- 1 Double recipe of my Easy Pie Crust, prepared and chilled
Apple Pie Filling
- 3 Medium apples, peeled and small diced (we used Honeycrisp or granny smith)
- ½ Lemon, juiced
- 1 tablespoon (28g) light brown sugar
- 1 tablespoons (18g) all-purpose flour
- 1 teaspoon (5g) ground cinnamon
- 1 tablespoons (30ml) pure maple syrup
- 2-4 tablespoons of water as needed
For the Topping
- 1 large egg beaten with 1 tablespoon water
- Coarse sugar, optional
Instructions
For the Apple Filling
- Place apples in a medium saucepan, pour lemon juice over top, and stir to combine. Add the maple syrup and dry ingredients. Mix well to coat the apples.
- Cook apples on the stove over medium heat, adding 1-2 tablespoons of water to prevent sticking as needed. Continue cooking, stirring occasionally for 10-15 minutes until the apples are just soft and tender but not mushy. Remove from heat to cool, transfer to another dish to speed up the cooling process. If you’re ready to bake immediately, prepare the pie circles in the next steps while the filling is cooling, as additional chilling time is required.
For the Pies
- Preheat oven to 375℉. Line 2 large, rimmed baking sheets with parchment paper. Note that prepared pies will need to chill in the fridge before baking.
- Roll out chilled dough to ¼” thick. Using a 3.5” round biscuit cutter, cut circles out of the dough. Make the cuts as close to one another as you can so that you don’t have to re-roll the dough scraps too many times. Reroll the dough until you have 20 circles. Set aside 10 circles and place the other 10 in the fridge to firm up. These are the bottom circles.
- With the remaining 10, cut a few small vents/slits in the center, these are the tops of the pies. Place in the fridge for at least 10 minutes to allow them to firm up. Prepare the egg wash by combining the beaten egg with water.
- After the dough circles are chilled, fill the bottom circles. Place on the prepared baking sheet, at least 1 inch apart. Fill each circle with about 2 tablespoons of filling in the center, making sure to leave the dough around the edge bare so that it will seal well to the top crust. Brush the outside edge of the bottom circles with egg wash.
- Place a top crust on each bottom circle and crimp all around the edge with a fork to completely seal in the filling. Make sure these are well sealed so that the filling does not bake out of the seams. Brush each sealed pie with the egg wash, and then sprinkle the tops with coarse sugar if desired. Place back in the refrigerator for 10 minutes to help them hold their shape when they bake.
- Bake one tray at a time in the center rack of the oven. Bake for 25-30 minutes or until the crust is golden brown and the filling is bubbling out the slits on the top of the pies. You may need to turn the baking sheets, rotating the pans halfway through baking, especially if your oven bakes unevenly. Cool pies for at least 20 minutes before eating.
Notes
- Time-saving tip: Start to prepare the pie crust circles while the pie filling is cooling.
- Chill the pies. The trick to having hand pies hold their shape is to keep the pies nice and cold throughout the process. It’s important to chill the sealed pies in the fridge before baking.
-
Rotate the pans. Additionally, if your oven bakes unevenly, I suggest rotating the pans 180 degrees halfway through to promote even baking.
-
Go gluten-free. Make gluten-free apple hand pies using my gluten-free pie crust and cornstarch instead of flour in the pie filling.
- Different topping. If you don’t have sparkling sanding sugar, try brushing the finished crusts with better and sprinkling with a cinnamon sugar mixture.
Prep Ahead
- The apple filling can be made up to 2 days in advance and stored in the refrigerator in an airtight container.
- Pie crust can be prepared up to 3 days in advance and kept refrigerated. Be sure it’s double-wrapped tightly with plastic. Alternatively, you can freeze it ahead of time for up to one month.
Storing
- Leftover pies can be stored in a paper bag at room temperature for up to 2 days, or in the fridge in an airtight container for up to 5 days. These are great when gently reheated in an oven or air fryer, but are equally delicious cold or at room temperature.
Nutrition
- Serving Size: 1
- Calories: 357
- Sugar: 8.2 g
- Sodium: 251.5 mg
- Fat: 19.9 g
- Carbohydrates: 40.1 g
- Fiber: 2.5 g
- Protein: 5.6 g
- Cholesterol: 86 mg


