Description
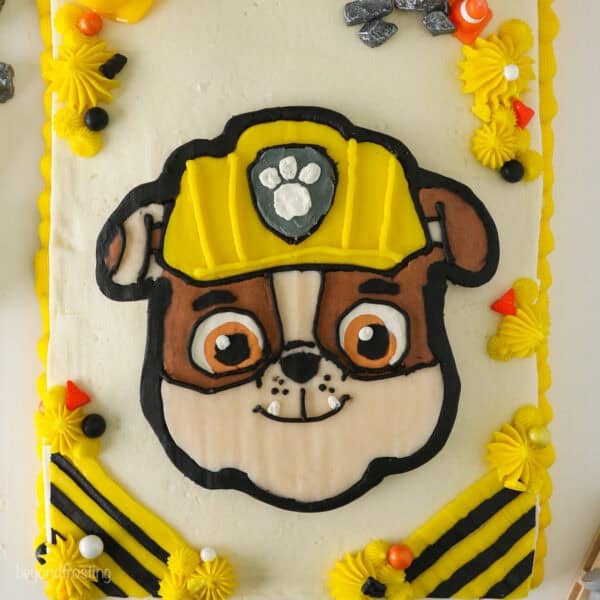
This Paw Patrol cake uses a buttercream transfer method to create an adorable Rubble-themed design! There’s no fancy techniques or fondant involved. It’s the perfect cake for a Paw Patrol fan’s birthday.
Ingredients
For the Cake
- 1 prepared 9×13 inch Vanilla or Chocolate Cake
Frosting for the Buttercream Transfer and Decorations
- 1 1/2 cups unsalted butter, cold
- 6 cups powdered sugar
- 1 tablespoon Pure Vanilla Extract
- 1 tablespoon Heavy whipping cream
- 1/8 teaspoon salt
Frosting for the Cake
- 2 cups unsalted butter, cold
- 8 cups powdered sugar
- 1 tablespoon Pure Vanilla Extract
- 1–2 tablespoons Heavy whipping cream
- ¼ teaspoon salt
Instructions
To Make the Frosting
- Cut the butter into pieces. Using the paddle attachment, whip the butter for 5-7 minutes, scraping down the bowl occasionally, and beating until the butter looks light in color.
- Add 2 cups of powdered sugar and mix on low speed until incorporated into the butter then add the vanilla extract and mix to combine. Beat for about 60 seconds.
- Next, add an additional 2 cups of powdered sugar and beat on low speed until sugar is incorporated. Increase speed to medium-high and beat for 3 minutes.
- Add the remaining 1 cup of powdered sugar along with the heavy whipping cream and salt. Beat on low until the ingredients start to mix together. Increase speed to medium-high and beat for another 3-5 minutes to whip additional air into the frosting.
- Color the buttercream and decorate the cake following the detailed tutorial in the post.

Notes
- If you plan to remove the cake from the pan, be sure to grease the pan generously or line the bottom of the pan with parchment paper.
- If you only want to frost the top of the cake and not the sides, just make half of the second batch (frosting for the cake).
- You will have leftover buttercream, but you can certainly freeze any leftover buttercream for up to 2 months. Store in an airtight container or bag, removing any excess air.
- If you want to make a chocolate buttercream for the cake, swap out 1 cup of powdered sugar for 1 cup of cocoa powder.
- Piping Tips – For this tutorial, I use size 12, size 3, and size 5 piping tips to create the Rubble outline and fill in the details. I then use a #199 piping tip to pipe the shell border around the bottom of the cake, and a #47 basket-weave tip to create the construction stripes. The blog post has the full tutorial and products listed.
Storage
- The frosted cake can be stored in an airtight container at room temperature for up to 4 days. However, if you live in a hot and humid environment, consider storing the cake in the refrigerator and serving at room temperature instead.
Nutrition
- Serving Size: 1 Slices
- Calories: 443
- Sugar: 47.5 g
- Sodium: 187.5 mg
- Fat: 18.9 g
- Carbohydrates: 65.2 g
- Protein: 4.7 g
- Cholesterol: 65.3 mg