Description
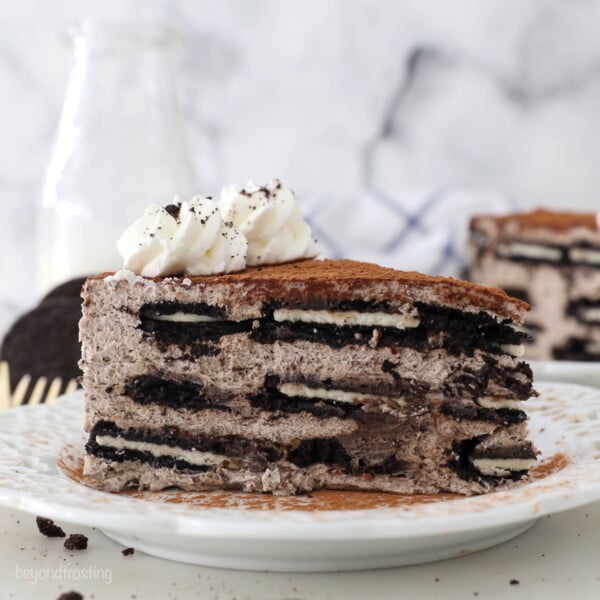
This No-Bake Oreo Mousse Cake has layers of Oreo cookies that are soaked in coffee and layers of a decadent Oreo mascarpone mousse.
Ingredients
For the Mousse:
- 2 packages (14oz) Oreo cookies
- 3/4 cup (177ml) brewed coffee, cooled
- 2 tablespoons milk
- 16 ounces (452g) mascarpone cheese, cold
- 2 1/2 cups (590ml) heavy whipping cream, cold
- 1 cup (130g) powdered sugar
- 1 teaspoon (5ml) pure vanilla extract
Topping
- 1-2 tablespoons (7-14g) cocoa powder
- ¾ cup (98g) heavy whipping cream
- 3-4 tablespoons (24-32g) powdered sugar
Instructions
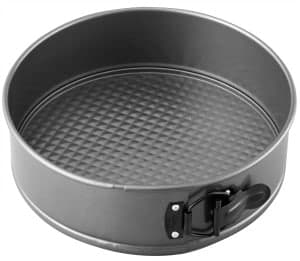
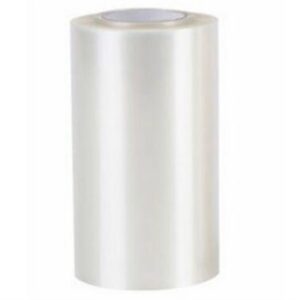
- Prepare a 9-inch springform pan by lining the bottom with parchment paper and line the sides with either parchment paper or a cake collar (affiliate link). Set aside.
- Prepare the mousse: Place your mixing bowl in the freezer or refrigerator for 5-10 minutes before starting.
- Grind 10 Oreos into a fine crumb using a food processor or blender. Set aside.
- Spoon the mascarpone cream into your bowl and beat on a medium-low speed while slowly pouring in the heavy cream, allowing the mascarpone cheese to turn to a liquid consistency, then add the remaining heavy cream.
- Once all the cream has been added, increase the mixing speed to high (speed 8-10) and beat it until soft peaks form.
- Next add the vanilla extract, powdered sugar and Oreo crumbs. Beat until well combined, and mixture reaches stiff peaks.
- Divide the mousse between two large piping bags. Cut the tip of the piping bags off, about ¾” up from the bottom.
To Assemble:
- In a small bowl, combine the coffee and milk, stir to combine.
- Pipe a very thin layer of mousse on the bottom of the pan and spread evenly.
- Each layer will have 19 Oreos. Quickly dunk each Oreo in the prepared bowl of coffee &milk. Starting with the outside edge, place the cookies just inside the edge of the pan and work your way into the middle so they are tightly fit.
- Starting on the outside edge, pipe the mousse in an even layer working your way towards the middle Then use an offset spatula to smooth out the mousse, creating a nice even layer.
- Repeat this process two more times. There are 3 layers of Oreos and 4 layers of mousse. The top layer may be the thinnest. Cover and refrigerate for at least 4 hours. Prepare the topping prior to serving. Dust the top with cocoa powder if desired.
- Make the topping: Place the mixing bowl and whisk attachment in the freezer for 5 to 10 minutes to chill. Pour the heavy whipping cream into the chilled bowl and use an electric mixer to beat the heavy cream at medium-high speed until soft peaks start to form. Slowly add the powdered sugar and continue beating at high speed until stiff peaks form. Pipe a border around the outside edge. If you have any leftover Oreos, you can use them for garnish or crush them up and sprinkle them on top. Keep refrigerated.

Notes
- Lining the bottom and sides of the pan will help prevent the mousse and cookies from sticking. It also gives you the cleanest finish. I recommend using cake collars for the sides if available.
- Substitute for coffee: If you’d prefer not to make this with coffee, just use milk instead
- Substitute for mascarpone: Cream cheese is an acceptable substitute for mascarpone. I’d probably recommend using 12 ounces (about 1 ½ blocks) of cream cheese. The rest of the recipe remains the same.
- Don’t have a springform pan? To make this without a springform pan, please refer back to the blog post
- Freezing instructions: I recommend letting the dessert sit in the refrigerator for at least 2 hours before freezing. Tightly wrap the pan twice in plastic wrap. Freeze for up to 1 month and then thaw in the refrigerator overnight.
- Storage instructions: You can make this up to 2 days in advance of serving. Just be sure to tightly wrap the pan in plastic wrap. Keep refrirderated.
Nutrition
- Serving Size: 1 Slice
- Calories: 575
- Sugar: 24.1 g
- Sodium: 91.5 mg
- Fat: 49.7 g
- Carbohydrates: 27.9 g
- Fiber: 0.3 g
- Protein: 4.5 g
- Cholesterol: 144.2 mg