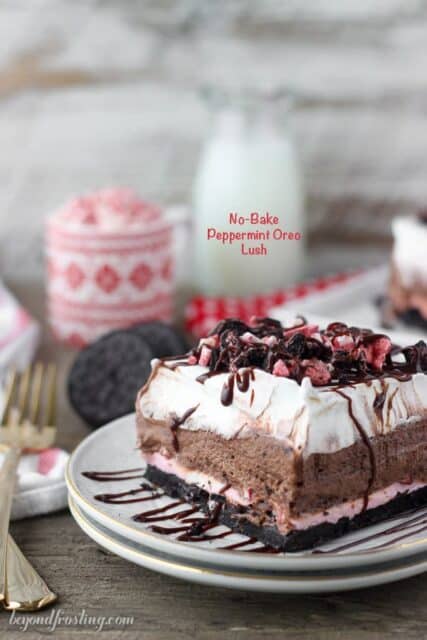
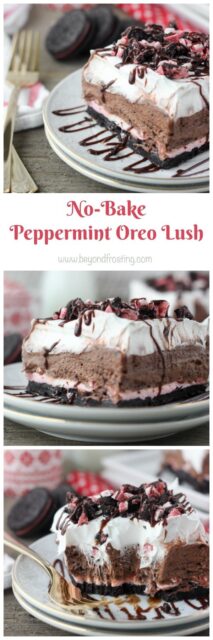
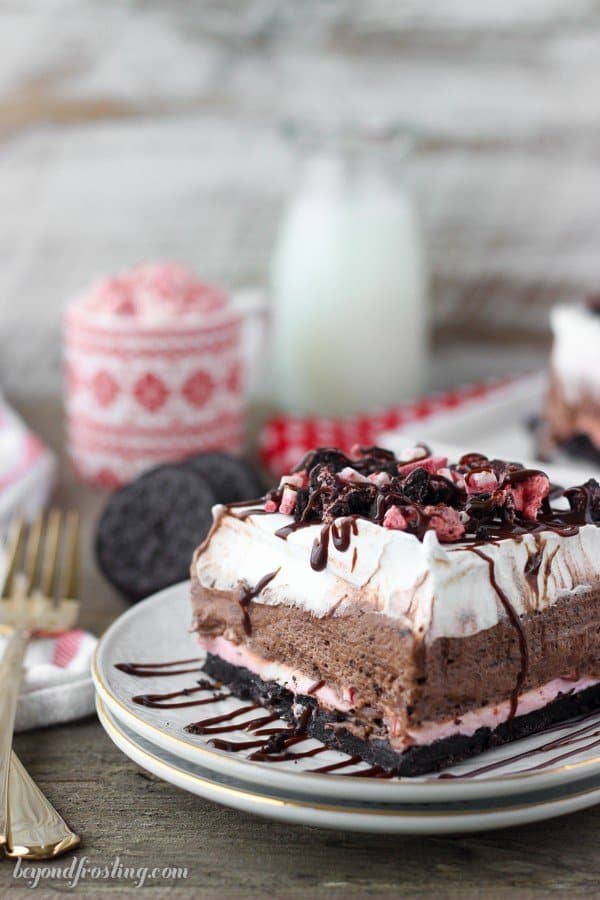
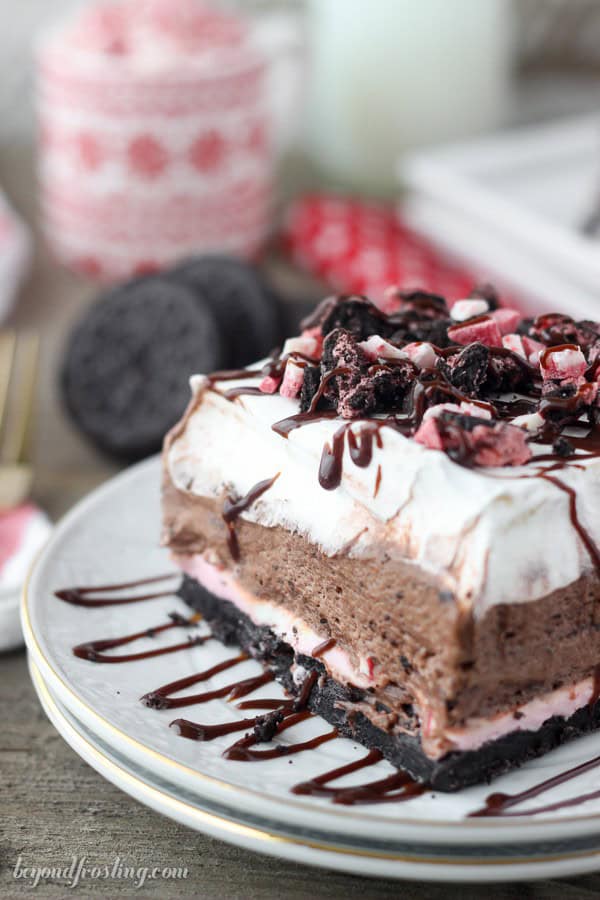
This No-Bake Peppermint Oreo Lush is an easy Christmas dessert that everyone will love. It’s made up of layers of Peppermint Oreos, peppermint cheesecake, and chocolate mousse then topped with whipped cream!
Easy Christmas Dessert
This no-bake Peppermint Oreo Lush is the perfect Christmas dessert! Now, if you weren’t already familiar with the word “lush”, its official definition is “very rich and providing great sensory pleasure” so this is probably the most accurately named dessert of all time. Trust me. You’ll understand once you take a bite.
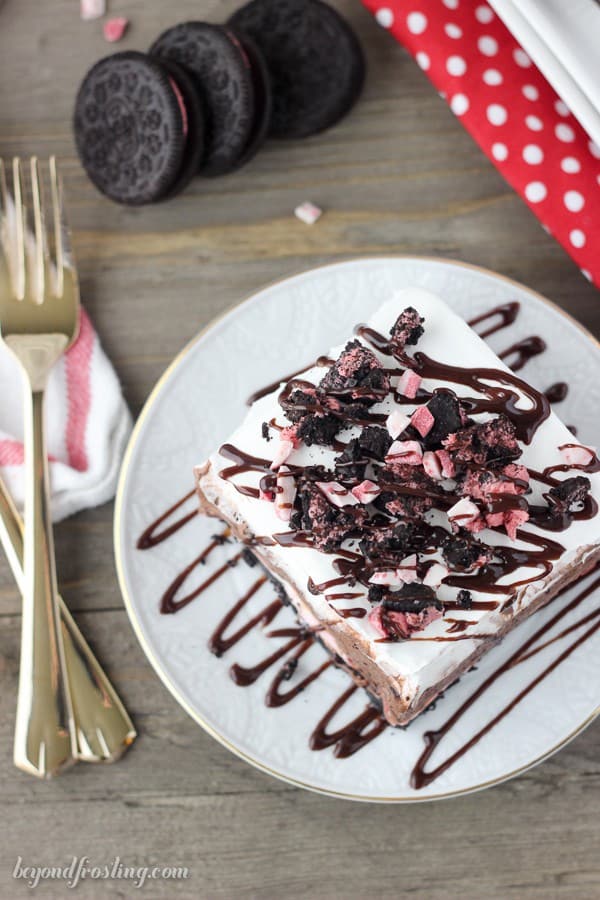
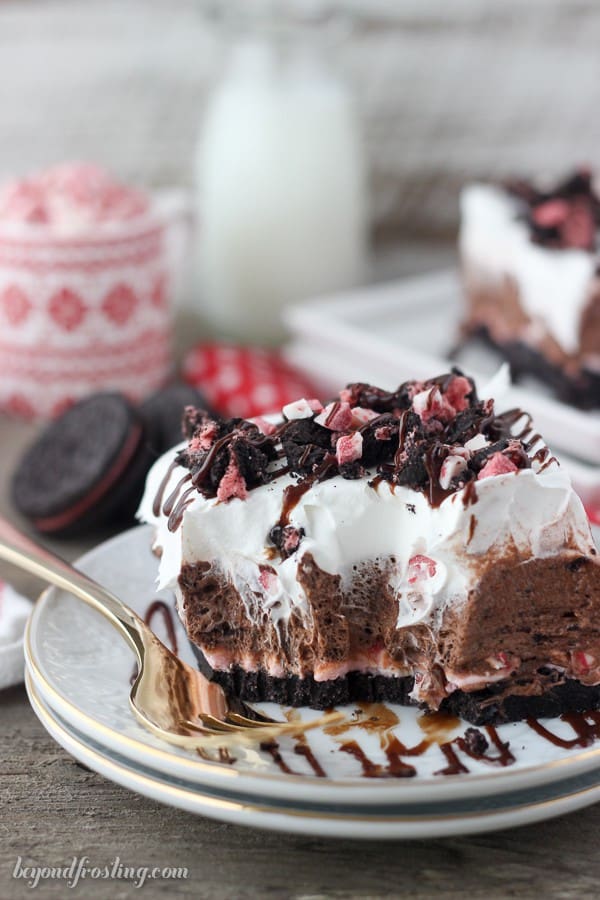
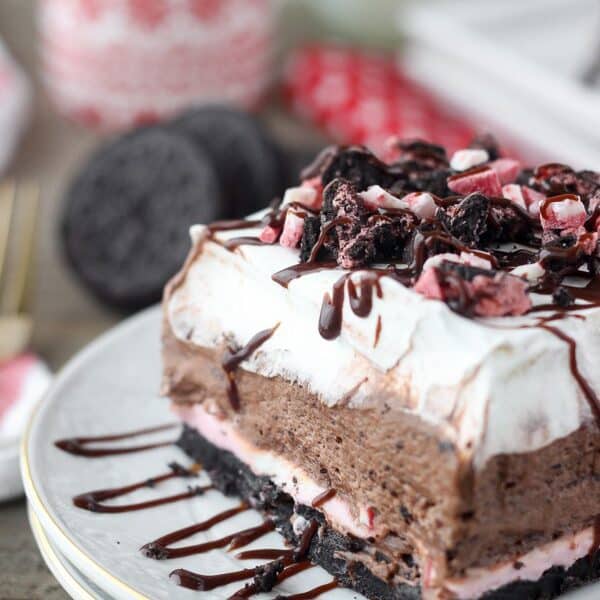
This Christmas treat starts with a layer of Peppermint Oreos to form the crust, if you can’t find the peppermint ones, a bag of regular Oreos will also work. Then it’s topped with a layer of peppermint cheesecake which is followed by a chocolate mousse. Finish it off with whip cream, crushed peppermint candy, chocolate sauce, and more Oreos. Grab a big fork for this one.
Not only is this Oreo lush so good, but it doesn’t require any baking! I love freeing up the oven during the holidays, especially when hosting a party. So if you’re looking for more no-bake recipes to serve a crowd, try this. chocolate peppermint lasagna.
Ingredients Needed For Oreo Lush
For the Crust
- Peppermint Oreos – you can also use regular Oreos, I don’t recommend using double stuffed.
- Unsalted Butter – melted
For the Cheesecake Layer
- Cream Cheese – softened before incorporated into the cheesecake layer for a smoother texture.
- Granulated Sugar
- Heavy Whipping Cream
- Peppermint Extract – a little goes a long way! Start with less and add more to taste.
- Red Food Coloring – you don’t have to use food coloring, but it does add a fun, festive color to the dessert.
- Crushed Peppermint Candy – I use Andes Peppermint Crunch. The Hershey’s Candy Cane bars also work well.
For the Pudding Layer
- Instant Chocolate Pudding and Milk – combined to form the base for the pudding layer.
- Cold Water and Gelatin Powder – stablizes the whipped cream that’s mixed into the pudding.
- Heavy Whipping Cream
- Powdered Sugar
Easy Instructions
This Christmas dessert lasagna is so simple with just three quick-to-make layers!
For the Crust
- Grind the cookies. Set aside 5 Oreos to garnish this dessert with. Crush the remaining cookies using a food processor or blender under they’re fine crumbs.
- Form the crust. Combined the melted butter with the cookie crumbs and stir to combined. Press the mixture into a 9-inch square baking pan the chill in the refrigerator while your prepare the rest of the layers.
For the Cream Cheese Layer
- Combine cream cheese and sugar. Beat the softened cream cheese on medium-high speed for 2-3 minutes, add the granulated sugar, then beat until well incorporated. You may need to scrape down the bowl occasionally, but make sure it’s nice and smooth.
- Mix in other ingredients. Add in the heavy whipping cream, peppermint extract, and red food coloring. Mix until well incorporated then fold in the Andes Peppermint Crunch. Spread the layer over the chilled Oreo crust.
For the Pudding Layer
- Make the pudding. Combine pudding mix and milk and whisk until combined. Refrigerate for 10 minutes.
- Prep the gelatin. Place gelatin and cold water into a small dish and allow it to turn to a solid, this doesn’t take long, but you’ll want to be sure the pwoder is dissolved. Microwave for 10 seconds to turn it back into a liquid. Remove any pieces of gelatin that did not melt.
- Make the whipped cream. Chill a mixing bowl in the freezer, then pour in the heavy whipping cream. Beat until soft peaks form. Drizzle in the liquid gelatin, then add in the powdered sugar. Beat again until stiff peaks form.
- Combine it all together: Fold the whipped cream into the pudding until it’s well incorporated and spread over the cheesecake layer.
For the Topping
- Add the topping: Thaw a container of Cool Whip and spread over the top of the lush. Alternativly you could prepare a second batch of whipped cream for the topping as well.
- Chill: Refrigerate for 4-6 hours or preferably overnight.
- Garnish and serve. Drizzle with hot fudge, sprinkle with additional Andes mints and crushed Oreos, then serve and enjoy!
Tips for Making Dessert Lasagna
- Go easy on the peppermint. When it comes to peppermint extract, a little bit goes a long way. I always recommend starting with less and adding more to taste.
- For the perfect whipped cream: Before you make the whipped cream, chill the bowl in the freezer for a few minutes. This keeps the cream nice and cold so it whips up to a thicker consistency.
- No food coloring? No problem. The food coloring gives the lush a festive color but is totally not necessary!
- Try other toppings. Try chocolate chips, marshmallows, mini M&ms, you name it.
- Leave out the peppermint. You can super easily make this dessert into plain Oreo lush by using regular Oreos and swapping the peppermint extract for vanilla extract
Can This Be Made Ahead of Time?
Definitely! This recipe is the perfect make-ahead dessert so you can get ahead on holiday cooking. Just assemble as directed but leave off the toppings. Instead, cover and store in the fridge for up to 2 days. When you’re ready to eat, add the toppings, then slice and serve!
How to Store It
The fully assembled Oreo lush will last in an airtight container in the fridge for up to 5 days. I don’t recommend freezing it.

No-Bake Peppermint Oreo Lush
- Prep Time: 45 minutes
- Chill Time: 4 hours
- Total Time: 4 hours 45 minutes
- Yield: 9-12 slices
- Category: No-Bake
- Method: Refrigerator
- Cuisine: American
Description
This Peppermint Oreo Lush is a No-Bake layered Icebox Cake. The crust is made with Peppermint Oreo, followed by a no-bake peppermint cheesecake, a chocolate mousse and it’s finished with whipped cream.
Ingredients
For the crust
- 2 bags 7ounces Peppermint Oreos (or one 14oz bag regular Oreos)
- ½ cup unsalted butter, melted
For the cheesecake layer:
- 8 ounces cream cheese, softened
- ¼ cup granulated sugar
- 2 tablespoons heavy whipping cream
- 1/8– 1/4 teaspoon peppermint extract
- 1 drop red food coloring
- ¼ cup crushed peppermint candy (like Andes Peppermint Crunch)
For the pudding layer:
- 1 package (3.4 oz) instant chocolate pudding
- 1 ¼ cups cold milk
- 1 tablespoon cold water
- 1 teaspoon powdered gelatin
- 1 ¼ cups heavy whipping cream
- 1/2 cup powdered sugar
For the topping
- 8 ounces Cool Whip (see notes)
- Chocolate sauce for drizzle
- Peppermint Candy for garnish (like Andes Peppermint Crunch)
Instructions
For the crust:
- Set aside 5 Oreos for the garnish. Grind the remaining cookies into a fine crumb using a food processor or blender.
- Pour the melted butter over the cookie crumbs and stir until the crumbs are well coated. Press into a 9-inch square pan. Set aside in the refrigerator.
For the cream cheese layer:
- Soften the cream cheese in the microwave by removing the wrapper and placing the cream cheese on a plate. Microwave for 15 to 20 seconds. Or leave out at room temperature for 30 minutes.
- In your mixing bowl, beat the cream cheese on medium-high speed for 2 to 3 minutes. Add the granulated sugar and continue beating for another 2 to 3 minutes beating until the sugar is well incorporated, scraping down the bowl as needed.
- Next, add the heavy whipping cream, peppermint extract and red food coloring. Mix until all ingredients are well blended. Fold in Andes Peppermint Crunch. Spread the thin layer of cheesecake over the Oreo crust.
For the pudding layer:
- In a small bowl, combine the pudding mix with the milk and whisk until the powder mixture is dissolved. Refrigerate the pudding until firm, about 10 minutes.
- Place 1 tablespoon of cold water in a small dish. Sprinkle the gelatin over the cold water, trying to spread the powder evenly. Allow the gelatin to turn to a solid (about 2-3 minutes). Microwave for 10 seconds until the gelatin turns back to liquid. Remove any pieces of gelatin that did not melt.
- Place a metal mixing bowl in the freezer to chill for 5-10 minutes. Pour the heavy whipping cream into the chilled bowl and use an electric mixer to beat the heavy cream on high speed until it reaches soft peaks. Slowly drizzle in the liquid gelatin. Next add the powdered sugar and continue beating on high speed until stiff peaks form.
- Fold the prepared whipped cream into the pudding until well combined and spread over the cheesecake layer.
For the topping:
- Thaw a container of Cool Whip and spread over top. Refrigerate this dessert for 2-4 until all layers have set. Garnish with hot fudge and sprinkle with additional Andres mints and crushed Oreos.
Notes
- In place of Cool Whip for the topping, you can make another batch of whipped cream using 1 cup heavy cream and 1/2 cup powdered sugar. No need to include the gelatin, but prepare the whipped cream in the same methods used in step 3 under the pudding layer.
- Storing: The fully assembled Oreo lush will last in an airtight container in the fridge for up to 5 days. I don’t recommend freezing it.
- Making ahead: This can be made up to 2 days in advance. Just assemble as directed but leave off the toppings. Store covered in the refrigerator.
Nutrition
- Serving Size: 1 slice
- Calories: 516
- Sugar: 34.6 g
- Sodium: 346.9 mg
- Fat: 38.3 g
- Carbohydrates: 39.3 g
- Fiber: 0.4 g
- Protein: 5.5 g
- Cholesterol: 95.9 mg


Making your Peppermint Oreo Lush right now. Stupid question: do you remove the filling from the oreos for the crust? Also, there is no Peppermint Oreos. It is now Mint Oreos (with green filling). Does that matter?
Hi Sharon, apologies for the delay, I am off for the holidays. For the future, you do not need to remove the filling from the Oreos! And no worries on the mint Oreos! Sounds yummy to me!
which picture are we going for here? im a visual learner 😉 but there seem to be a couple different pictures of the dessert with different thickness levels. thanks!
Hi Kim, it’s all the same slice 🙂
See, my husband LOVES mint and chocolate so I would definitely have to share! Lol. This is absolutely something we’d both go nuts for!
I love every ingredient in this. Perfect!!!!!!
Thank you so much Susan!
What a showstopper! Love love love this Julianne!
Yum! Let the holidays begin!