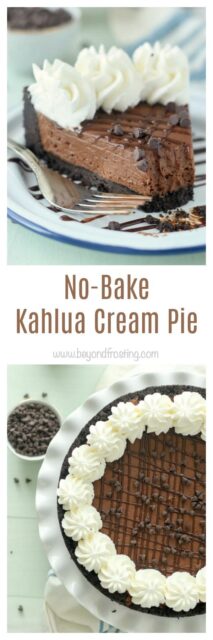
This homemade No-Bake Kahlua Cream Pie is a chocolatey Kahlua-spiked pudding with a thick Oreo crust.

After a few weeks in a row of hosting visitors and traveling, we finally had a quiet weekend at home, but that won’t last for long! Portland has been experiencing an excessive heat wave this last week with temperatures over 100 degrees for several days in a row.
Saturday was the first time I turned on the oven in a week. We’ve been grilling or going out to eat just to avoid heating up the house any more than we needed it. Thank goodness for no-bake desserts, am I right?

Even though it’s been a couple of weeks since I made this No-Bake Kahlua Cream Pie, it would have come in quite handy if you happened to have to go to a party over the weekend.
This Kahlua Cream Pie starts with a batch of homemade chocolate Kahlua pudding, a recipe similar to the one I made in my cookbook. Once cooled, I mixed in some whipped cream to make the pudding a little bit lighter.

Don’t be afraid to make a homemade pudding! For the longest time, I too, was intimidated by the whole, tempering the eggs thing. The thing is, you just need to prepare everything ahead of time, and work quickly to whisk the warm milk into the eggs.
Once you add the eggs back into the milk mixture, and then add the chocolate, the pudding will thicken quite quickly. Once it starts to bubble you’ll want to remove it from the heat.
I always strain my pudding once or twice, because there’ll always be some dry ingredients that didn’t dissolve in the bottom of the saucepan. You don’t want those to end up in the pudding, making it grainy.

Once the pudding is ready and strained, I included a note to place Saran wrap directly on the surface of the pudding. This helps to prevent any type of skin from forming on the surface of the pudding. I also like to poke a few holes with a toothpick to let some of the heat escape.
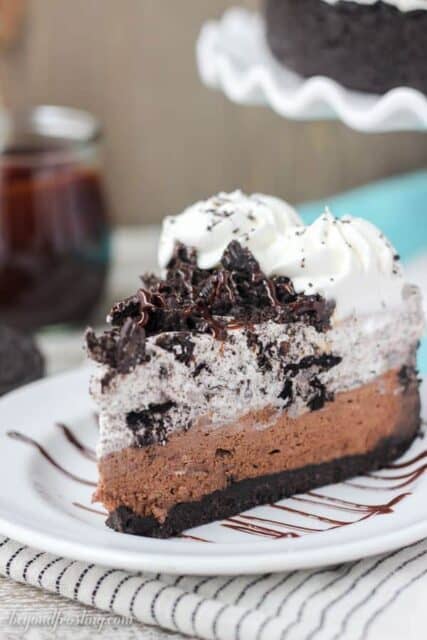
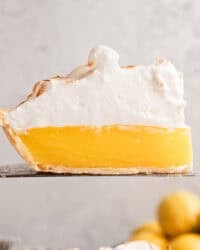
The silky chocolate mousse is surrounded by a thick Oreo crust. Can you believe there was a time when I used to remove the filling from the Oreos for my cookie crust? Current self is asking past self “what the heck were you thinking?”. Don’t do that! You need the filling and all for the crust, it helps bind it together and it makes it thicker.
This no-bake pie is heavenly, and a little bit rich, but it’s everything you need on a warm summer night.

Follow Beyond Frosting:
Facebook | Twitter | Pinterest | Instagram
If you love no-bake recipes, be sure to check out my cookbook, No-Bake Treats!
Print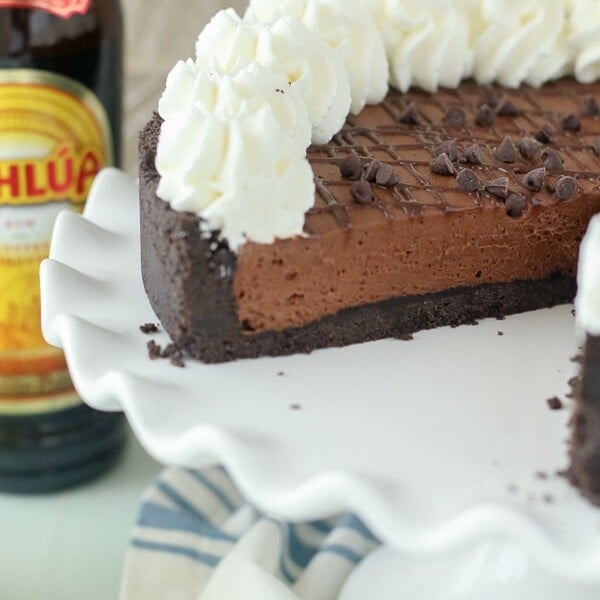
No-Bake Kahlua Cream Pie
- Prep Time: 20 minutes
- Chilling Time: 5 hours 10 minutes
- Total Time: 5 hours 30 minutes
- Yield: 16 servings
- Category: Dessert
- Method: Stovetop
- Cuisine: American
Description
This homemade No-Bake Kahlua Cream Pie is a chocolatey Kahlua-spiked pudding with a thick Oreo crust.
Ingredients
For the pudding
- 2 large egg yolks, slightly beaten
- 3 tablespoons all-purpose flour
- ⅓ cup granulated sugar
- ½ teaspoon espresso powder or ground coffee
- Dash of salt
- ¾ cup milk
- ¾ cup Kahlua
- 1 teaspoon vanilla extract
- 4 ounces dark chocolate chips
- 1 cup heavy whipping cream
- ½ cup powdered sugar
For the crust:
- 1 package Oreo cookies (14.3 oz)
- 8 tablespoons (1 stick) unsalted butter
For the topping:
- ¾ cup heavy whipping cream
- 2–3 tablespoons powdered sugar
- hot fudge sauce for garnish
- mini chocolate chips for garnish
Instructions
For the pudding:
- Prepare all the ingredients prior to starting. Place the egg yolks in a separate bowl and set side.
- In a medium saucepan, add the flour, sugar, espresso powder and salt and whisk to combine.
- Next, add the milk, Kahlua, and vanilla extract to the saucepan.
- Heat the mixture over medium-low heat, whisking constantly.
- Once the mixture is warm (but not boiling) pour about ¼ cup of it into the bowl with the egg yolks and whisk vigorously to temper the yolks.
- Immediately pour the egg yolk mixture back into the saucepan and continue whisking over medium-low heat to prevent the eggs from cooking.
- Whisk the pudding until it starts to thicken, then add the chocolate chips and continue whisking until the pudding starts to bubble and become thicker.
- Strain the pudding through a fine sieve once or twice, rinsing the sieve in between.
- Pour the pudding into a medium bowl and cover with clear plastic wrap (placing directly on the surface of the pudding), then poke a few holes in the plastic wrap with a toothpick.
- Allow the pudding to cool on the counter for at least 1 hour before refrigerating. Refrigerate 2-3 hours until the pudding has cooled and is firm.
- Once cooled, place the mixing bowl and whisk attachment in the freezer for 5 to 10 minutes to chill.
- To prepare the whipped cream, pour the heavy whipping cream into the chilled bowl and use an electric mixer to beat the heavy cream on medium-high speed until the cream starts to thicken. Slowly add the powdered sugar and continue beating on high speed until stiff peaks form.
- Slowly fold the prepared whipped cream into the cooled pudding until it’s completely mixed. Set aside and prepare the crust.
For the crust:
- Prepare a 9-inch springform pan by lightly greasing the edges of the pan with cooking spray, and then wiping gently with a paper towel.
- Grind the cookies into a fine crumb using a food processor or blender.
- In a small bowl, melt the butter in the microwave for 30 to 45 seconds. Pour the melted butter over the cookie crumbs and stir until the crumbs are well coated.
Pour the crumbs into your springform pan and press firmly into the bottom and up on the sides to create a thick crust.
Pour the filling in the prepared crust, spreading evenly and refrigerate for at least 3-4 hours to allow the filling to reset.
For the topping:
- Prepare another batch of whipped cream by placing your bowl in the freezer for 5-10 minutes. To prepare the whipped cream, pour the heavy whipping cream into the chilled bowl and use an electric mixer to beat the heavy cream on medium-high speed until the cream starts to thicken. Slowly add the powdered sugar and continue beating on high speed until stiff peaks form.
- Pipe the borders of the pie with whipped cream using a large open star tip. Garnish with hot fudge sauce and mini chocolate chips. This pie must stay refrigerated.
Filed Under:
You might also like:


Is this freezable?
Hi Deb, Yes, you can freeze this no-bake Kahlua cream pie. It is best to freeze the pie without toppings like chocolate shavings or extra whipped cream to avoid texture issues.
So, I grew up with Kaluha pie that was just like the picture above, a dark, thick chocolate pie. However, making this, it has turned into a light colored soft pudding pie. I had never added a whipped cream mixture into the pie before. Was part of the instructions misplaced with another one?
Hi Jamie, what did you use for the chocolate chips?
Hi…just wondering if I could you cornstarch instead of flour, and if so, how much…
Thanks
I am sorry this got caught up in my spam folder and I did not see it. It would be a 1:1 substitute
Yum! This always looks incredible. I have been watching those temps soar up yonder. Your treats are the perfect solution!
I want to dive right into this pie!