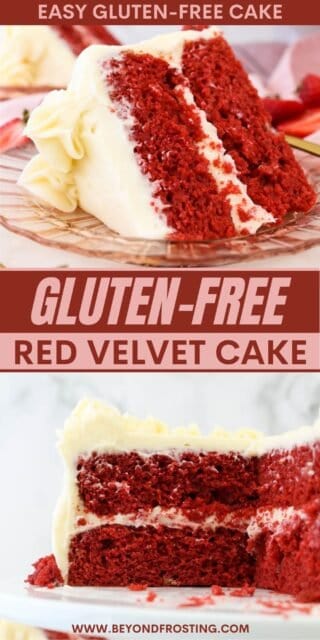
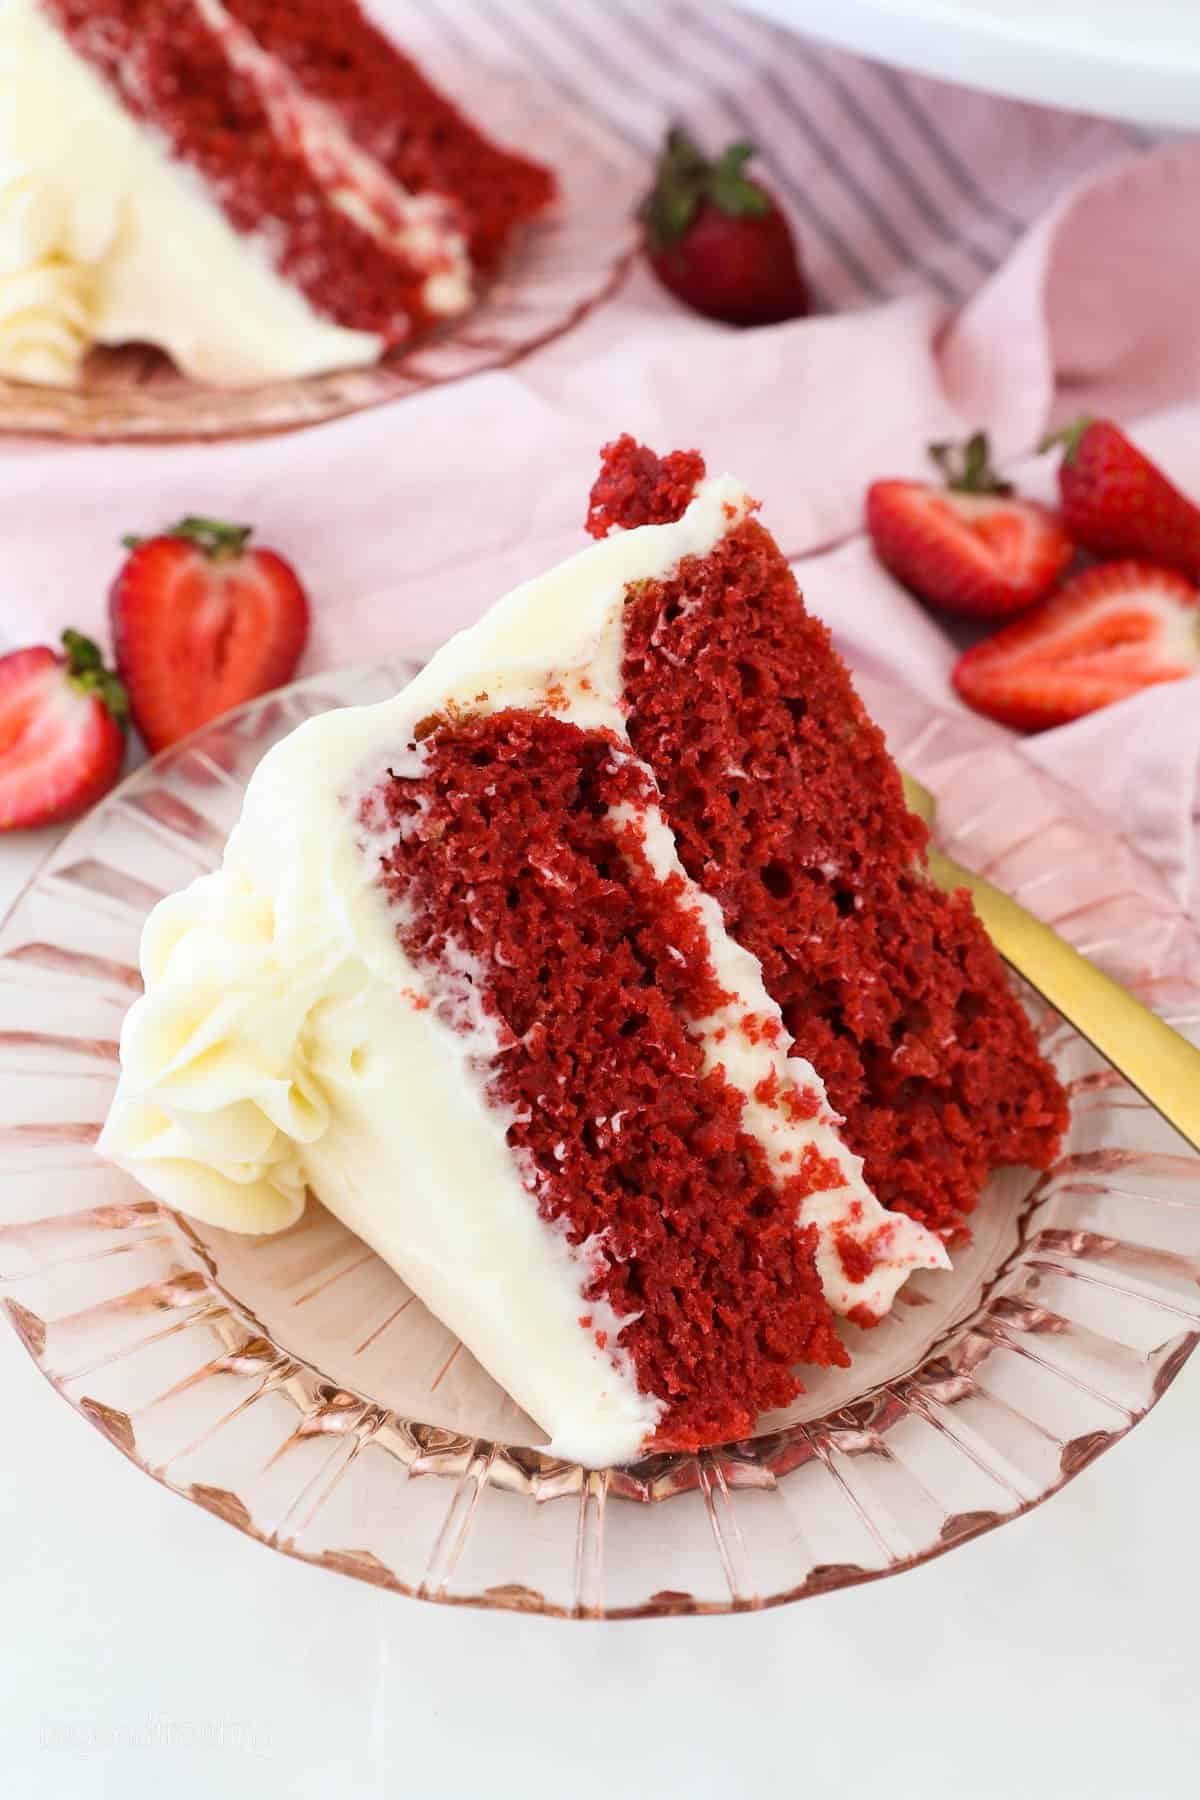
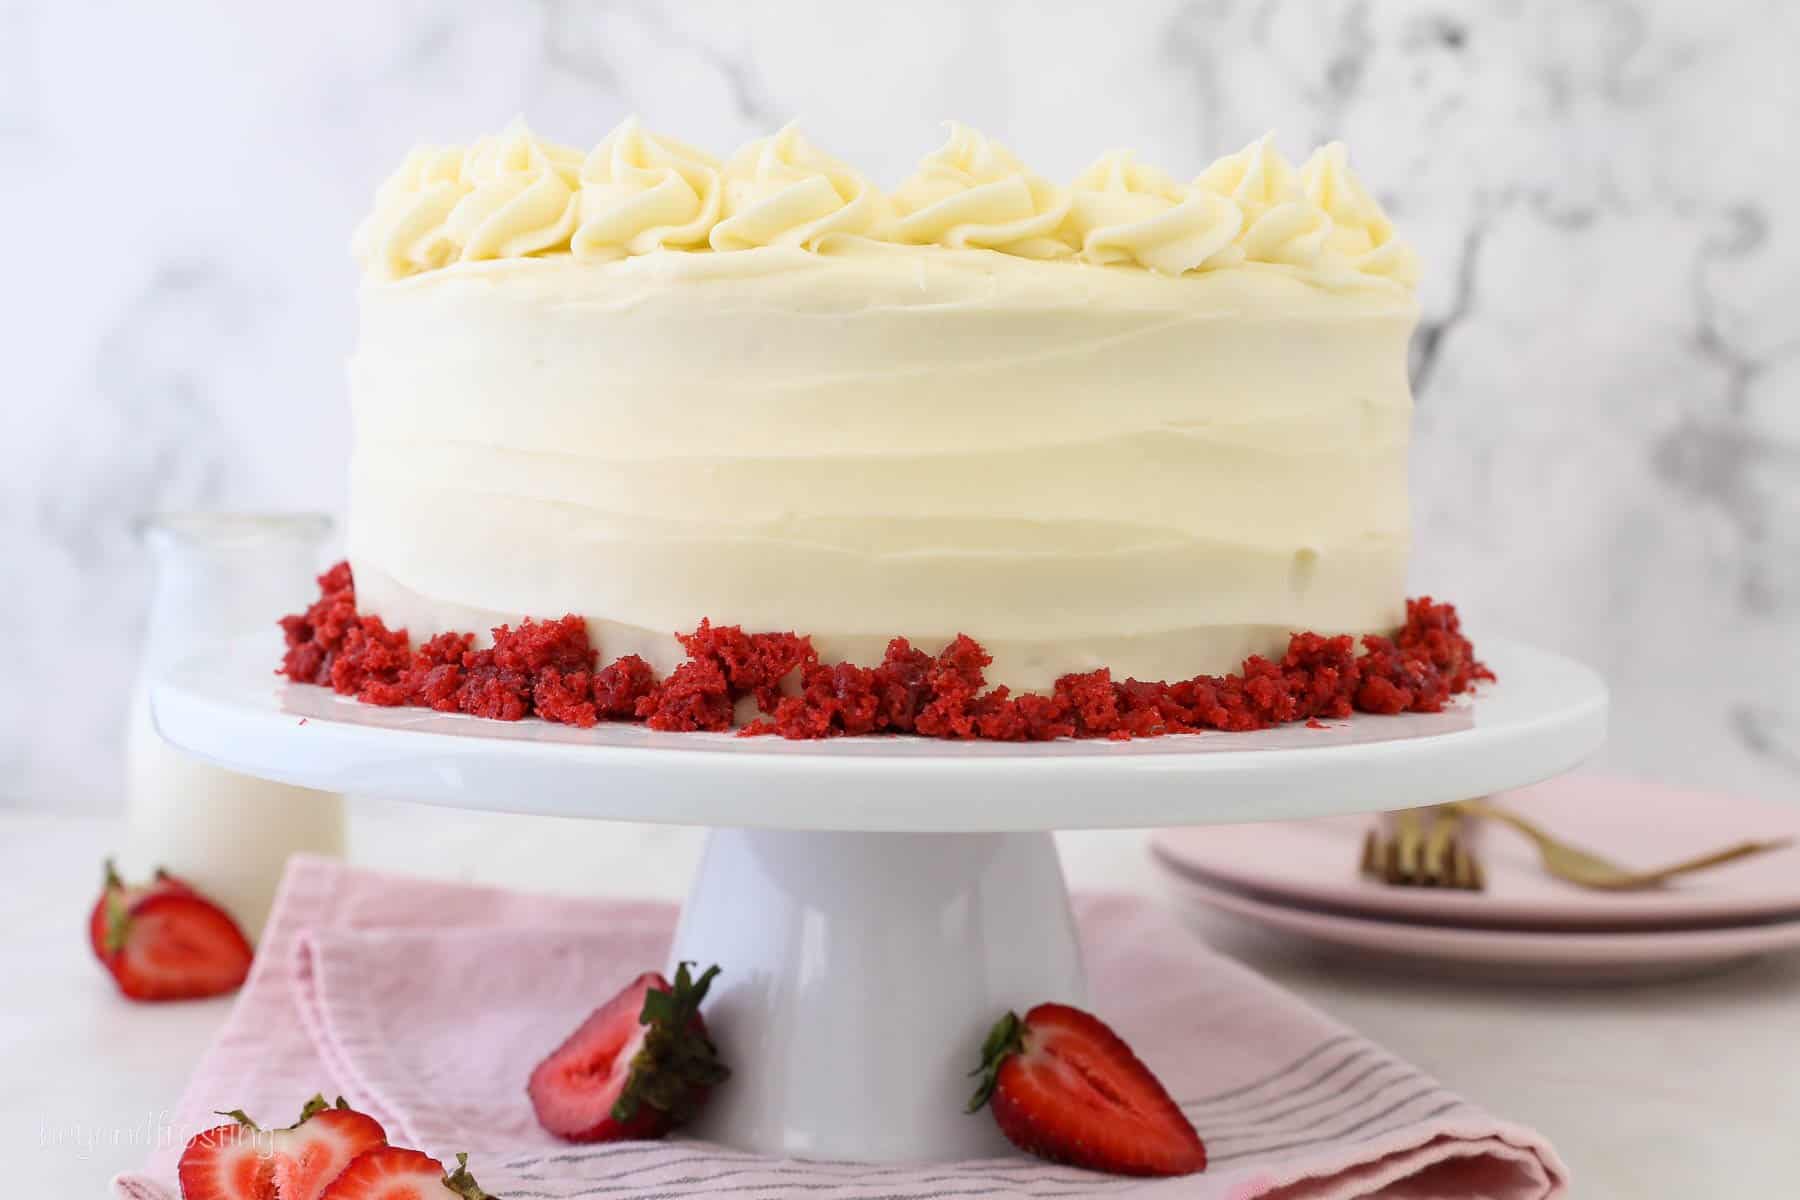
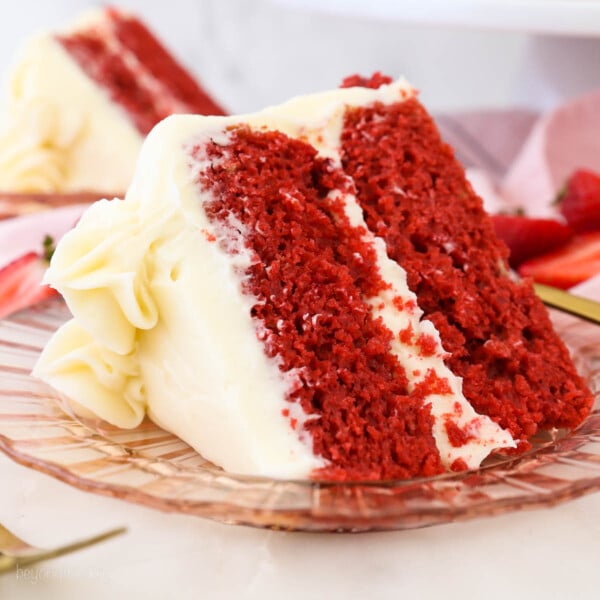
Topped with rich, tangy cream cheese frosting, this Gluten-Free Red Velvet Cake appears to be a decadent layer cake but is actually quite easy to assemble. The perfect gluten-free cake for holidays (great for both Christmas and Valentine’s Day!), birthdays, or any special occasion.
Decadent Gluten-Free Layer Cake
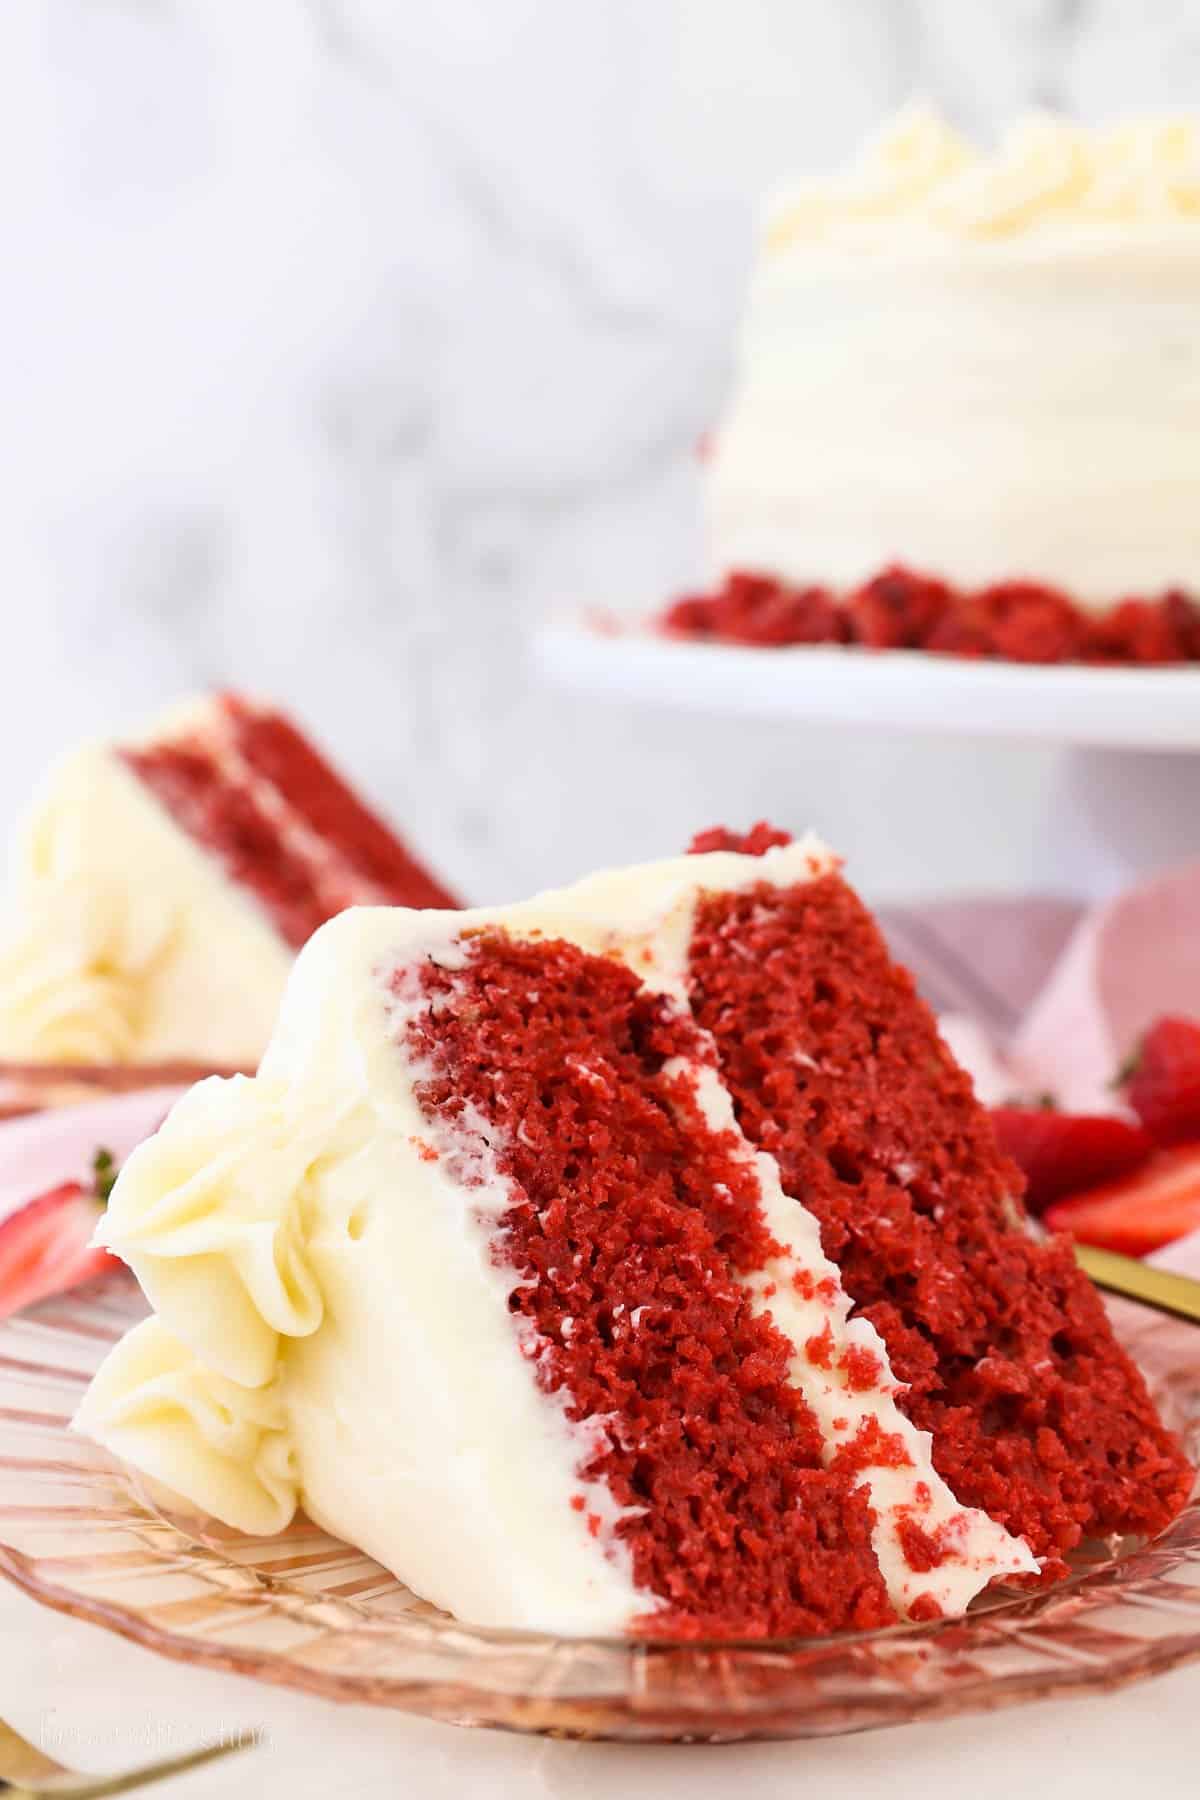
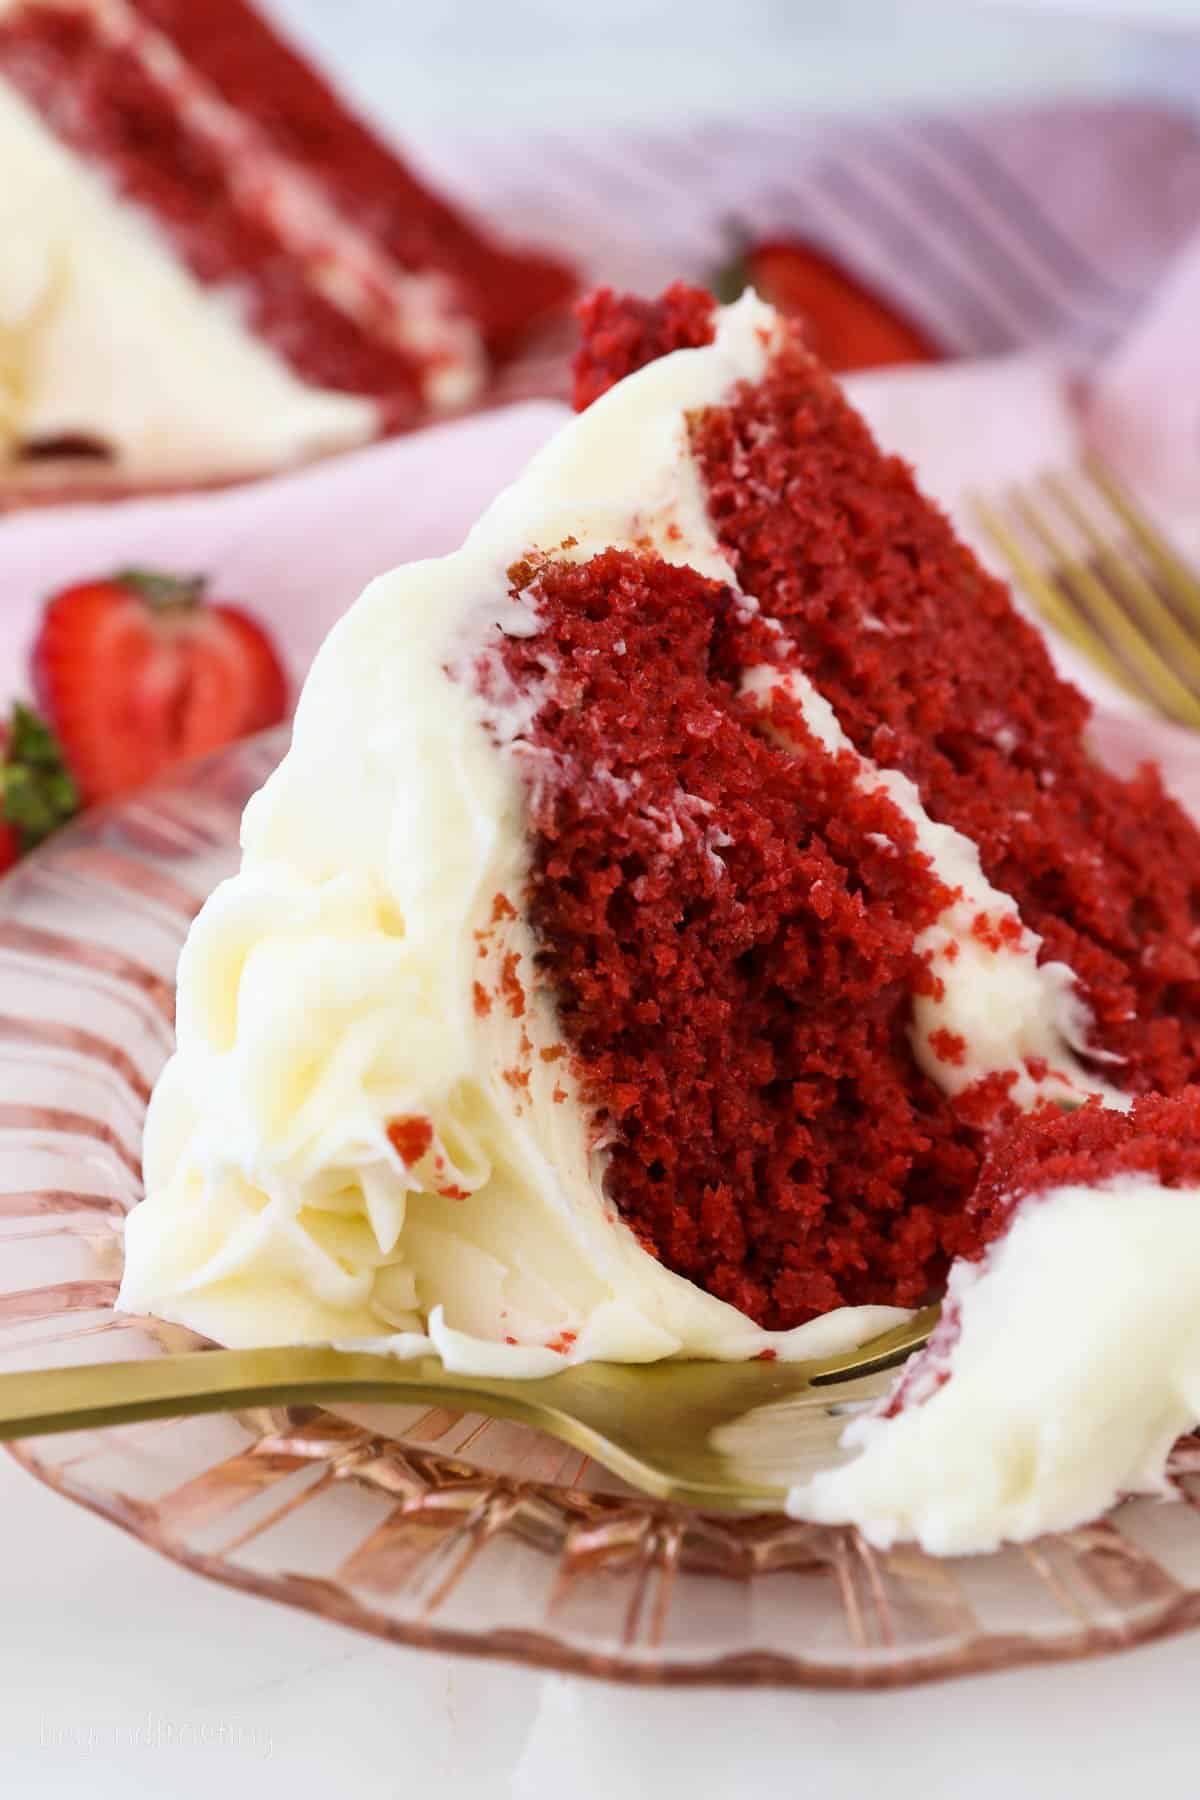
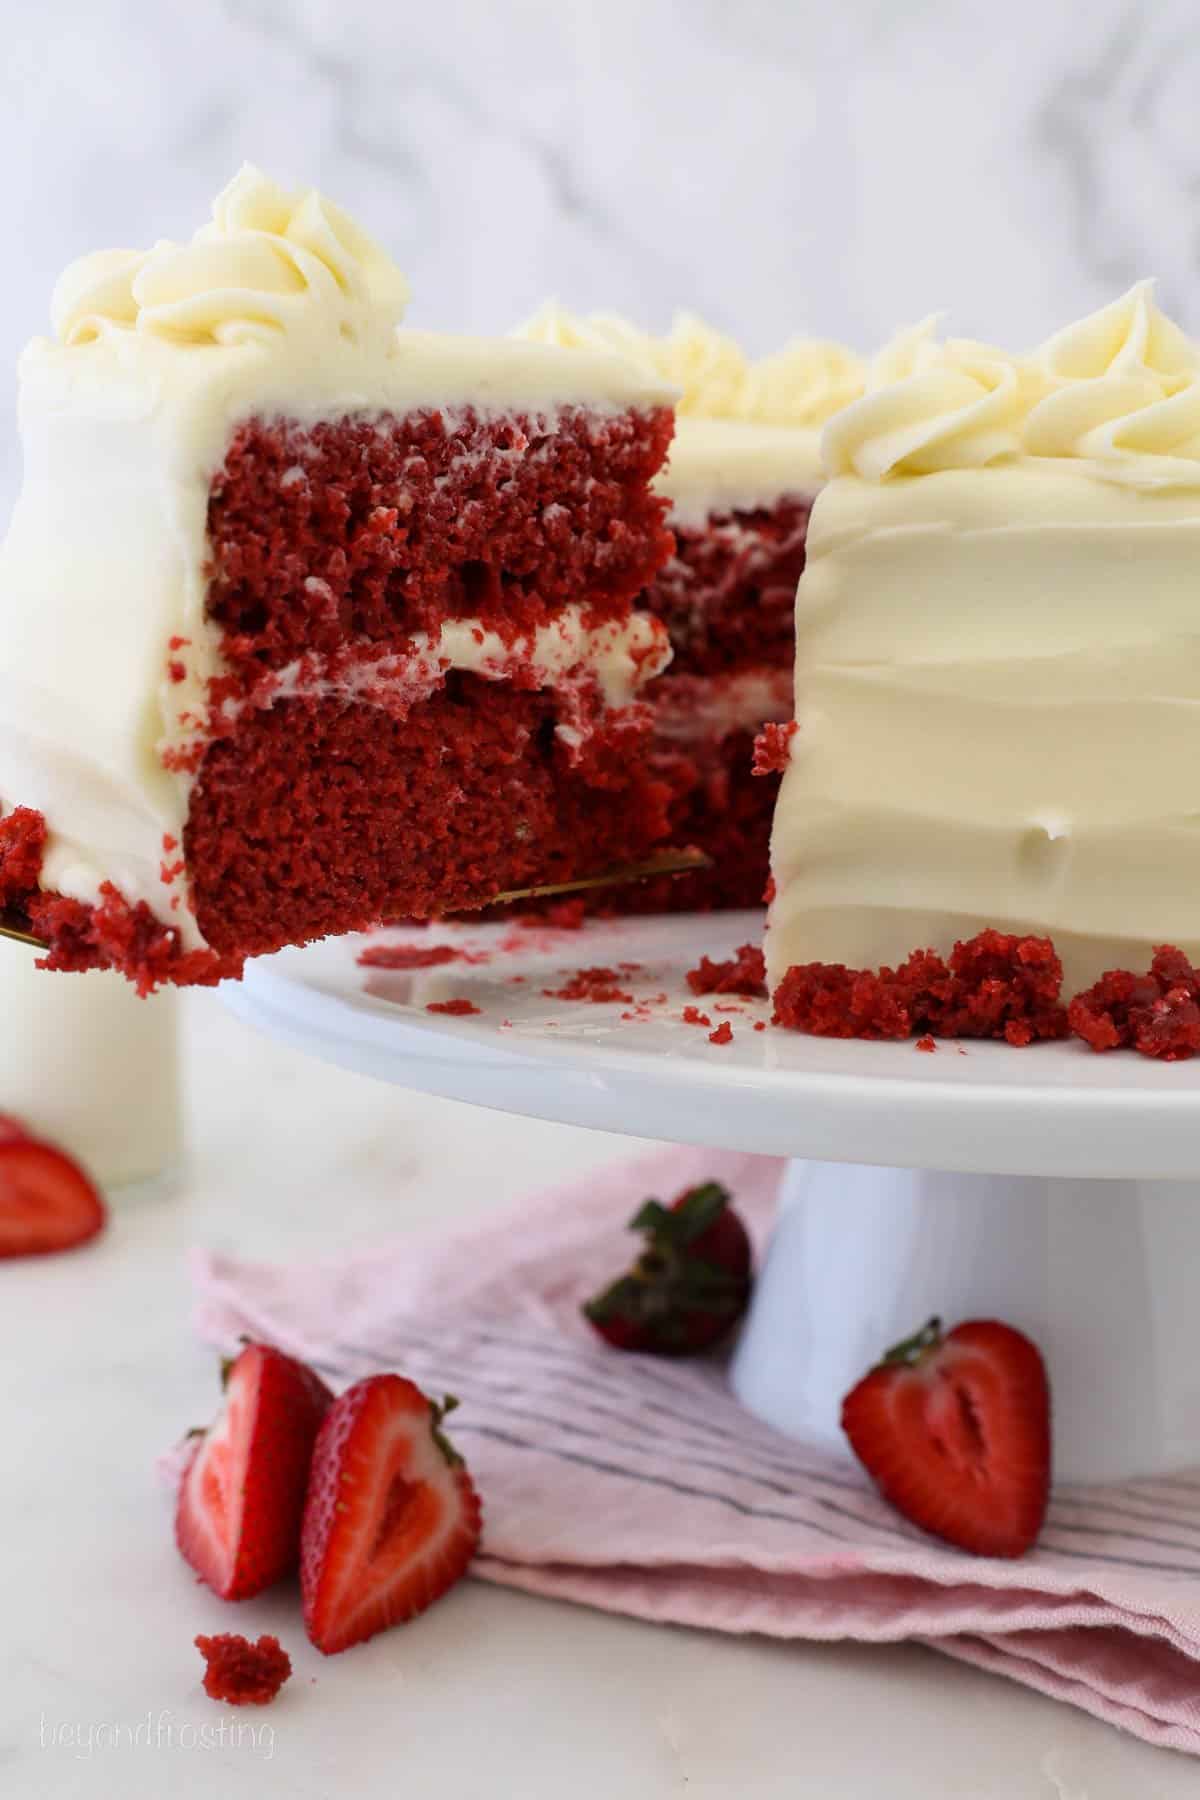
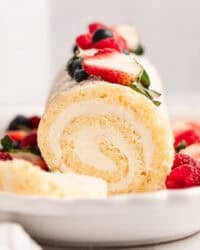
This moist, flavorful Gluten-Free Red Velvet Cake is adapted from two of my favorite recipes – red velvet cupcakes and cream cheese frosting. Vibrant red cakes are layered with thick, tangy cream cheese frosting for that classic red velvet look and flavor.
All-purpose flour is swapped for gluten-free flour and you’re left with a gluten-free cake with an incredible flavor, while the sour cream, oil, and melted butter help keep it uber moist.
The bright red color makes this cake ideal for Christmas and Valentine’s Day but it really just makes a beautiful treat anytime you need a gluten-free dessert!
What Does Red Velvet Taste Like?
Red velvet cake has a very subtle flavor. It has chocolate vibes, thanks to the addition of cocoa powder, but it’s not quite a chocolate cake and there’s usually a light vanilla undertone as well.
Typically the REAL star of a red velvet cake (including this one) is the frosting. Red velvet is traditionally topped with cream cheese frosting, which has a sweet-tangy flavor that balances out the subtle cake.
Key Ingredients
Here are the details on the 5 most important ingredients in this gluten-free red velvet cake. Scroll down to the recipe card for the full list of ingredients and measurements.
- Buttermilk – Buttermilk is an ingredient you’ll always find in red velvet cake. The acidity helps provide the flavor and also reacts with the cocoa powder for the color. If you don’t want to buy some just for this cake, you can make homemade buttermilk with regular milk and lemon juice or vinegar.
- Vinegar – The vinegar reacts with the baking soda to help the cake rise and create a fluffy texture.
- Cocoa powder – It’s very important to use natural cocoa powder, as it reacts best with the acids. This gives the cake a light chocolate flavor and also a reddish-brown color as it reacts with the buttermilk and vinegar.
- Gluten-free flour – See below for my recommendation.
- Cream cheese – It’s important to use full-fat cream cheese for the frosting as the reduced fat may not have the same texture and result in a too-soft frosting.
What’s The Best Gluten-Free Flour to Use?
My favorite gluten-free measure for measure flour is from King Arthur. Make sure your flour is 1 cup for cup replacement and includes the xanthan gum, as this is an important ingredient for binding the cake together. Any measure for measure replacement flour should include it but it’s always best to double-check.
Do I Need to Dye The Batter?
If you want your red velvet cake to have the bright red color typically associated with red velvet cake, you will need to add some food coloring. I like to use a concentrated gel, like Americolor, Wilton, or Chefmaster Super red gel color. It’s the easiest way I’ve found to achieve the vibrant red color without an entire bottle of food coloring. I recommend starting with 1 teaspoon and adding more as needed.
How to Make Gluten-Free Red Velvet Cake
Making this delightful gluten-free dessert may be easier than you think. The cakes themselves are easy to make and the frosting comes together in minutes. No special equipment or fancy techniques are needed for decorating it either!
For the Cake
Step 1: Prepare the pans. Line two round baking pans with parchment paper then flour and grease the sides. You can add bake-even stripes if you want.
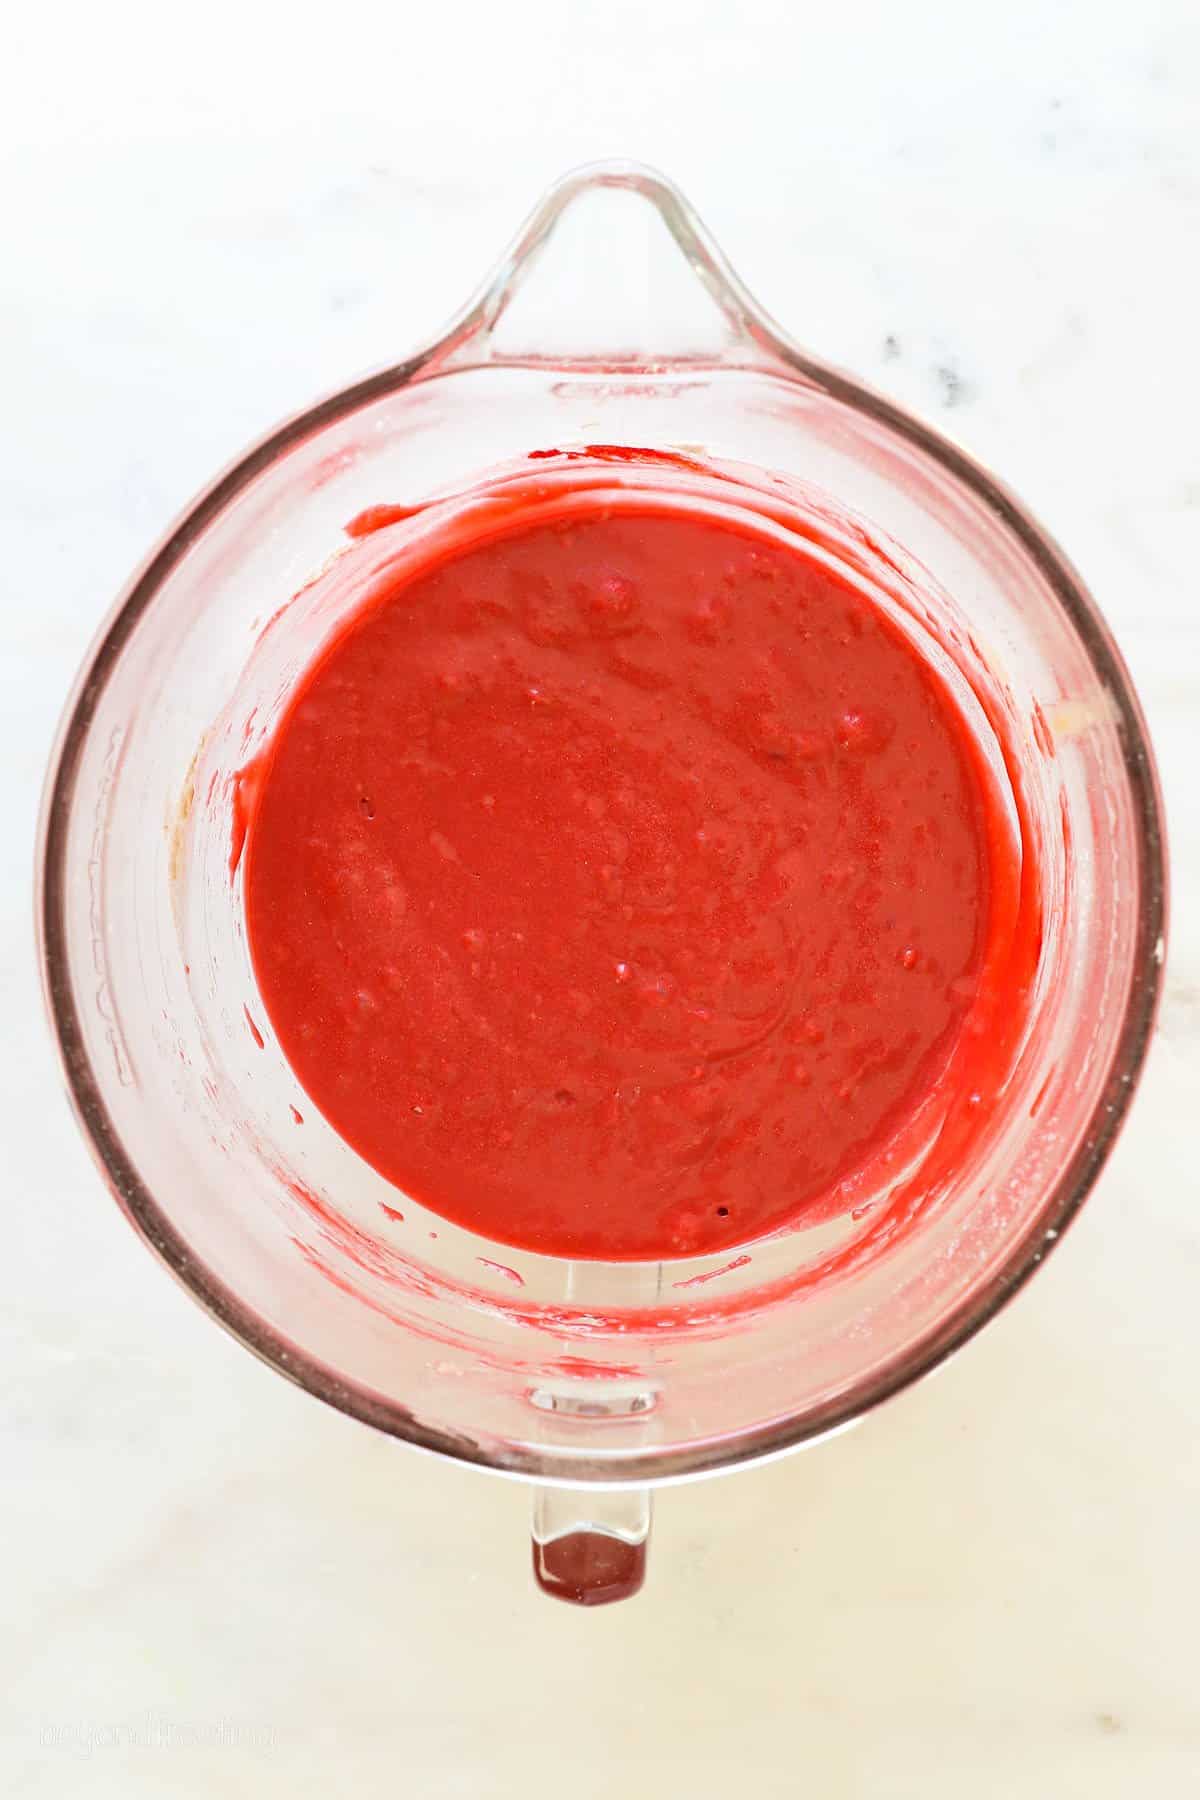
Step 2: Make the batter. Beat the oil, butter, egg, and vanilla extract. Once combined, add the sugar, followed by the sour cream, buttermilk, vinegar, and food coloring. Combine the dry ingredients in a separate bowl, then beat into the wet ingredients. Make sure to scrape the bottoms and sides of the bowl with a spatula.

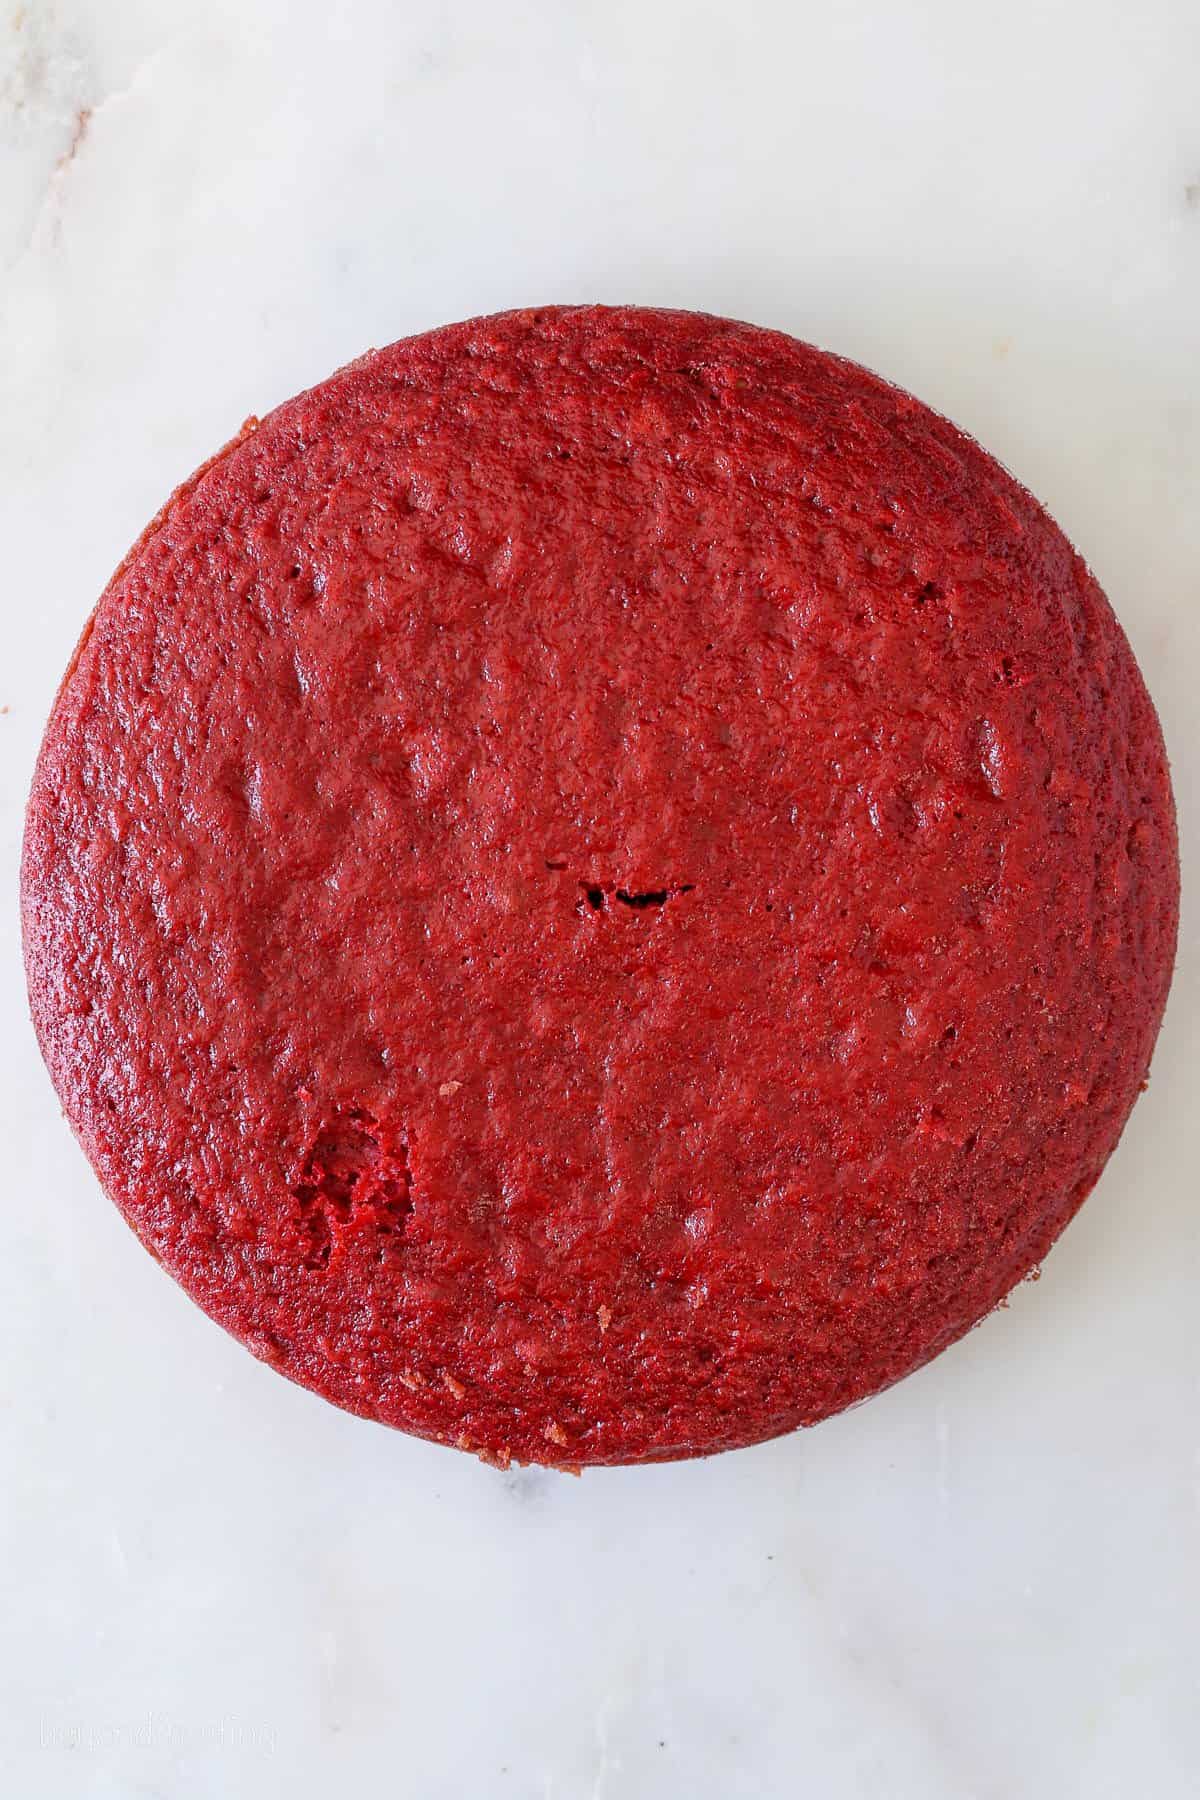
Step 3: Bake. Divide the batter evenly between the two pans. Bake for 25 to 32 minutes, until a toothpick inserted in the center comes out clean.
Step 4: Cool. Cool in the pan for 15 minutes, then remove from the pan and allow to cool completely on a rack.
For the Cream Cheese Frosting
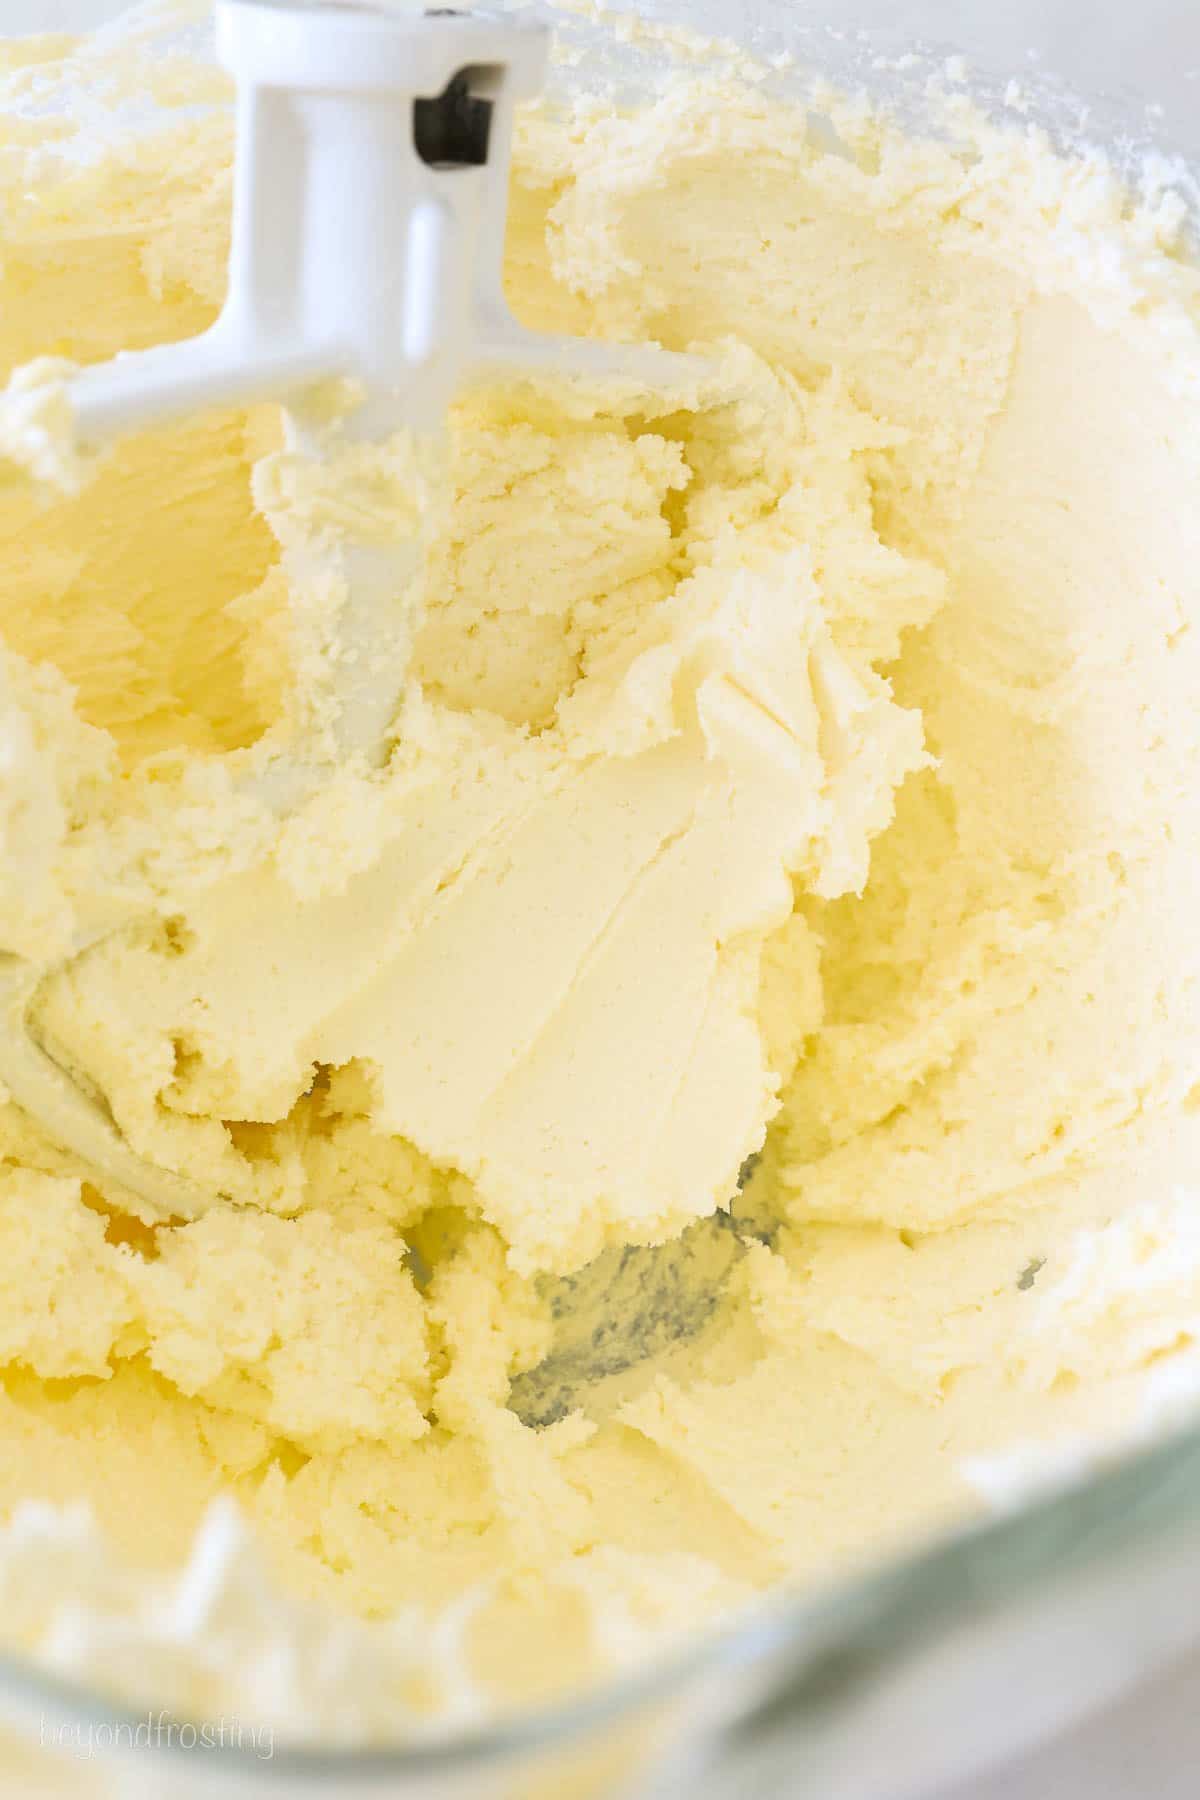
- Whip the butter. Whip the butter for 3 to 5 minutes until fluffy. It helps to cube the butter to make it easier for the mixer to break down.
- Add the remaining ingredients. Add the cream cheese and beat for an additional 2-3 minutes until free of lumps. Alternate adding 2-3 cups of confectionary sugar with the liquid, until the desired consistency is reached.

To Assemble the Cakes
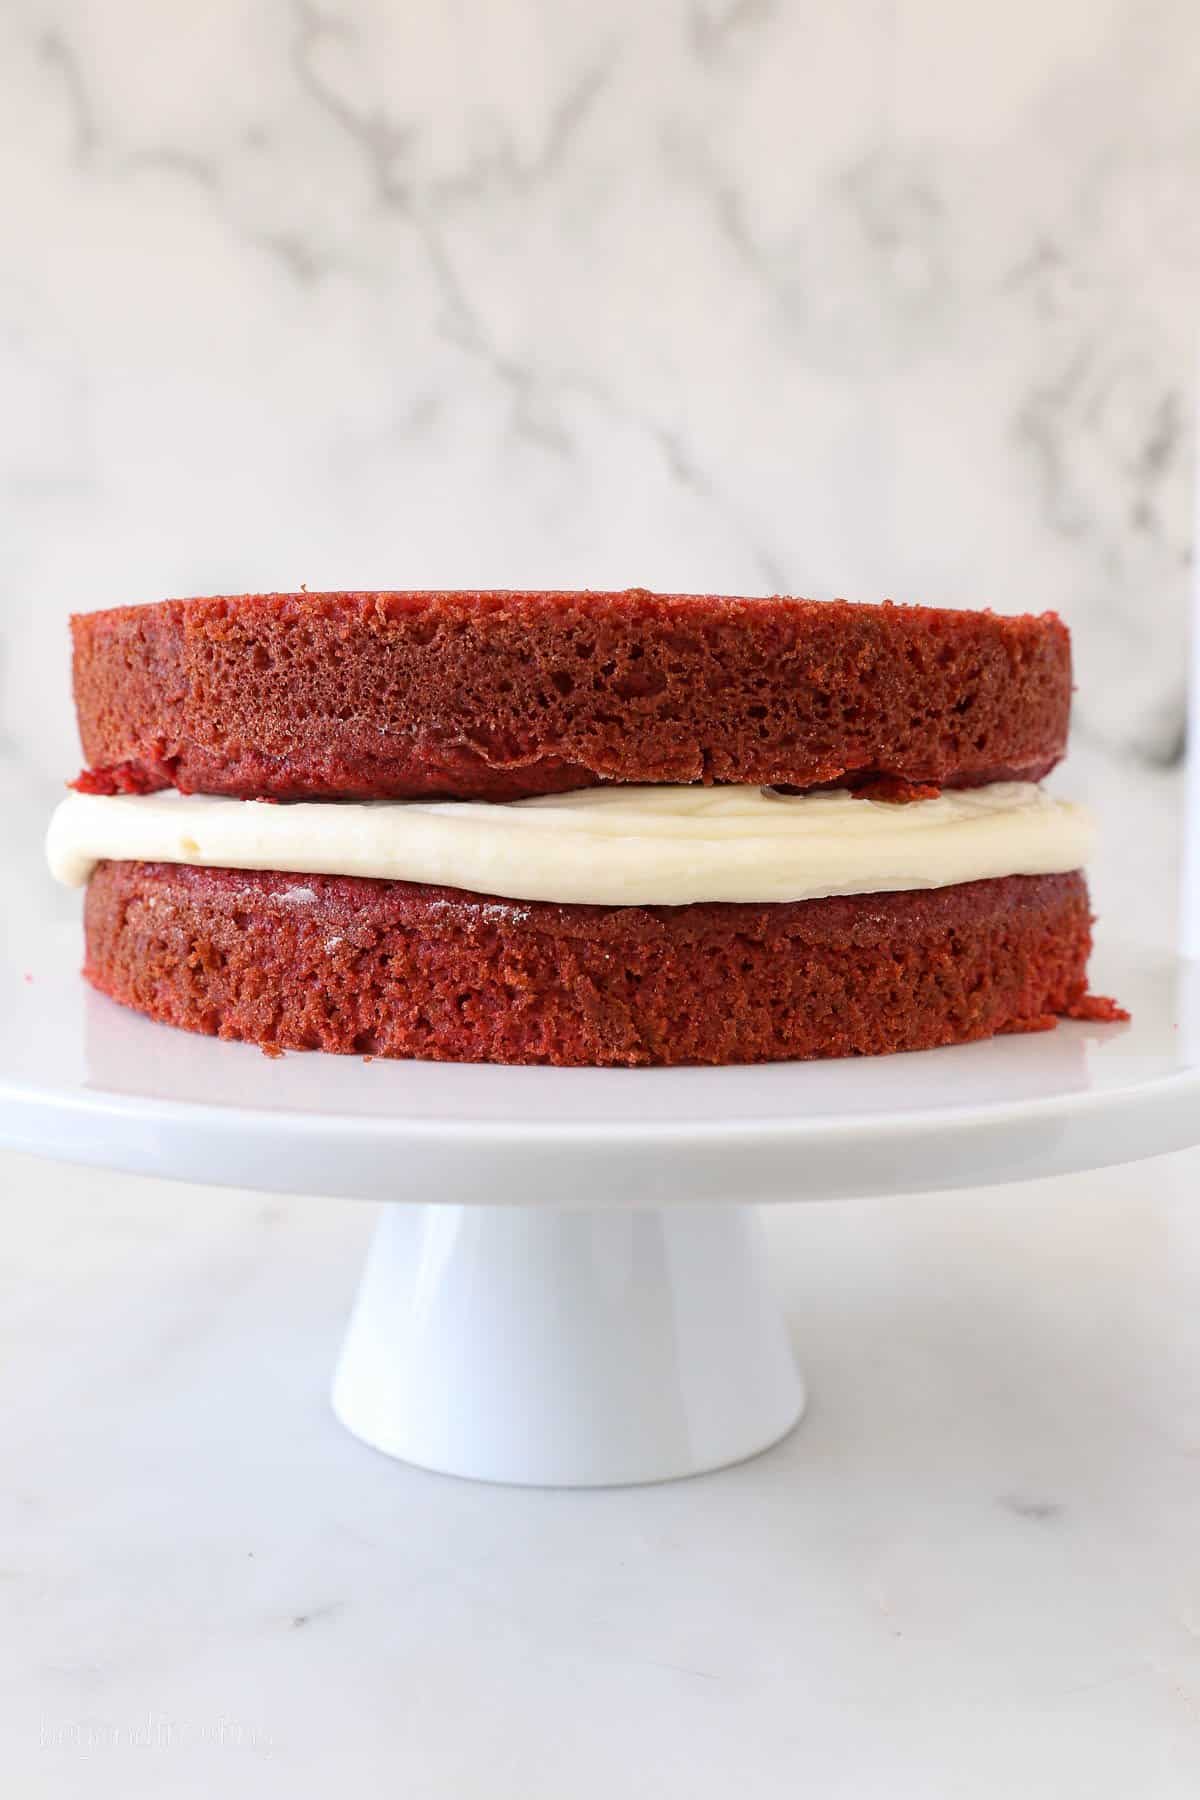
- Level the cakes. There shouldn’t be too much to level off but if needed, remove any domes on the cakes.
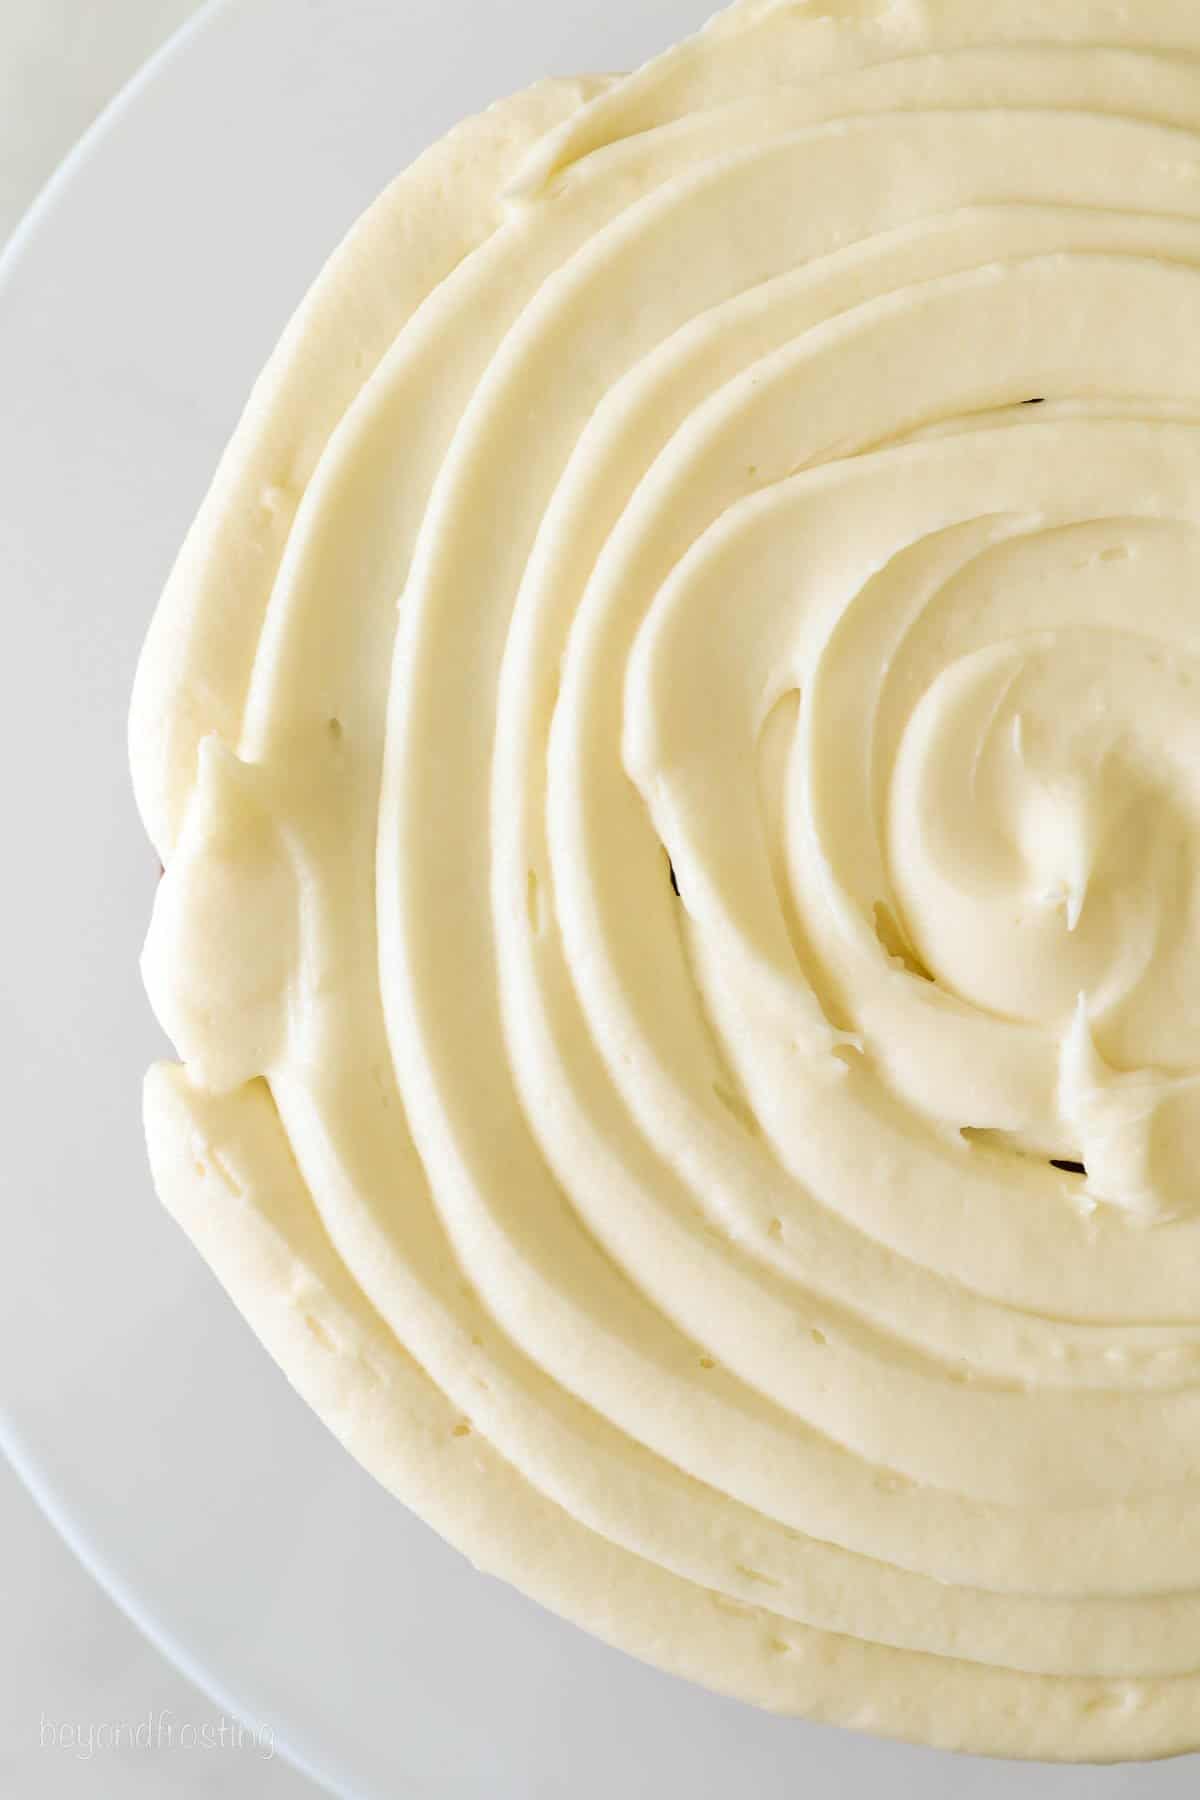
- Layer the cakes. Add a dollop of frosting to the cake board and top with the first cake layer. Pipe a layer frosting working in circles from the outside edges into the middle and spread evenly. Add the second cake on top and flip it upside down so the bottom of the cake is now the top. This gives you a nice, flat layer to decorate.
- Frost the cake. First, apply a crumb coat to the cake after the second layer is added, just enough to cover the outside. Freeze for 5 to 10 minutes to set then add the remaining frosting to the side and top.
Can I Make This in Advance?
Yes, both the cake layers and cream cheese frosting can be made in advance. The cake layers should be wrapped in plastic and kept on the counter at room temperature, while the cream cheese frosting can be prepared and stored in the fridge.
You may want to consider whipped the frosting in the mixer for a few minutes to get a better consistency. Especially if the frosting seems too thick or isn’t spreading after it sits on the counter for 30 minutes or so.
How to Store
Gluten-Free red velvet cake is best served at room temperature. Since my house is kept at a mild temperature, I will keep mine on the counter for up to 1 day. However, if your home is warm or it won’t be enjoyed within a day, you’ll definitely want to store this in the fridge due to the frosting.
Storing in an airtight container like a cake carrier is best to keep the cake from drying out.
While the cake layers can be wrapped in plastic and frozen for 3 months, I do not recommend freezing the frosted cake.
More Gluten-Free Desserts:
- Gluten-Free Carrot Cake Cupcakes
- Best Gluten-Free Chocolate Chip Cookies
- Homemade Gluten-Free Pie Crust
- Gluten-Free Chocolate Cupcakes
Gluten-Free Red Velvet Cake
- Prep Time: 45 minutes
- Cook Time: 25 minutes
- Total Time: 1 hour 10 minutes
- Yield: 10-12 slices
- Category: Cake
- Method: Oven
- Cuisine: American
Description
Topped with rich, tangy cream cheese frosting, this Gluten-Free Red Velvet Cake appears to be a decadent layer cake but is actually quite easy to assemble. The perfect gluten-free cake for holidays (great for both Christmas and Valentine’s Day!), birthdays, or any special occasion.
Ingredients
For the Cake
- 1/3 cup (78ml) vegetable oil
- ¼ cup (56g) unsalted butter, melted
- 2 large eggs, at room temperature
- 2 tablespoons pure vanilla extract
- ¼ cup (60g) sour cream, at room temperature
- 2 teaspoons (10ml) distilled white vinegar
- 1 ½ cups (285g) granulated sugar
- 2 ¼ cups (280g) measure-for-measure gluten-free flour, sifted
- 1 tablespoon (5g) cocoa powder, sifted
- 2 teaspoons (8g) baking powder
- 1 teaspoon (4g) baking soda
- 1 teaspoon (5g) salt
- 1 1/3 cups (315ml) buttermilk, at room temperature
For the Frosting
- 1 cup (226g) unsalted butter, cold
- 12 ounces (339g) full fat cream cheese, cold
- 6–7 cups (911g) powdered sugar
- 1 tablespoon (15ml) pure vanilla extract
- 2 teaspoons (9ml) heavy whipping cream or milk
- Pinch of salt
Instructions
For the Cake
- Preheat the oven to 350°F. Prepare two 8-inch round baking pans, line the bottom with parchment paper, then grease and flour the sides. Prepare bake even stripes if desired.
- In a large mixing bowl, combine the vegetable oil, butter, egg, and vanilla extract. Beat on medium speed until well incorporated. Next add the sugar and beat until well combined. Scrape down the bowl as needed.
- Next mix add the sour cream, vinegar, buttermilk, and red gel color and beat until well combined.
- In a separate bowl, combine the remaining dry ingredients and add to the batter, beating until well combined. Use a spatula to scrape down the sides of the bowl and stir the batter from the bottom to the top to ensure it’s well mixed.
- Divide the cake batter evenly between the two 8-inch pans. Bake at 350° F for 25 to 32 minutes. Check the cakes for doneness by inserting a toothpick into the center of the cake. If the toothpick comes out clean, the cake is done. Allow the cake to cool in the pans for 15 minutes. Then gently run a knife around the edges of the cake and flip them out of the pan and onto a rack to cool completely.
For the Frosting
- Cut the butter into pieces, about 1 tablespoon size. Using the paddle attachment, whip butter for 3-5 minutes, scraping down the bowl occasionally until the butter is light and fluffy.
- Then add the cream cheese and cream together with the butter for 2-3 minutes until they are whipped and free of lumps, scrape down the bowl occasionally.
- Slowly add confectionary sugar, 2-3 cups at a time, alternating with the liquid (vanilla extract and heavy cream), and beat until desired consistency is reached. Add salt if desired.
To Assemble the Cakes
- Level off the cakes by removing any domes if necessary. Place a dollop of frosting on your cake board and place the bottom layer of cake centered on a cake board.
- Pipe a layer of frosting in circles working outside the edge to the middle. Spread evenly with an offset spatula. Add the second layer of cake, inverted. Apply a crumb coat to the cake and put it in the freezer for 5-10 minutes.
- Remove from the freezer and add the remaining frosting to the side and top of the cake.

Nutrition
- Serving Size: 1 Slice
- Calories: 801
- Sugar: 86.5 g
- Sodium: 437.6 mg
- Fat: 37.7 g
- Carbohydrates: 112.1 g
- Fiber: 0.9 g
- Protein: 5.8 g
- Cholesterol: 116.1 mg
I used this recipe for a gluten free client and it was amazing..
My question can I use this for a lactose free client? I will substitute the sour cream to lactose free and the cream cheese.
Thank you
I’ve made this recipe 2 years in a row now for my sister who has a wheat allergy. This year I added a little extra vanilla to the batter and it was amazing! She loved it this year and the year before, thank you!!
I love that Noelle! Thank you thank you!
These is the BEST gluten free cake! I made it into cupcakes. I baked them 15 minutes. They were light, fluffy and tasted delicious. I used Cup 4 Cup flour. There was no weird aftertaste, no odd texture. I’m making these for my niece’s wedding shower and I can’t wait for guests to find out their gluten free!
Oh my gosh Nancy, that makes me so happy! Thank you for sharing!
Made this yesterday for a coworker’s birthday treat, per her request of a GF red velvet cake; she has Celiac disease and in spite of how many recipes are out there, it always seems to be hit or miss, and she was so happy with the result! I was also pleasantly surprised the texture was so spot on (some coworkers couldn’t even tell it was GF!) Thanks for sharing your recipe, made our vet clinic staff very happy!
That is awesome Lucia! Thank you so much for sharing!
I’m going to try this one.
this cake is very yummy! (especially for gluten free) but can take some time to do.
Can this be made with all purpose flour? And if so would it still be the 2 1/4 cup? Or would it be 2 cups?
Yes you can make this with all-purpose flour. It’s a measure for measure replacement, so you’d use the same amount of AP flour
how much red gel color do you add?
2 teaspoons is estimated, but I didn’t specify because it’s really about the color you’d like to achieve.
Hola, tienes una receta de Pastel de terciopelo Rojo con harina de todo uso? Saludos
Puede usar esta misma receta, solo use harina para todo uso en su lugar.
Super easy recipe, I used cakeflour instead of the gluten-free, cake turned out great,and super moist!!!!!
Thank you sooooooo much Julianne for your delicious EASY cake recipes!!! You are the BEST!!!
You’re so welcome! Super interested to hear about the cake flour.