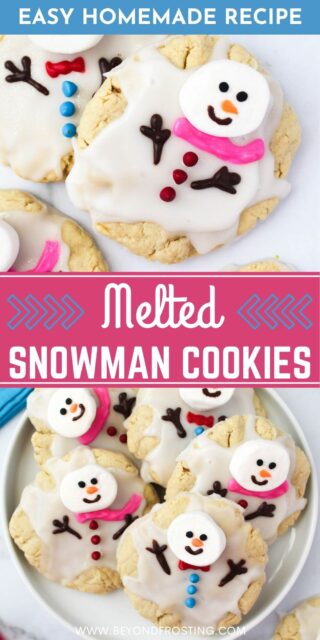
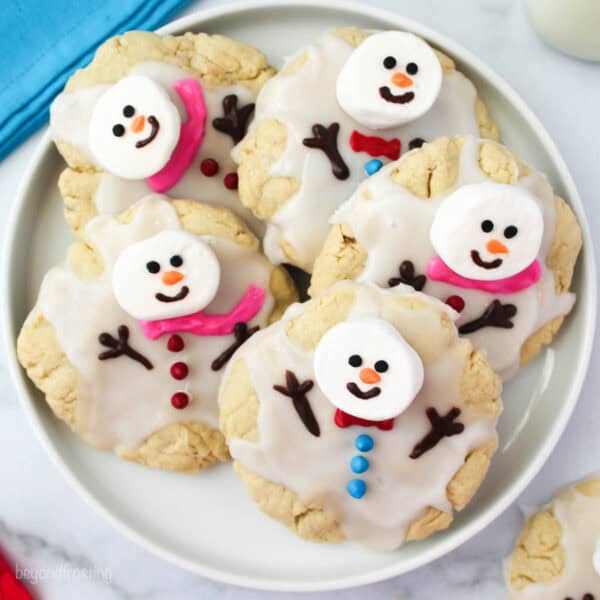
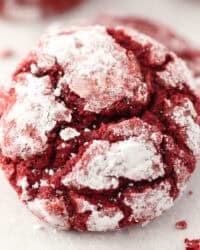
These Melted Snowman Cookies are the perfect Christmas cookie! Soft, thick, and pillowy sugar cookies are transformed into the cutest melted snowmen. These are made with homemade icing, marshmallows, melted chocolate, and sprinkles!

Why I Love These Melted Snowman Cookies
Christmas is right around the corner, which means it’s time to start planning all the goodies you get to bake for holiday parties. Have you heard of melted snowman cookies? You have to add these easy treats to your holiday offerings. Here’s why I love them:
- Super cute: These melted snowman cookies are the cutest winter-themed dessert! What’s not to love about a cookie with a smiling snowman on top?
- Perfectly sweet: The cookie base uses my favorite sugar cookie recipe which is subtly sweet and soft. Then we’ll use sugar cookie icing to make it look like a snowman is melting on top of each cookie.
- Easy to decorate: All you need is some marshmallows, melted chocolate, candy melts and sprinkles. I added a little luster dust for a sparkly finish.

Ingredient Notes
Here are a few notes on some of the ingredients in this recipe. Be sure to scroll down to the recipe card for a full, printable list.
- Unsalted Butter – Be sure to bring the butter to room temperature
- Granulated Sugar – I used regular white sugar.
- Milk – Any kind of milk works.
- Powdered Sugar – I recommend sifting the powdered sugar before incorporating the other ingredients. This helps prevent it from clumping.
- Corn Syrup – This makes your icing shiny and helps it flow smoothly over the cookies.
- Extract – This is for the icing. You can use whatever extract you like. Vanilla, almond, or even peppermint
Decoration Notes
This is what I used to decorate these melted snowman cookies, but feel free to use your imagination and use different decorations:
- Marshmallows – Regular-sized marshmallows work best so that there’s enough room to draw a face.
- Chocolate Chips – Use regular chocolate chips to draw decorate with or use candy melts.
- Candy Melts – Orange candy melts for the carrot nose, then whatever color candy melt you want to use for the scarf. I used pink and red!
- Confetti Sprinkles or Sugar Pearls
- Luster Dust – Optional, but adds a fun sparkle to the cookies that’s always a hit!

How to Make Melted Snowman Cookies
Let’s take a look at how to make these cookies step-by-step. I’ve added some photos below to make sure your cookies come out perfectly!
Make the Cookie Base
- Cream butter and sugar. Don’t rush this step, you want the sugar to be fully dissolved.
- Add remaining wet ingredients. Dissolve the baking soda in the milk. This activates the baking soda. Add to the dough along with the vanilla, and egg. Then beat until well combined.
- Add dry ingredients. Slowly add 1/2 cup at a time to the wet ingredients until a stiff dough forms.
- Make cookie dough balls and chill. Shape the dough into 12 equal size balls. Place the dough balls on a plate or tray, wrap with plastic wrap, and chill in the fridge for 30 minutes.
- Shape and bake. Press each ball into a rough circle, about 3.5 inches in size. You can make these as smooth or as rough looking as you’d like. Place the cookies onto two baking sheets lined with parchment paper or silicone baking mats and then bake one tray at a time.

Make the Icing
- Sift the powdered sugar. Sift the powdered sugar into a bowl to prevent clumping.
- Add remaining ingredients. Add 2 tablespoons of milk and whisk until well-combined, then whisk in corn syrup. If needed, add additional milk or powdered sugar to thin or thicken the glaze. It should run off your spoon but not spread too much.
Time to Decorate Your Cookies!
- Add the icing. Use a spoon to drizzle icing over the top of the cookies. Allow it to set for 30 minutes or longer. If desired, use a paintbrush to sprinkle luster dust over the frosting after it has hardened.
- Prep the decorations. Melt the chocolate chips and candy melts, then grab the sprinkles.


- Prepare the marshmallows. Cut the marshmallows in half, place a small drop of melted chocolate on the back of the cut side, then place it on the cookie.
- Draw the face. Use a toothpick to dot two spots for the eyes on the top of the marshmallows, then add on two confetti sprinkles. To draw the nose, use the end of a toothpick to dot the marshmallow with orange candy melts. Last, draw the mouth with chocolate using a toothpick.
- Add the buttons. Dot 3 drops of chocolate over the frosting to adhere the buttons, then add on confetti sprinkles or sugar pearls.
- Pipe the scarf. Using your color of choice, pour the melted chocolate into a piping bag, cut just the tip off the bag and draw the scarf.
- Pipe the arms. Pour the remaining melted chocolate in a piping bag and pipe the arms.
- Let them set. Allow the decorated cookies to set completely before serving.


Tips for the Best Melted Snowman Cookies
- Use a large cookie scoop. This is 3-3.5 tablespoons of dough per cookie. This creates just the right size of cookie for decorating. It also keeps the cookie dough balls uniform in size so they bake evenly.
- Allow the glaze to set. It’s hard to wait, but it’s much easier to decorate once the frosting as set.
- Gift them! These cookies make great holiday gifts! Wrap them up in a bag with a bow and give them out to your neighbors or friends as little holiday gift goodies.
Do You Have to Chill the Dough?
Yes! You’ll want to chill the dough for at least 15 minutes in the freezer or at least 30 minutes in the refrigerator before you bake it. This ensures that your melting snowman cookies have a thick and soft cookie base.

How to Store
- Storing baked cookies: Melted snowman cookies will last in an airtight container at room temperature for 5-7 days or in the fridge for up to 2 weeks.
- Can I freeze them? Yes, but I recommend doing so without the frosting and decorations. They will last in the freezer for up to 3 months. When you’re ready to frost, thaw in the fridge.
More Christmas Cookies

Melted Snowman Cookies
- Prep Time: 60 minutes
- Cook Time: 10 minutes
- Total Time: 1 hour 10 minutes
- Yield: 12 cookies
- Category: Desserts
- Method: Baked
- Cuisine: American
Description
These Melted Snowman Cookies are the perfect Christmas cookie! Soft, thick, and pillowy sugar cookies are transformed into the cutest melted snowmen with homemade icing.
Ingredients
For the Cookies
- 1/2 cup (113g) unsalted butter, at room temperature
- 1/2 cup (95g) granulated sugar
- 1/2 tsp baking soda
- 2 tablespoons (30m) milk
- 1/2 teaspoon vanilla extract
- 1 large egg, beaten
- Pinch of salt
- 2 1/2 cups (350 g) all-purpose flour
For the frosting
- 2 1/4 cups (292g) powdered sugar, sifted
- 1 tablespoon (15ml) corn syrup
- 2–3 tablespoons (30-45ml) milk
- 1/4–1/2 teaspoon extract (optional: vanilla, almond, peppermint or lemon)
Decorations
- 6 Marshmallows (regular size)
- ¼ cup chocolate chips (or chocolate candy melts)
- ¼ cup candy melts- the color of choice for scarf
- ¼ cup orange candy melts
- Confetti sprinkles or sugar Pearls
- Luster dust (optional)
Instructions
For the Cookies
- Beat the butter and sugar on medium-high speed until the sugar is dissolved and the mixture is creamy.
- In a small glass dish, dissolve the baking soda in the milk.
- Add the baking soda/milk, vanilla, and egg to the butter/sugar mixture. Beat until all the ingredients are well incorporated.
- Slowly add the salt and the flour, 1/2 cup at a time, and mix until a stiff dough forms.
- Shape the dough into 12 equal size balls using a large cookie scoop (about 3-3.5 tablespoons of dough each.)
- Place the dough balls on a tray or plate, wrap tightly with plastic wrap, then chill in the freezer for at least 15 minutes or in the refrigerator for at least 30 minutes.
- Preheat the oven to 350ºF and line two baking sheets with parchment paper or silicone baking mats.
- Remove the dough from the fridge and press/flatten each dough ball into a rough circle, about 3.5 inches in size.
- Bake at 350ºF for 9-12 minutes. Allow to cool for 5 minutes, then transfer to a wire cooling rack to cool completely.
For the Frosting
- Sift powdered sugar into a bowl and add in 2 tablespoons of milk. Whisk until well combined, then whisk in corn syrup.
- If needed, add additional milk (1 teaspoon at a time) to thin out the frosting. If it’s too thin, add an additional 1/4 cup powdered sugar to thicken.
To Decorate
- Use a spoon to drizzle frosting over the top of the cookies. Allow it to set for 30 minutes or longer.
- If desired, use a paintbrush to sprinkle some luster dust over the frosting.
- Cut the marshmallows in half and melt the chocolate in the microwave at 50% power, stirring until melted and smooth. Drop a dot of chocolate on the backside of the the marshmallow and stick it on top of the frosting. Use a toothpick to place 2 dot the top of the marshmallow and place 2 confetti sprinkles on top for the eyes or draw the on with some melted chocolate and a toothpick.
- Melt the orange candy melts in the microwave at 50% power and stir until melted and smooth. Dip the end of a toothpick in the chocolate and draw on the nose.
- To draw the mouth, dip the end of a toothpick in the chocolate and draw on the marshmallow.
- Next, use a toothpick to dot 3 drops of chocolate over the frosting to adhere the buttons.
- Pipe on the scarf, using whatever color of melted candy you prefer.
- Pour the remaining chocolate in a piping bag and add the arms, then allow all the decorations to set completely.

Notes
- Cookie dough will last in an airtight container in the fridge up to 4 days.
- Freezing Cookie dough: the dough will last up to 3 months in the freezer. If planning to freeze for a longer period of time, divide the dough into two equal discs, double wrap with plastic wrap and place in an airtight bag or container. If you need to freeze for a short time, portion out the dough into 12 equal balls. Flash freeze for 30 minutes and then wrap each one with plastic wrap then put in an airtight bag.
- Baked cookies: will last in an airtight container at room temperature for 5-7 days or in the fridge for up to 2 weeks. You can freeze the baked cookies too, but I recommend doing so without the frosting and decorations. They will last in the freezer for up to 3 months.
- Cookie decorations: These are all suggestion, feel free to use what you have or get creative. This recipe calls for melted chocolate to make it easiest on you, but if you have white chocolate you might want to use that to adhere the marshmallows, the eyes and buttons.
Nutrition
- Serving Size: 1 cookie
- Calories: 323
- Sugar: 49.1g
- Sodium: 277.1mg
- Fat: 9.5g
- Carbohydrates: 59.8g
- Fiber: 0.5g
- Protein: 2.1g
- Cholesterol: 35.9g

Such a cute idea. Can you lick royal icing from the bowl or will it harden on your insides? Just making sure, cause my hubby is a bowl licker.
Hi Agatha! Thank you for stopping by!! Yes, actually you can lick the bowl, although it is VERY sweet! And no, it will not harden in your belly, but perhaps you can try telling your husband that so he doesn’t eat all your frosting before you are done using it!