
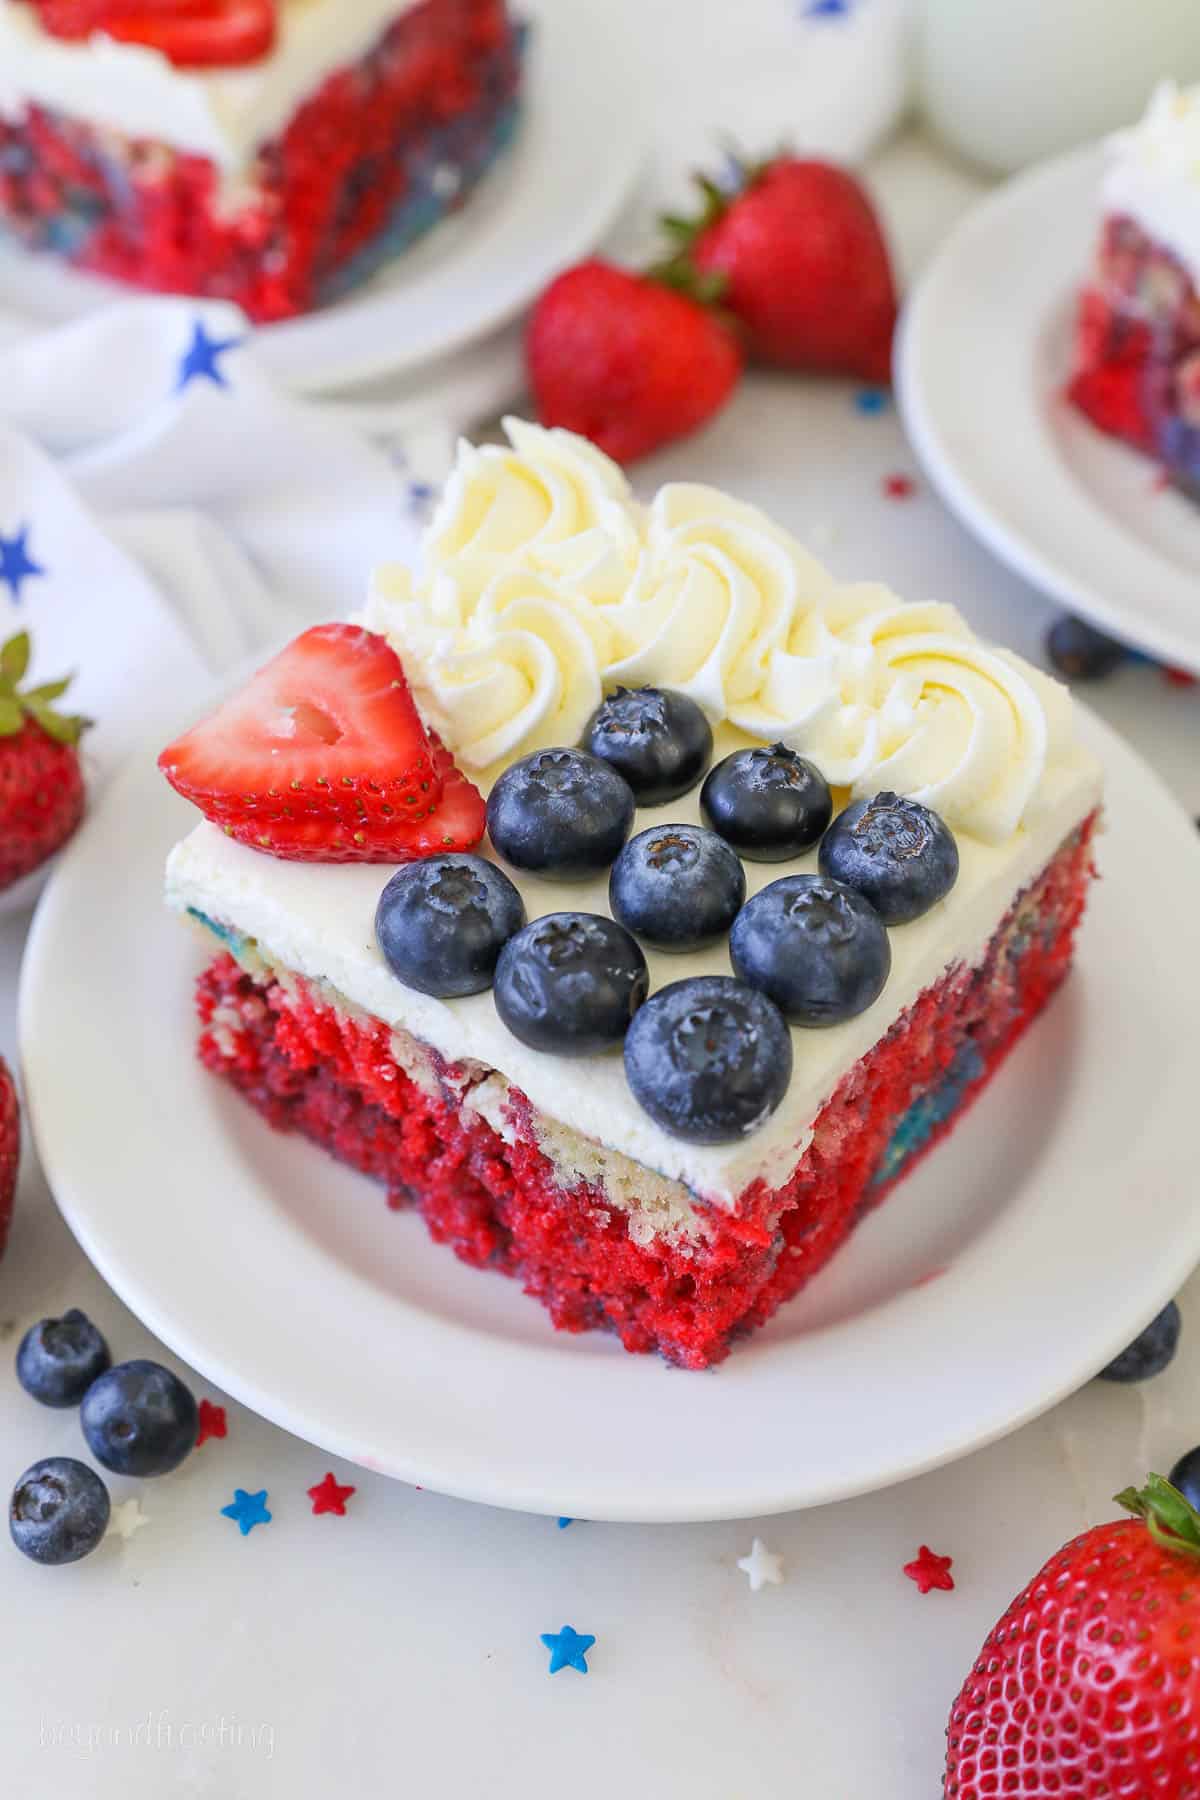
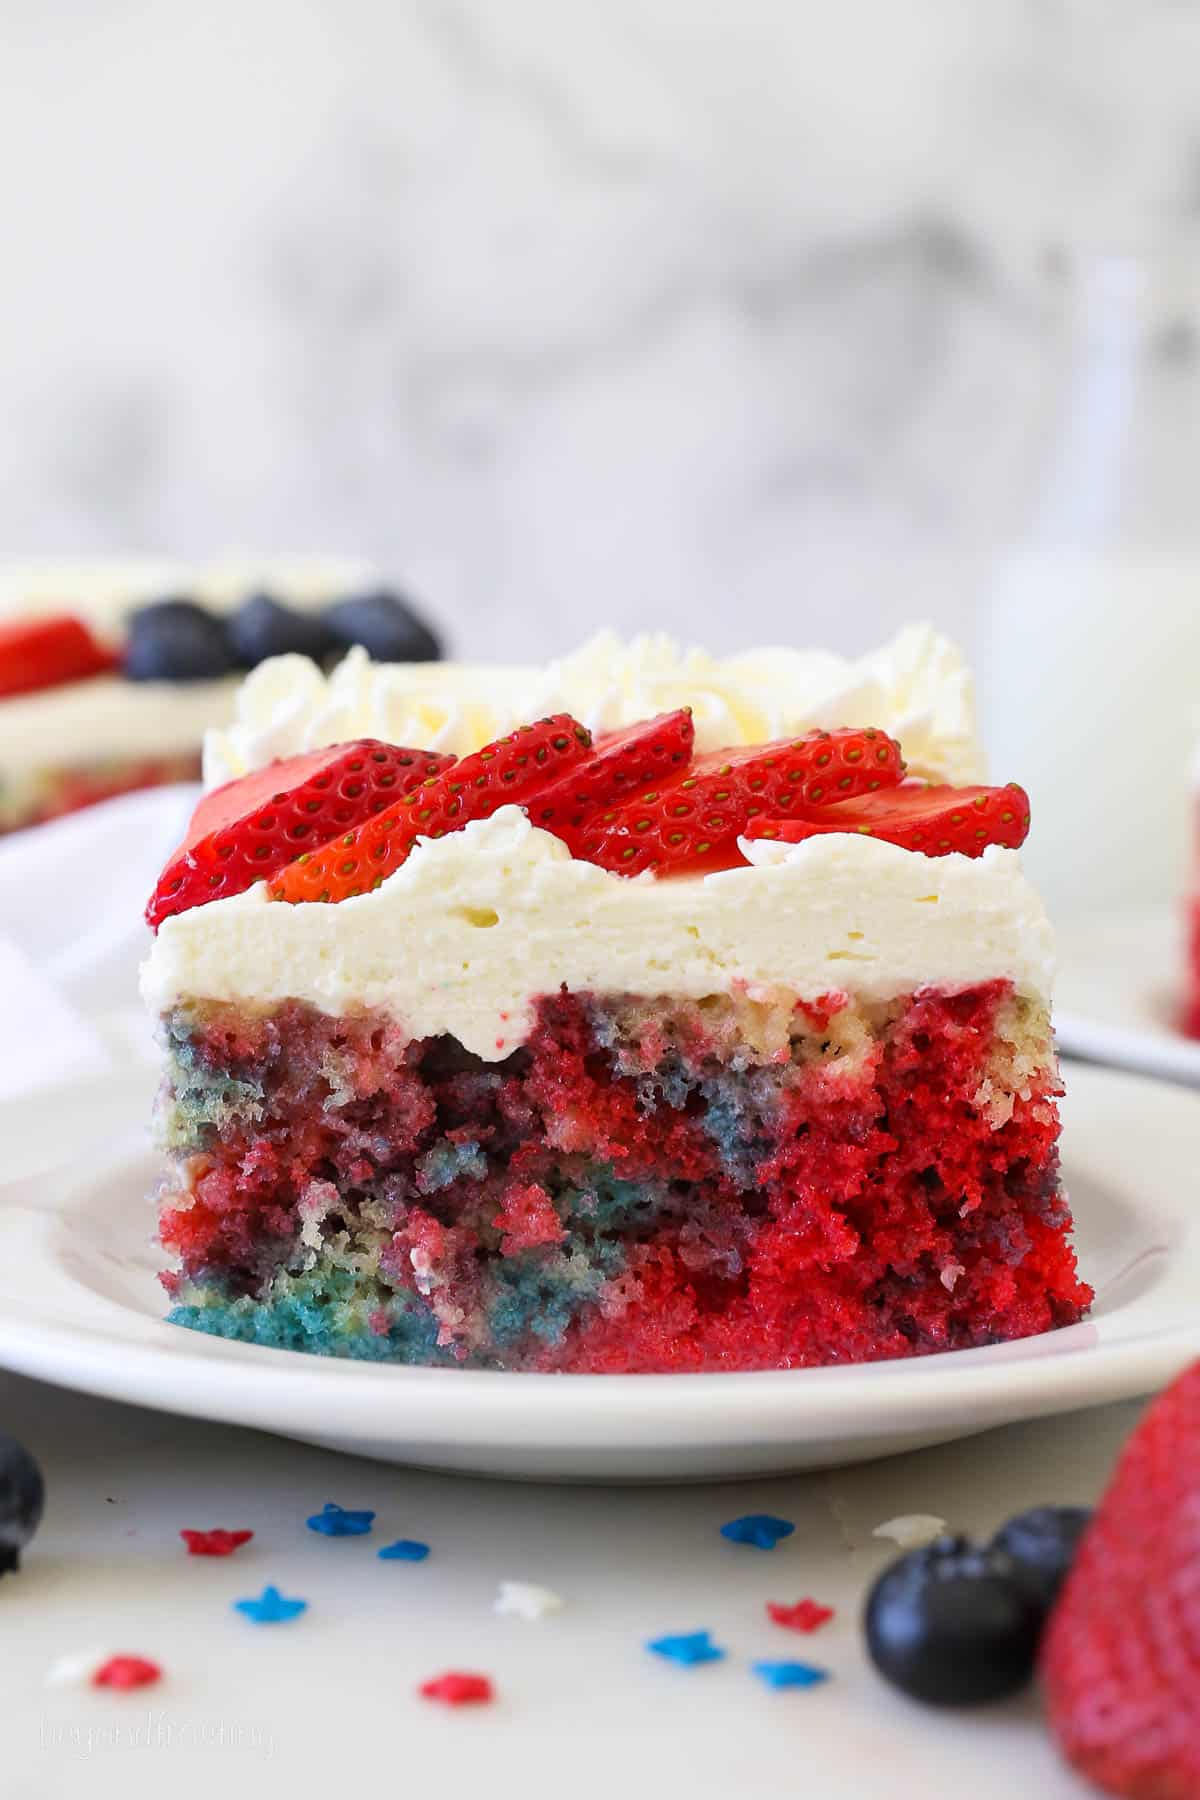
This Patriotic Flag Cake is the perfect 4th of July dessert. The tye-dye Red White and Blue Cake is soaked in sweetened condensed milk and topped with mascarpone whipped cream. Plus we’re using. fresh berries to decorate it like an American flag.
Are you looking for more 4th of July dessert ideas? You can make this into a Red White and Blue Layer Cake or this Flag Cupcake Cake makes serving dessert at your BBQ a breeze.

Easy Patriotic Flag Cake
If you are looking for an easy 4th of July dessert that kids and adults will love, this poke cake will knock your socks off. It’s my favorite berries and cream cake all dressed up for the occasion.
I took my classic yellow cake recipe and dyed the cake batter Red White and Blue. A tye dye cake may look complicated, but really it’s a simple recipe, and I am going to show you just how to do it.
For this particular recipe, using a yellow cake base is best so that you can really see all the colors of the cake. It’s light and spongy and perfectly moist. You could achieve these same results if you’re using a vanilla cake mix instead. Then I covered it with sweetened condensed milk which keeps it extra moist even after it’s been refrigerated.
This cake is decorated with my absolute favorite whipped cream frosting which uses mascarpone cheese to thicken the whipped cream, so it’s very stable for piping and decorating. Plus I decorated it to look like an American flag using fresh blueberries and strawberries. If you’d prefer, you can also make this with cream cheese instead of mascarpone although I find the mascarpone to be more stable for piping.
If you’d prefer not to dye the cake batter, you don’t have to! Simple prepare the cake as instructed, or try serving this as a vanilla cake instead.
How to make a Tye Dye Cake
You can make a tye dye cake with any colors you want, but for a Patriotic Poke Cake we are going to be using red and blue food colors to dye the cake batter. It’s really a simple process!
Step 1: Make the Cake Batter. First combine the oil, melted butter, egg & egg yolks and vanilla extra. Beat together until combined, then continue beating in the granulated sugar until it’s well mixed. Next mix in the sour cream. Once that’s incorporated, add half the dry ingredients and half the buttermilk, mixing just till it starts to combine. Then add all the remaining dry ingredients and milk, mixing until the batter is well combined, stirring if necessary.
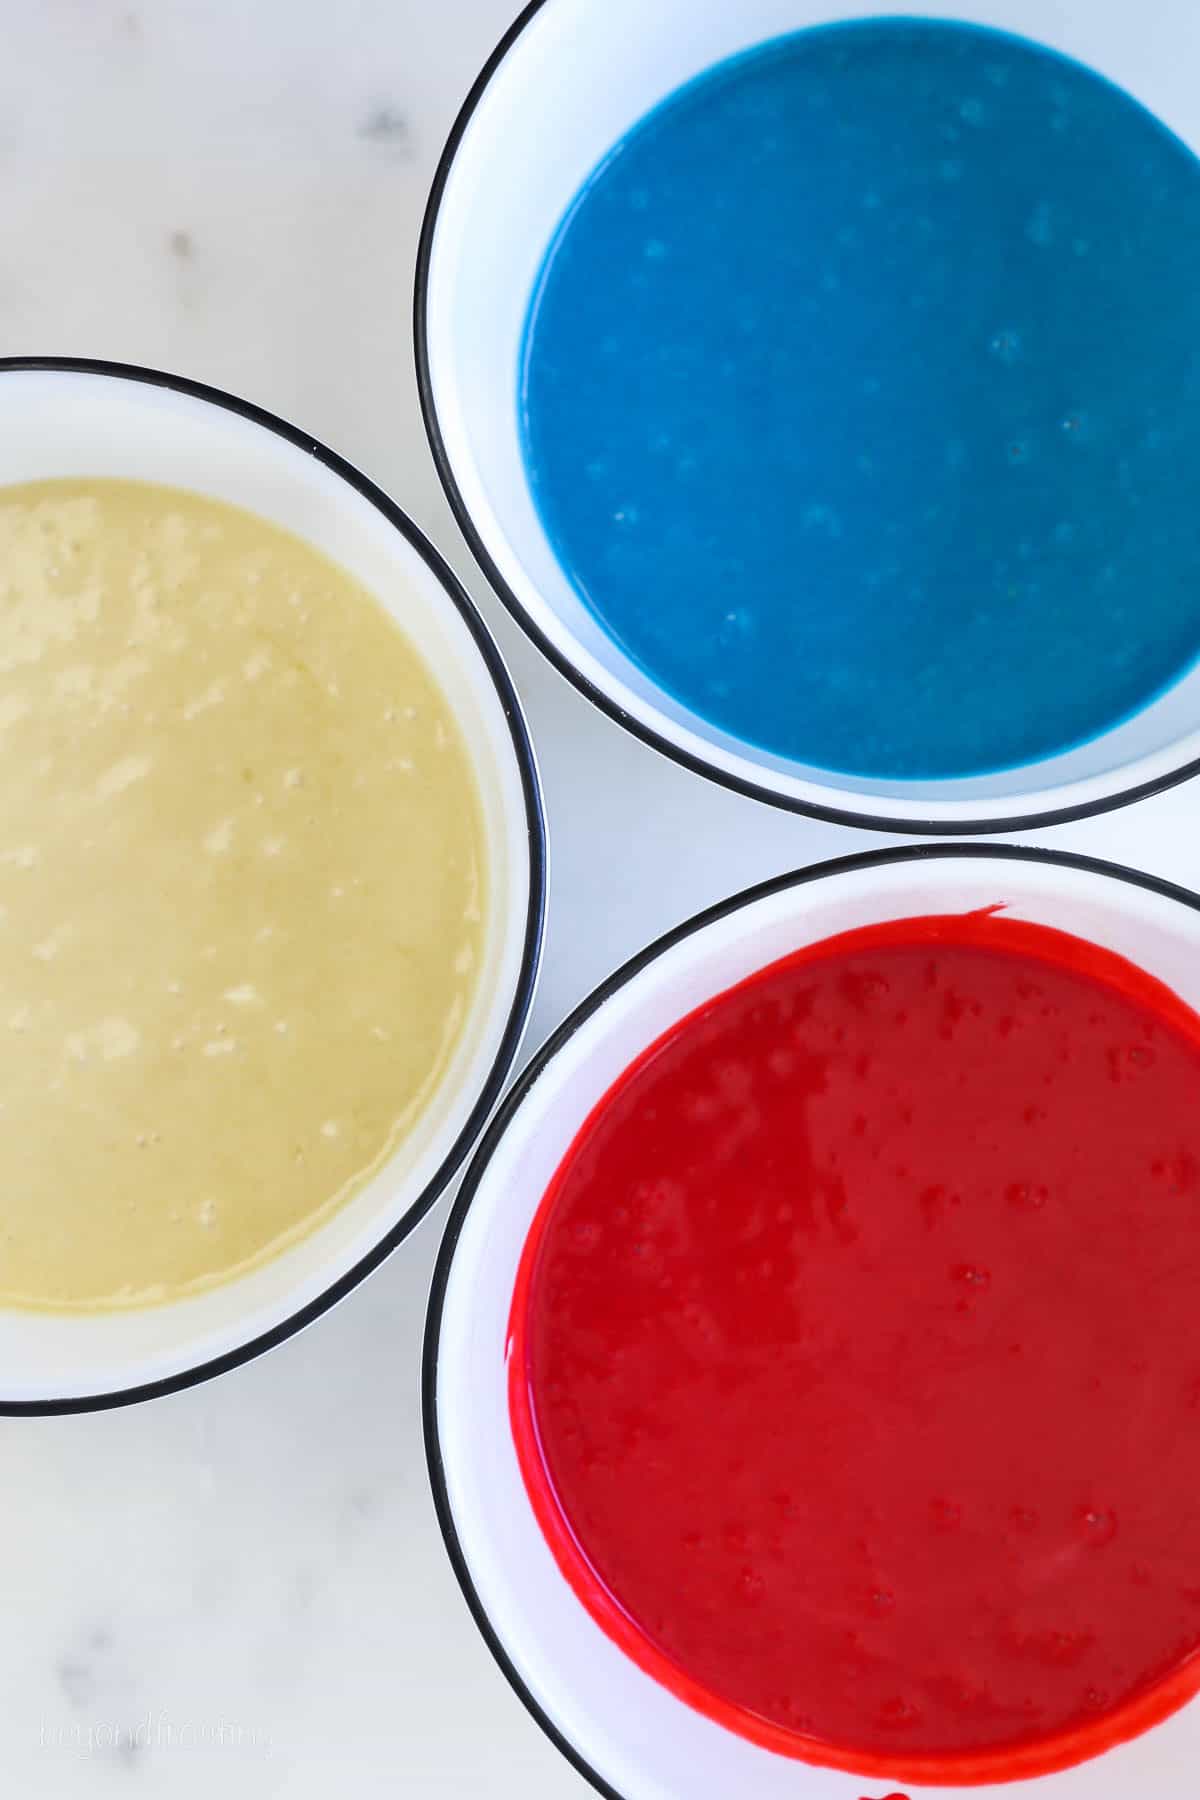
Step 2: Color the batter. Divide the batter between three bowls. For the white (the undyed portion), I measure out 2 cups of batter and set it aside. Divide the remaining batter evenly, about 1 1/2 cups each. Color the better using Americolor blue and super red and mix with a spoon until the colors are incorporated. It’s best to use gel food color because they are more concentrated, which means it takes less dye to make bright colors. The colors will darken once baked.
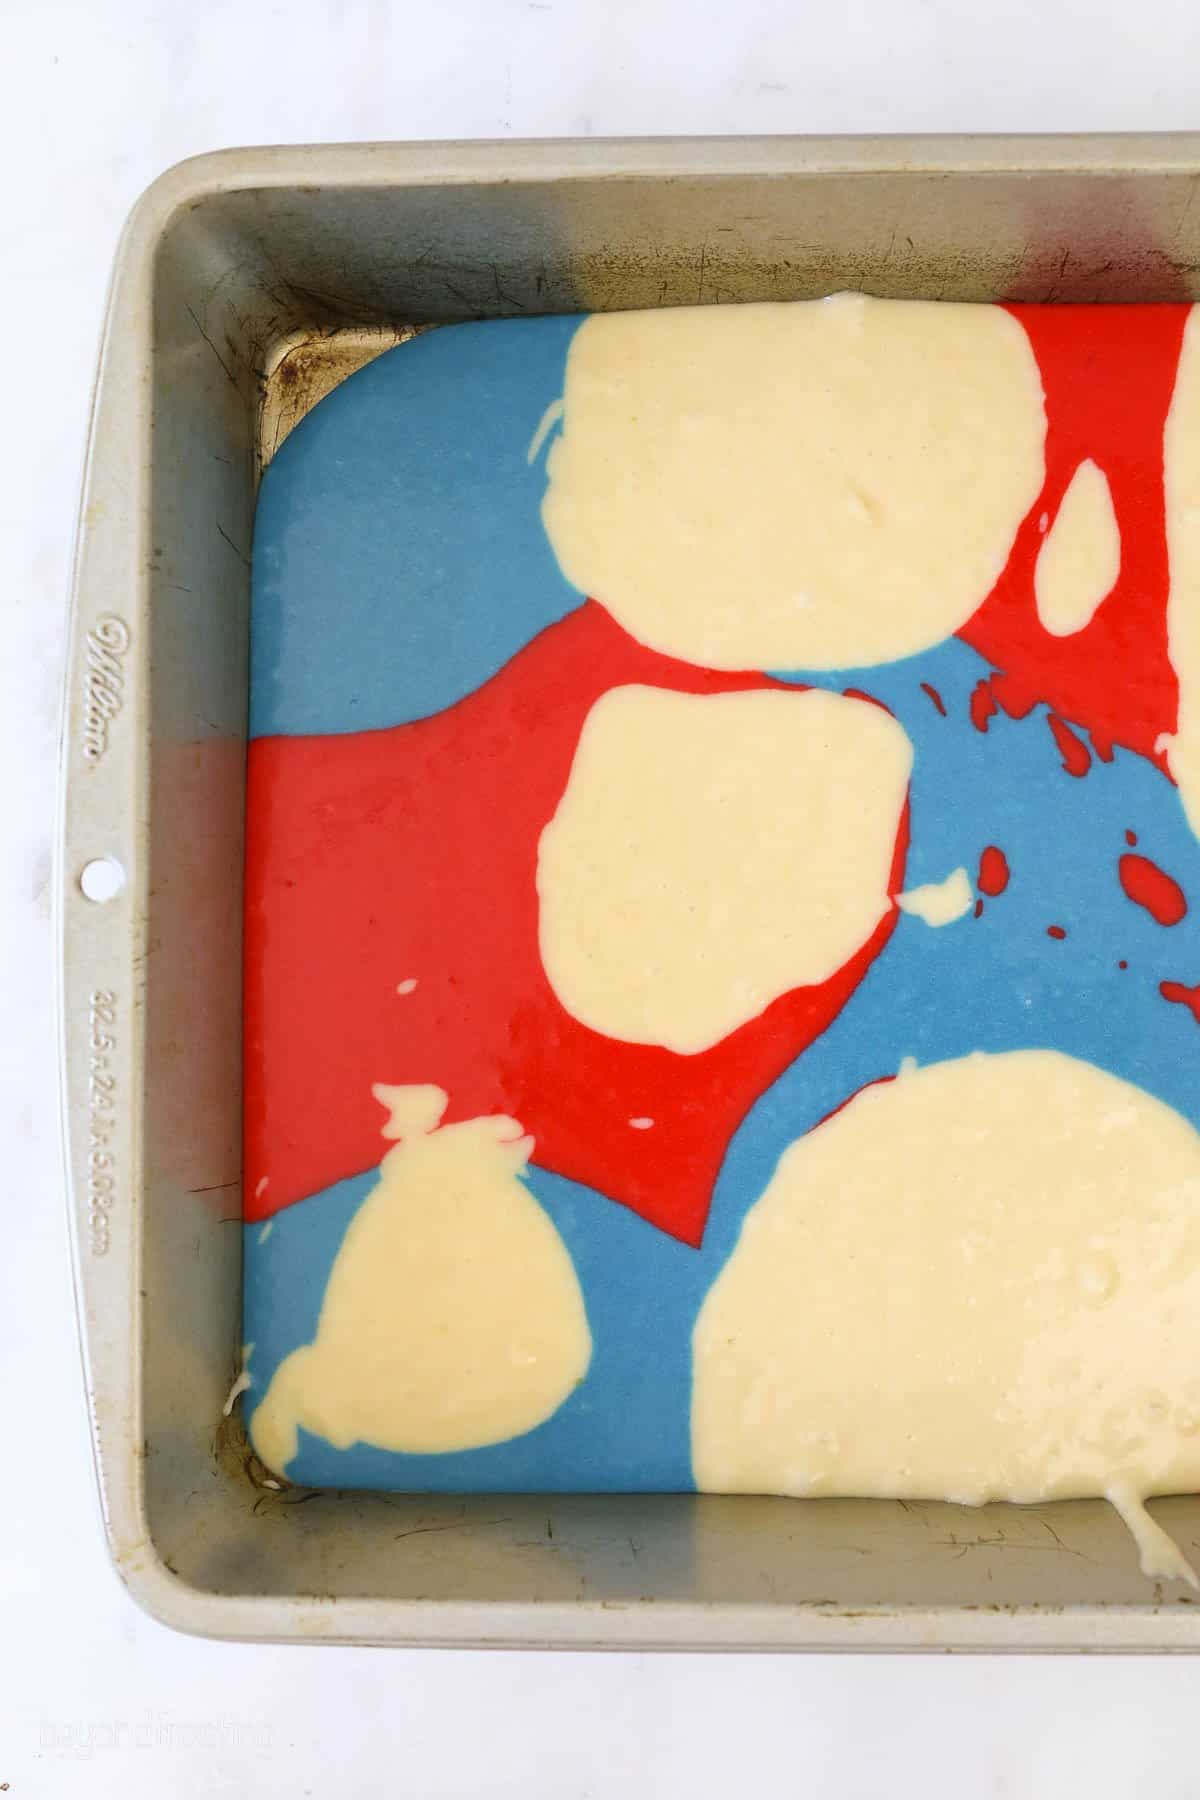
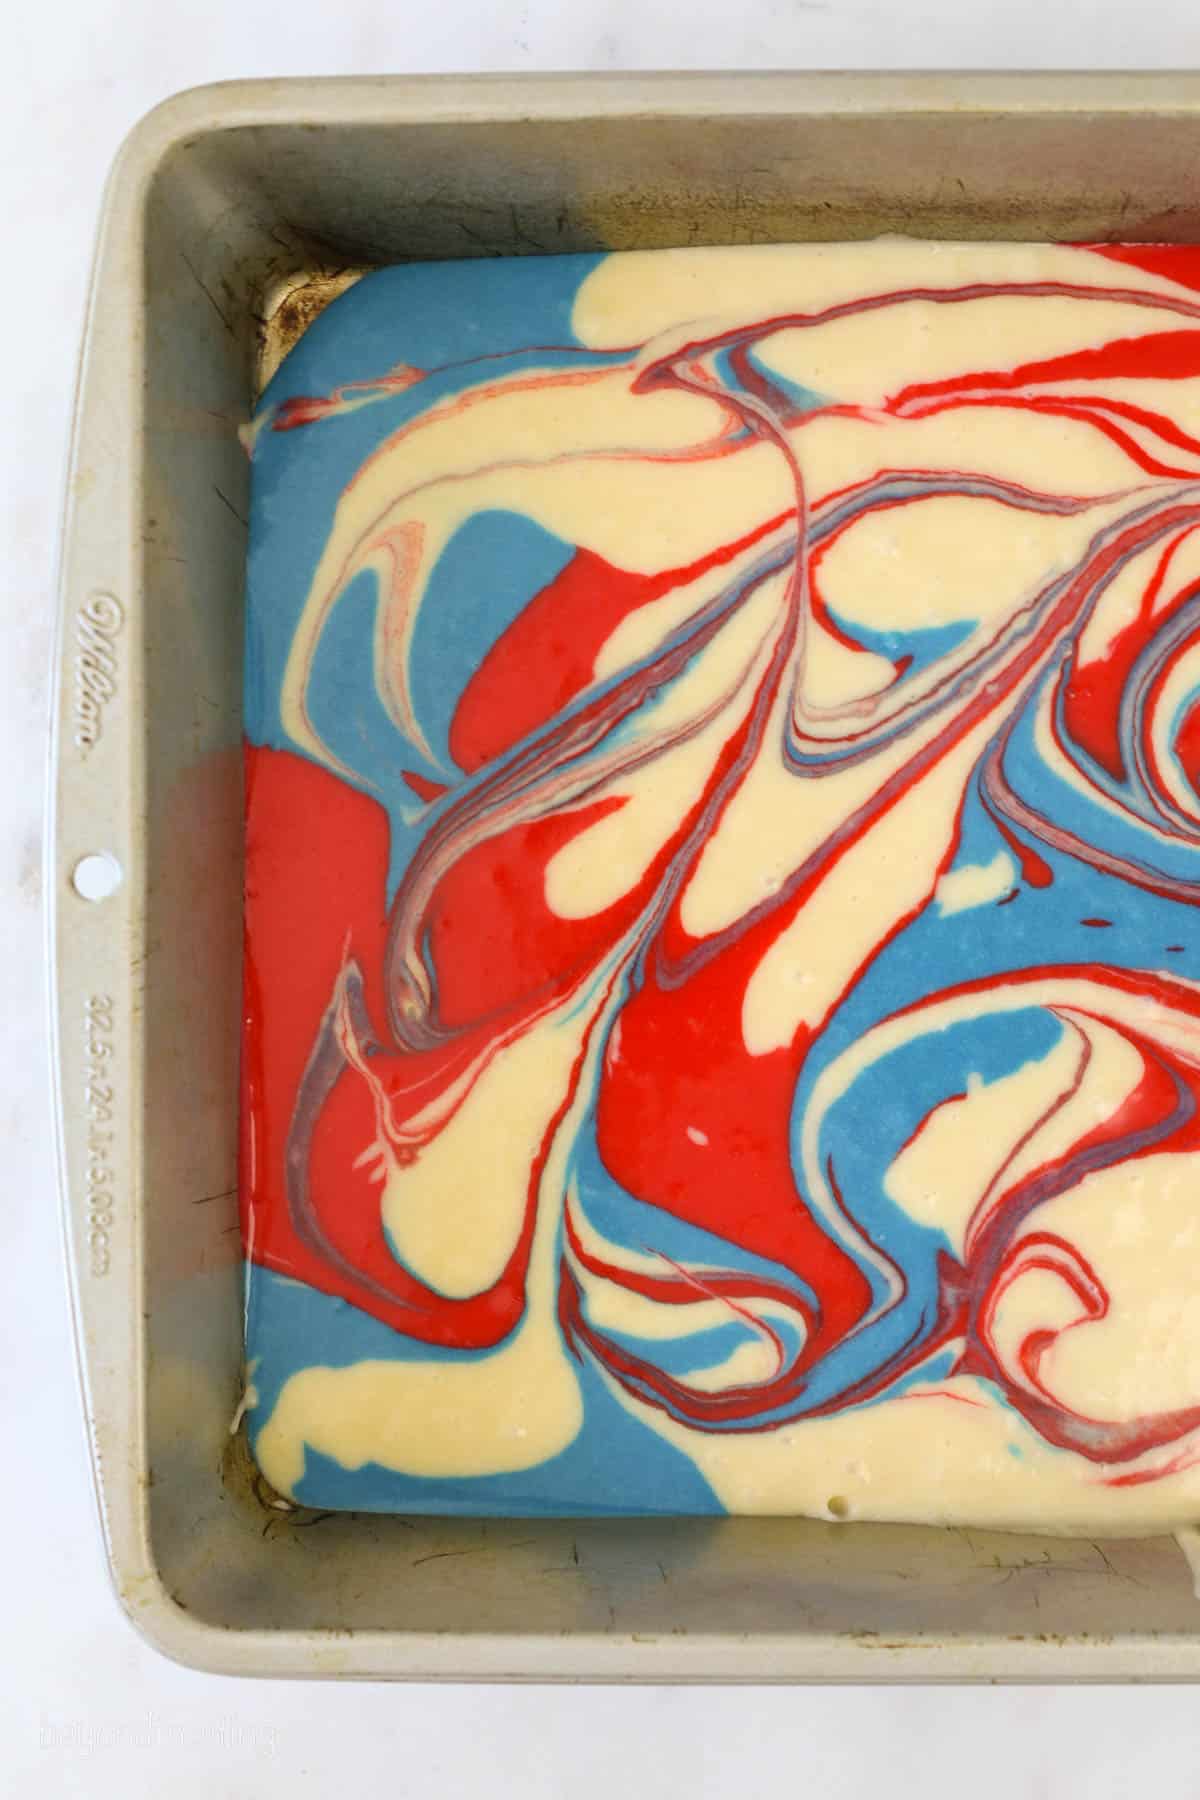
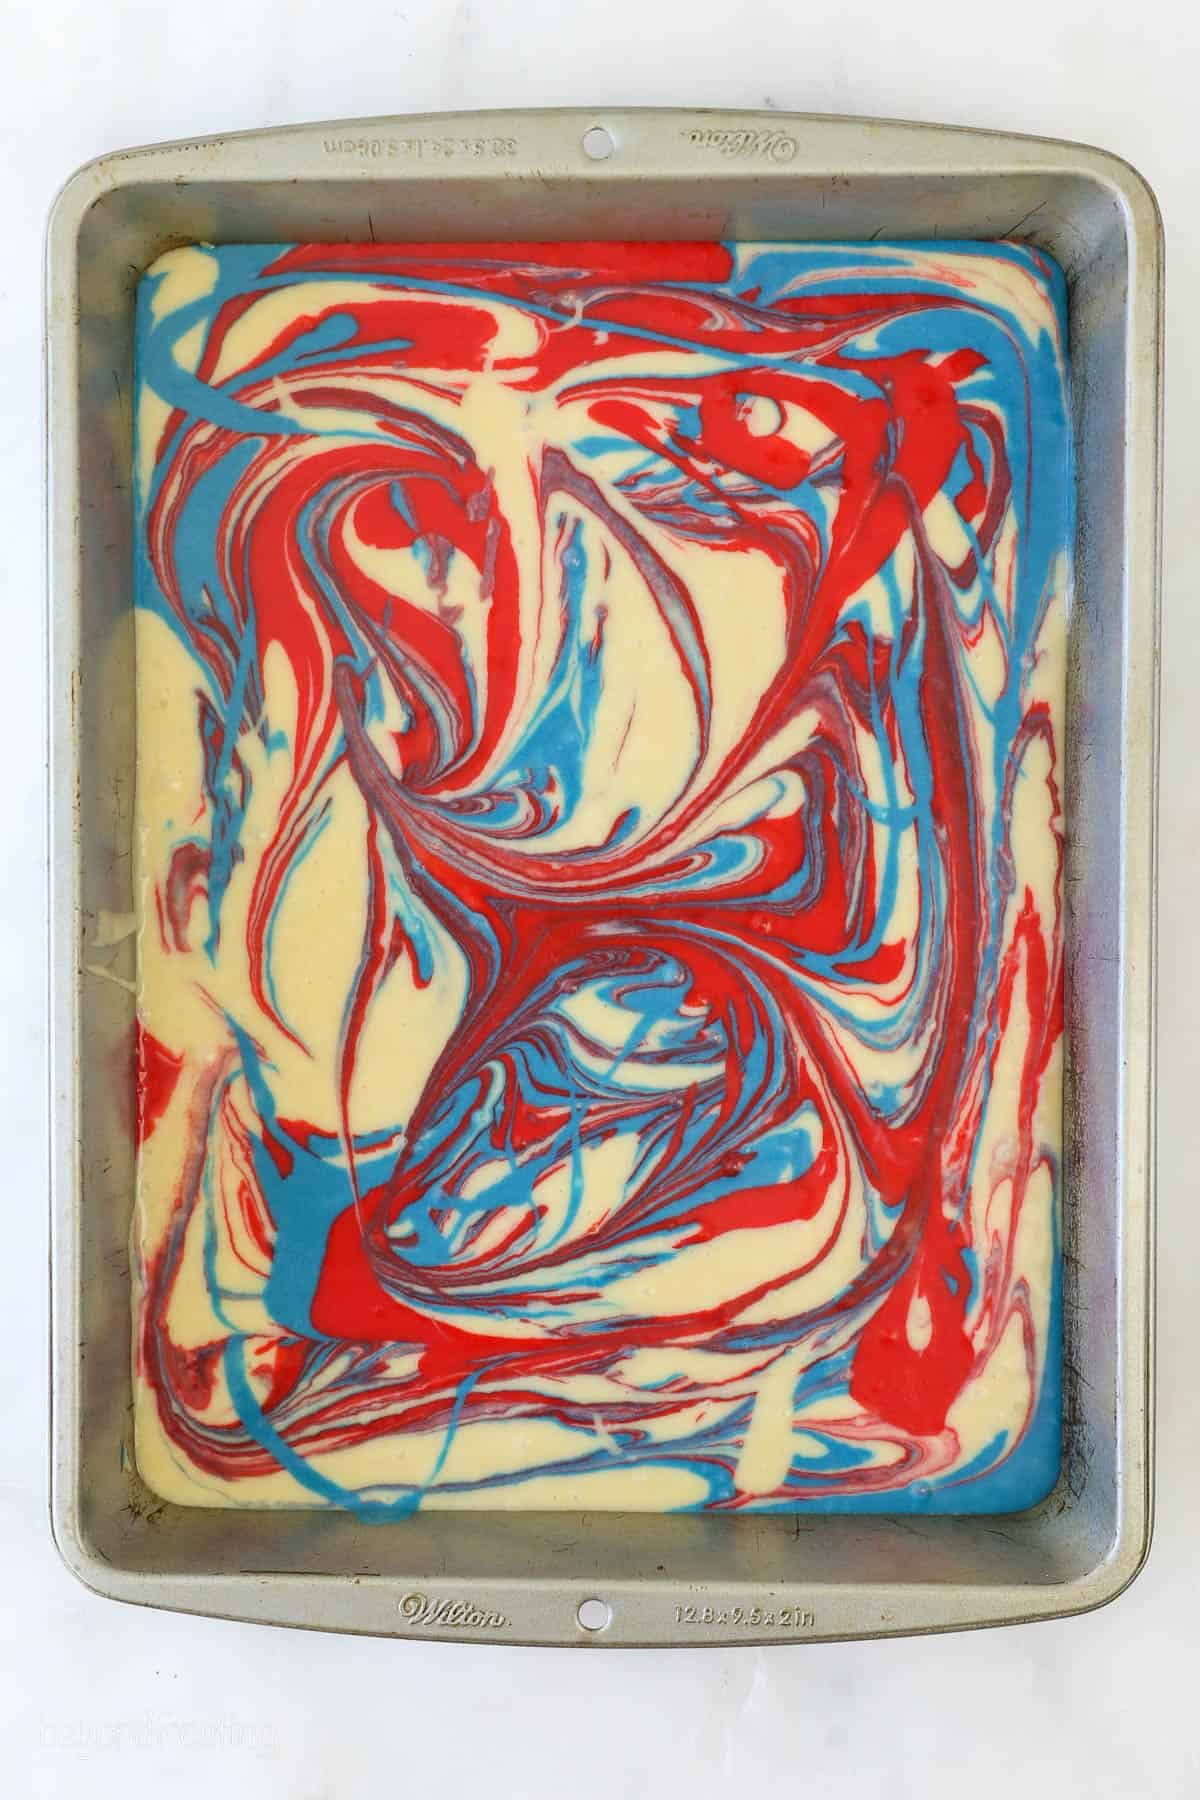
Step 3: Marble the cake. Pour the alternating colored cake batter, layering them in the pan, and swirl with a knife if you want a marbled look. The more you swirl it, the more the colors will be integrated.
Step 4: Bake. Bake the cake according to the recipe instructions. Cool completely.
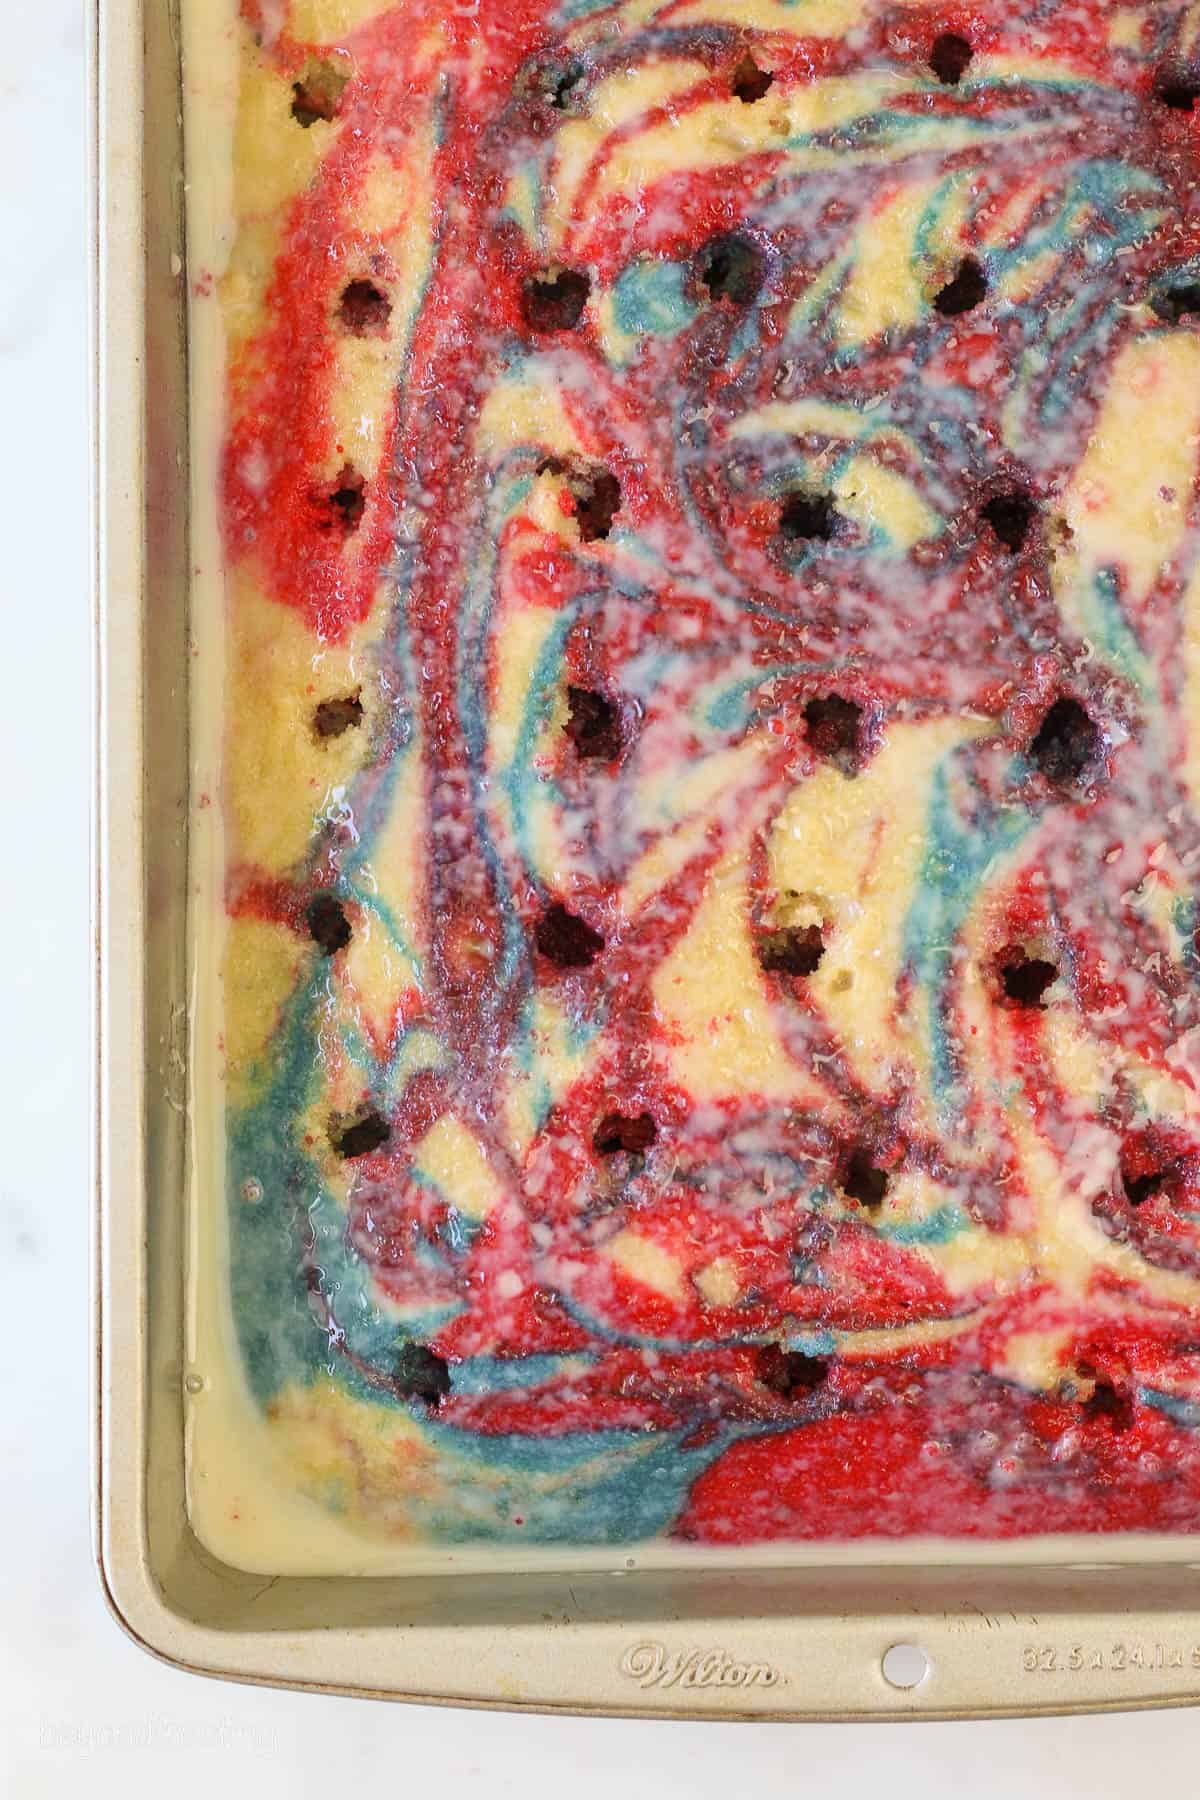
Step 5: Frost and Decorate. Once the cake is cooled, use a wooden spoon or something similar and poke holes all over the top of the cake. Pour the sweetened condensed milk over top and spread gently with a spatula to fill the holes. Once you’re ready to decorate, prepare all the fruit first by washing, dying and slicing accordingly. Then make the frosting, and proceed to decorate.
Step 6: Chill. It’s best if you can give this cake at least an hour’s time to chill before serving so the cake has time to really absorb the condensed milk. This is a great recipe to prepare ahead of time, and I’ve included notes below on how best to do that.
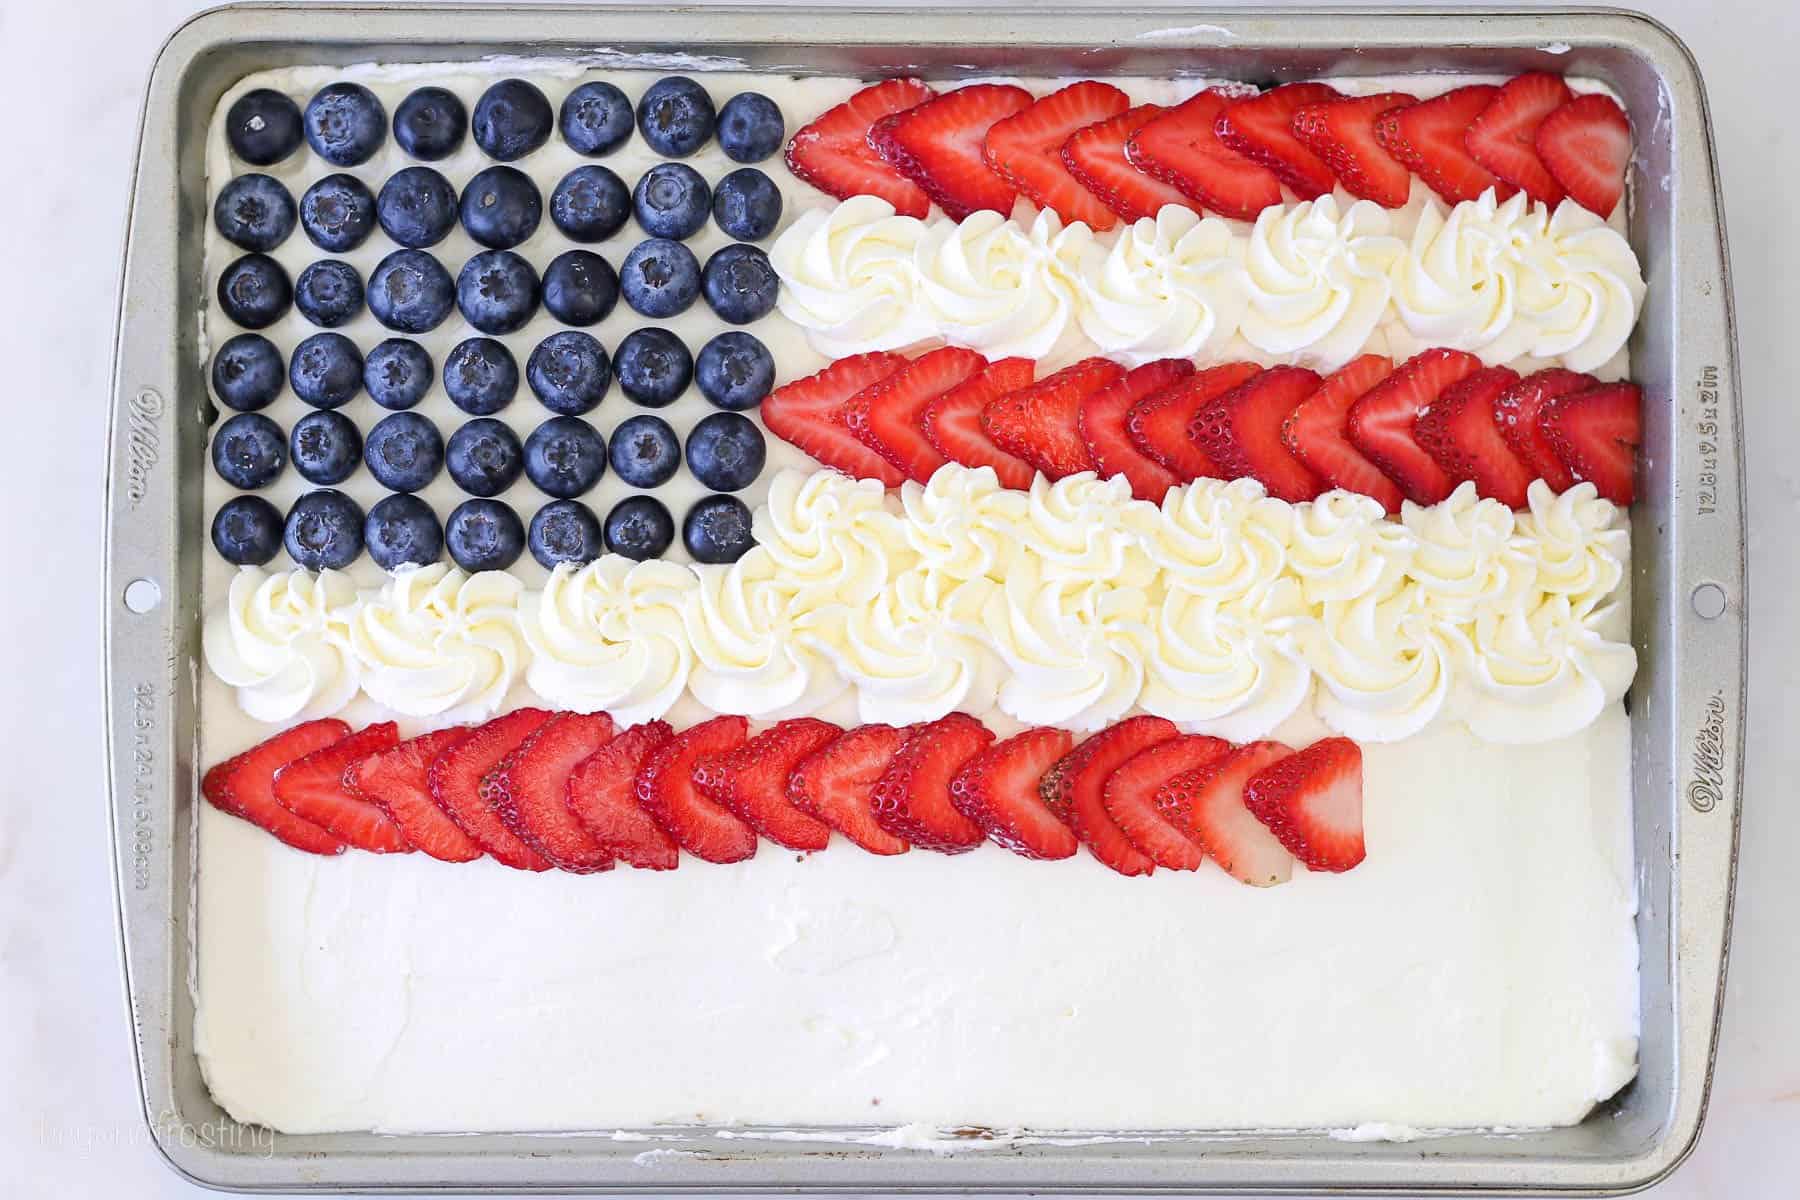
How to Decorate a Flag Cake
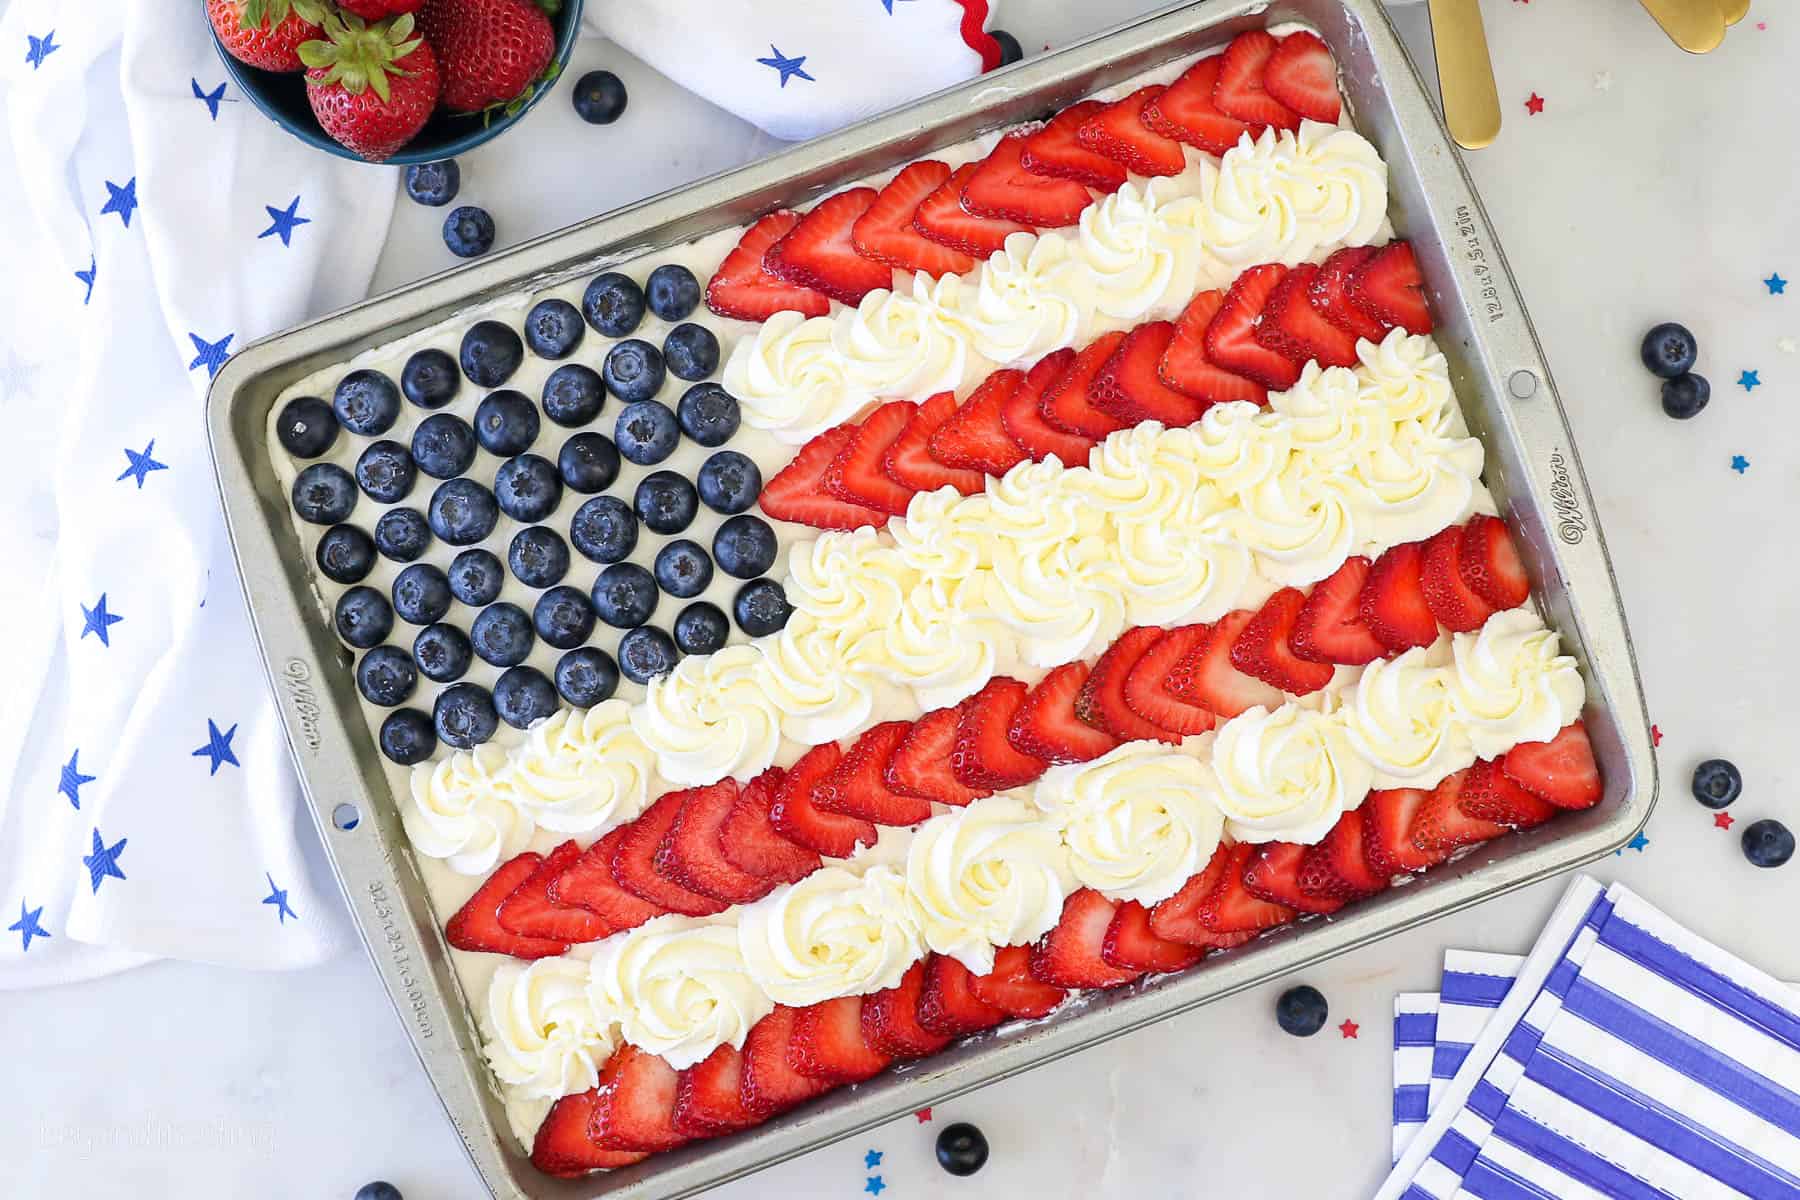
You can decorate this cake however you’d like, but in keeping with my Patriotic theme, I decorated it to look a flag using fresh blueberries and strawberries. See additional tips for preparing this can ahead of time if needed.
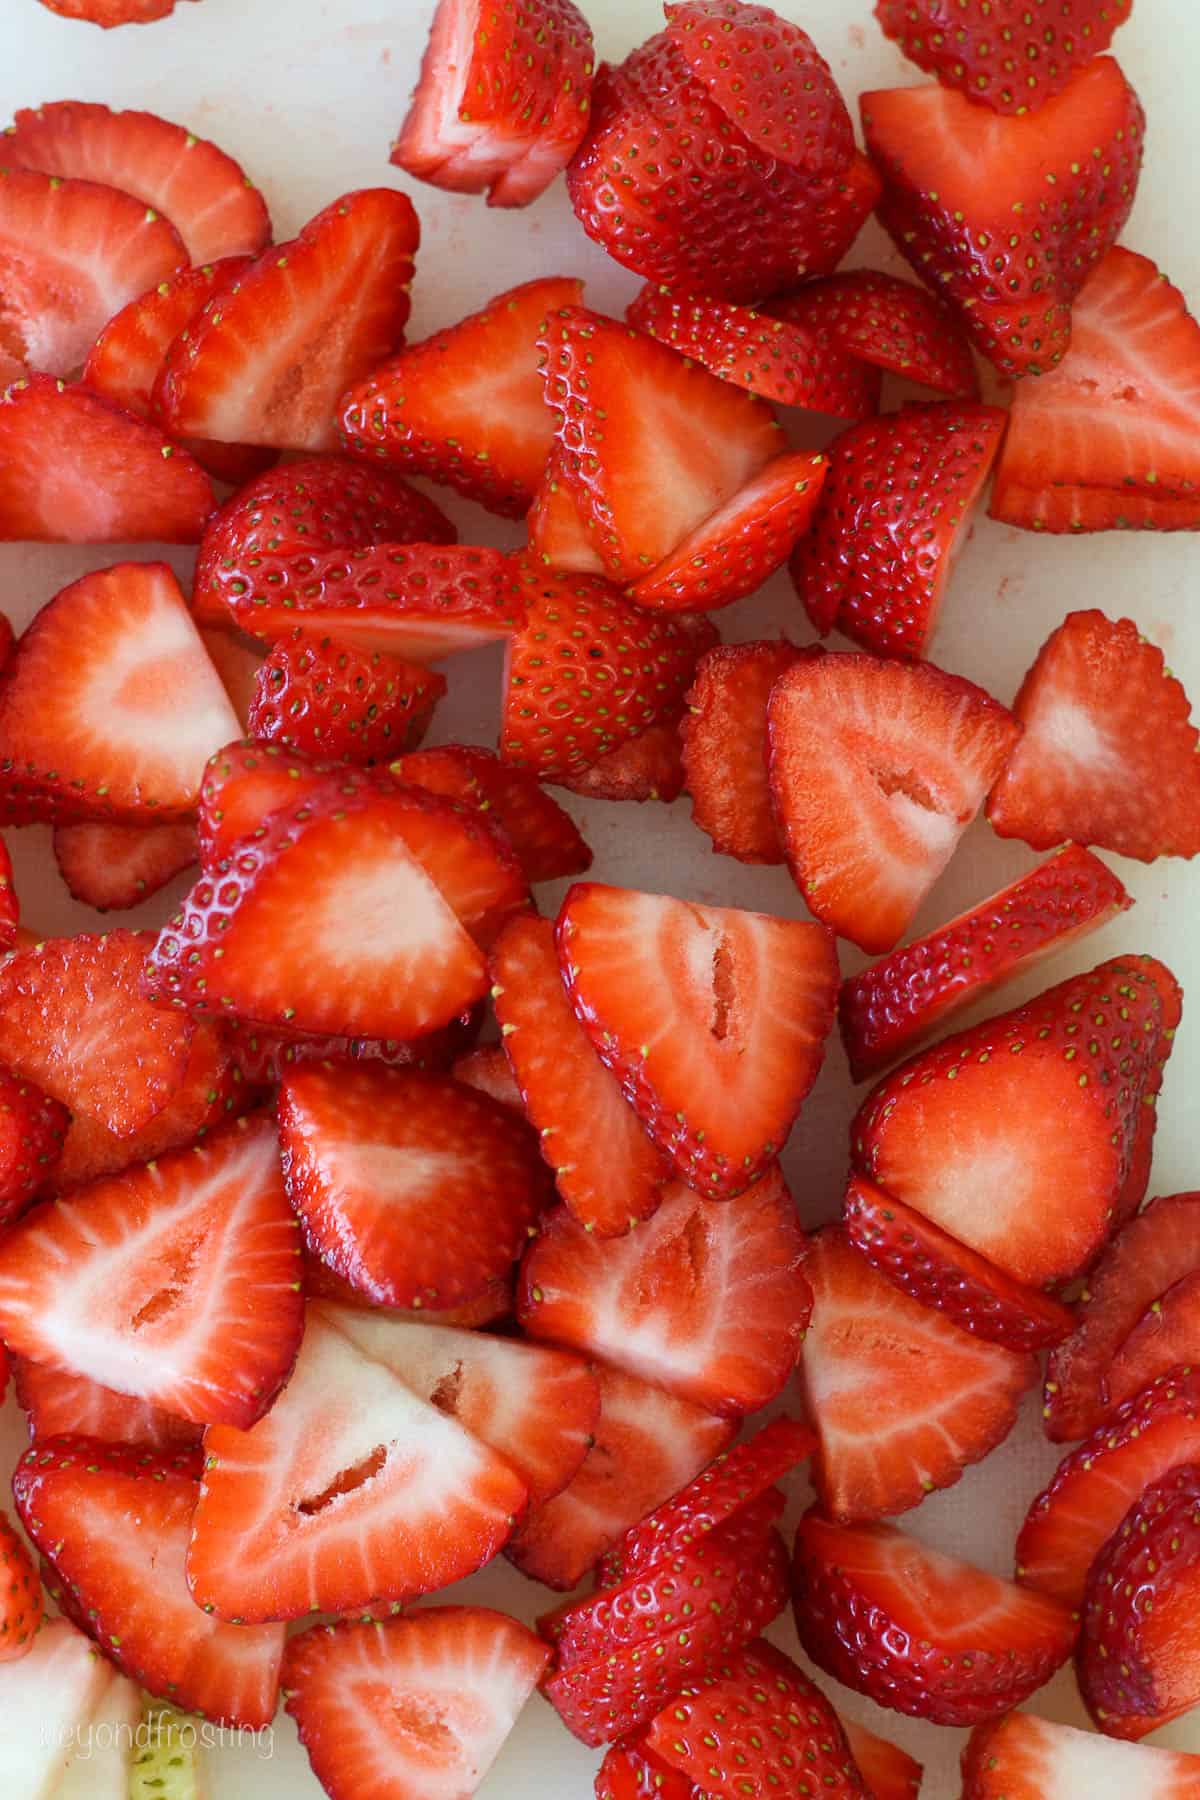
- Wash and dry all the berries. Then slice the strawberries thinly. It’s best to try and keep the strawberries groups together so when you lay them on the cake, you’re placing like sizes together.
- Prepare the whipped cream frosting. If you’ve never made a mascarpone whipped cream before, I recommend reviewing my full tutorial. You’ll want to use a chilled bowl and whisks if possible. Combine the mascarpone with some of the heavy cream and mix until the mascarpone incorporates into a liquid consistency. You’ll slowly stream in more heavy cream as needed and you may need to scrape down the bowl occasionally to help prevent a lumpy frosting. Once all the heavy cream has been added, beat until soft peaks form. Add the powdered sugar and continue beating until stiff peaks form.
- Set aside 2 cups of whipped cream frosting to use to decorate the top. Fill a large piping bag with a 1M piping tip and set it aside. Frost the cake with the remaining whipping cream.
- Place the blueberries in a 7×6 rectangle, placing them close together.
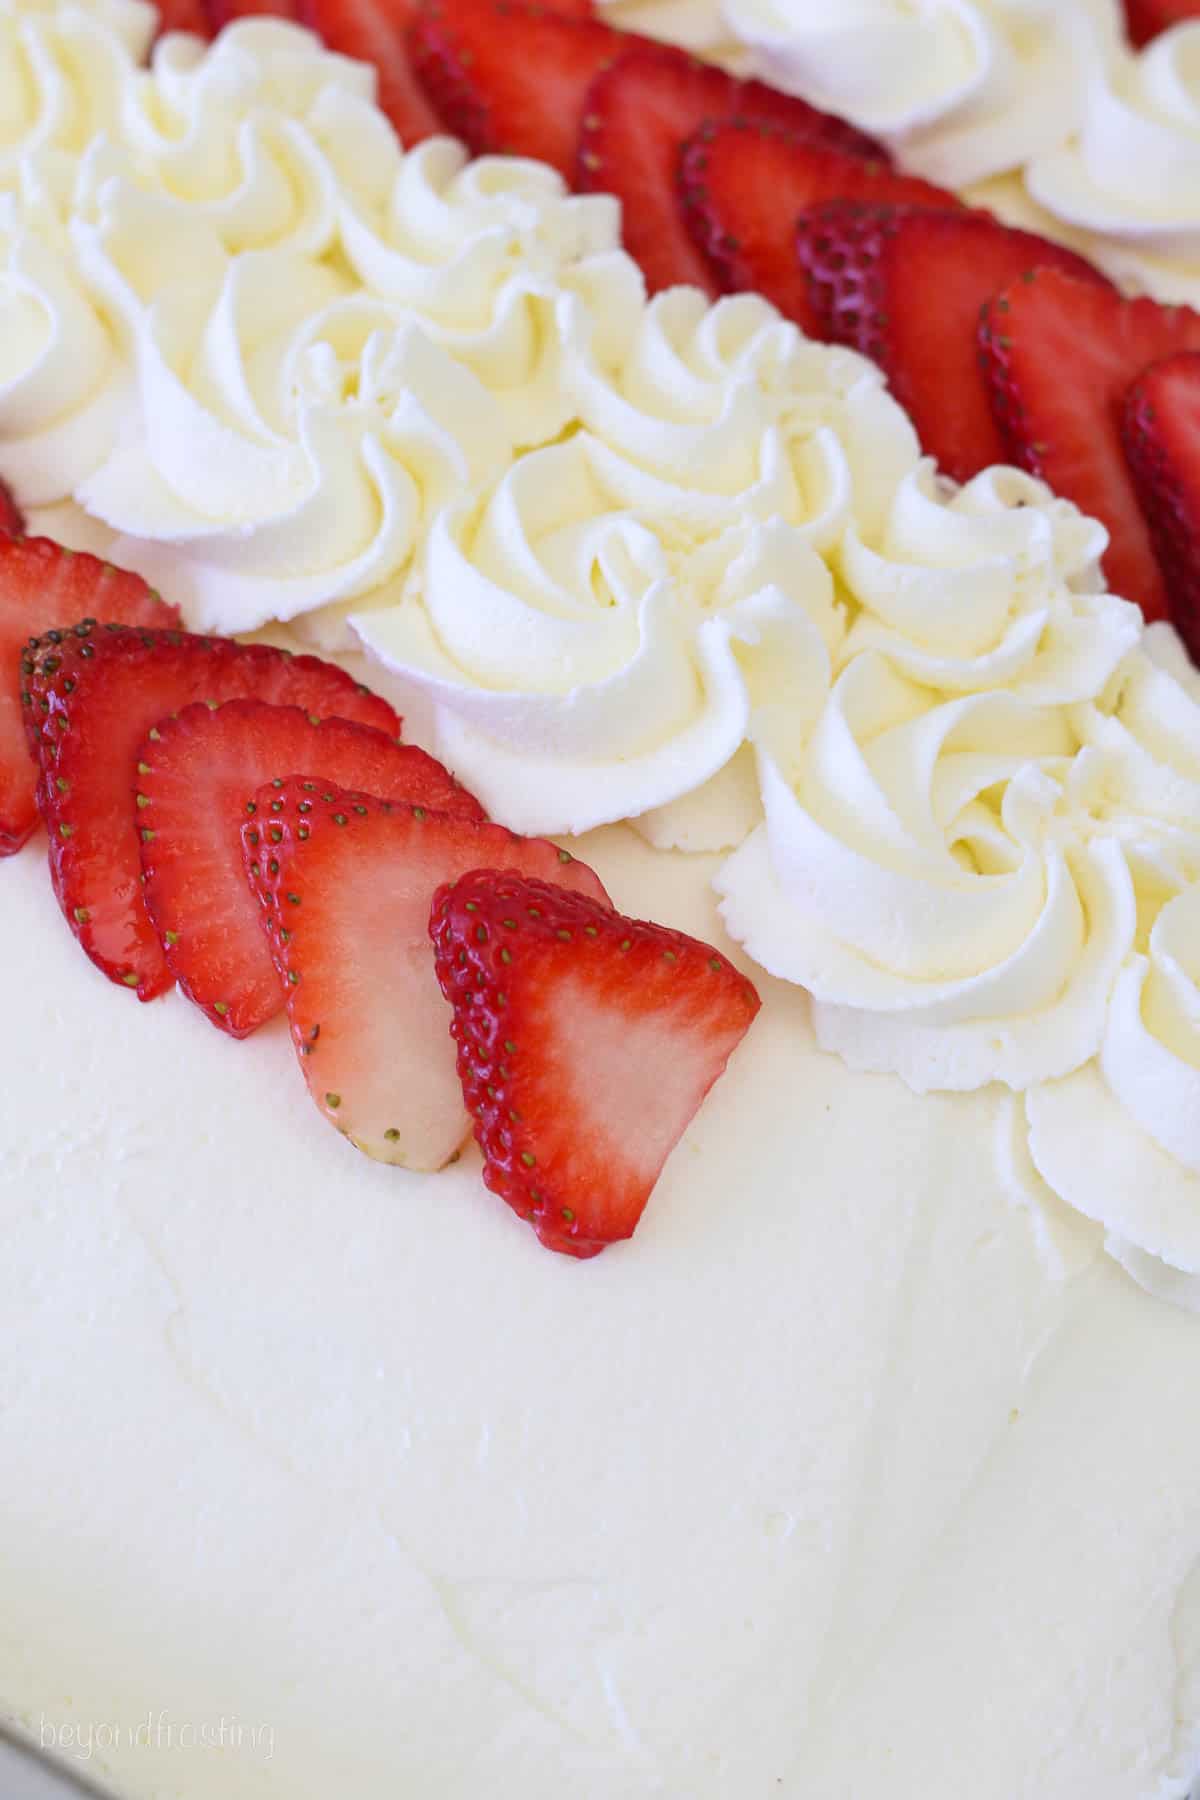
- Then start by laying the strawberries down, one over top of the other in a row.
- Pipe a line of rosettes using the prepared whipped cream.
- Then continue placing the strawberries, and alternating with rows of piped rosettes. You may need to slice the strawberries for the final row in order to fit.
Tips and Tricks for Recipe Success
- Use gel colors for the cake: Instead of traditional food color, I recommend gel colors from Wilton, Americolor or Chefmate. The gel is concentrated and produces bright and bold colors without adding too much coloring.
- Don’t over swirl the cake: If you’d like to see more defined colors, don’t over swirl the cake batter.
- Use Cool Whip: If you’d like to skip the whipped cream frosting (although I highly recommend you try it!), you can use Cool Whip for the topping instead. If you’d like to decorate with the rosettes in between, then use two 8-ounce tubs of Cool Whip, one to frost the cake and one to decorate with.
- Use the same size berries: In the recipe, I recommend buying two 1lb boxes of strawberries so you can find ones that are similar in size and fresh. You won’t use them all on the cake but you can bring the extras to the party and put them out for your guests to enjoy with the cake.
- Prepare it ahead of time: I’ve included a few tips below to do all the prep work ahead of time. Most importantly, dry off extra moisture from the berries. Once the strawberries are sliced, pat them dry with a paper towel.
Preparing and Storing in Advance
You can make the cake up to 2 days in advance, however, poke cakes need to be refrigerated once they’re filled and decorated. The cake is best when the condensed milk has had a chance to absorb into the cake. Allow at least an hour for it to soak up or you can fill the cake and chill it overnight in an airtight container.
For the best results, I recommend adding the whipped topping and berries the day of serving however, you can frost and decorate it the night before if needed. In that case, be sure to really dry the berries and pat away extra moisture off the strawberries with a paper towel, you can even slice them ahead of time too, and bring along any extra berries for your guests to put on top of their cake.
How to Keep a Poke Cake Cold for an Outdoor Party
I know lots of BBQs and parties happen outside in the summer, which makes it harder to serve these types of cakes. If your cake pan doesn’t have a lid, then do your best to tightly wrap it in plastic wrap. Then place the pan in a cooler with some ice or several ice packs to keep it cold until serving. Place the cooler out of the direct sunlight when possible.
More 4th of July Dessert Ideas
Print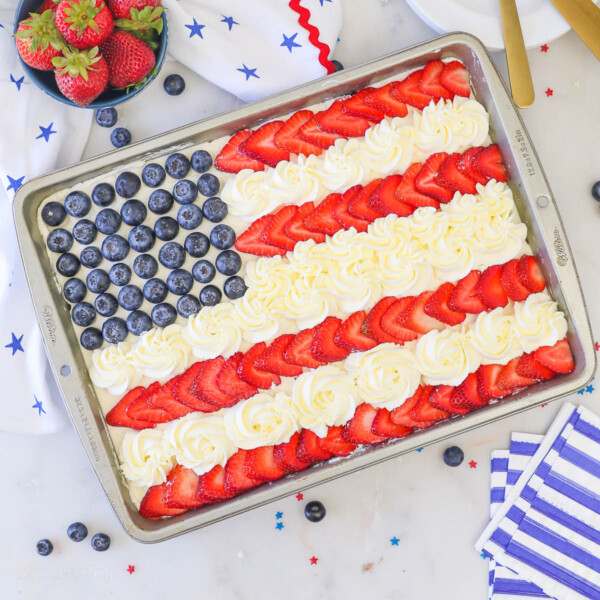
Patriotic Flag Poke Cake
- Prep Time: 45 minutes
- Chill Time: 1 hour
- Cook Time: 28 minutes
- Total Time: 2 hours 13 minutes
- Yield: 15 slices
- Category: Cake
- Method: Baked
- Cuisine: American
Description
The tye dye vanilla cake batter is soaked in vanilla pudding topped with whipped cream and berries decorated like an American flag. You’d be surprised how easy it is to make this cake.
Ingredients
For the Cake
- 1 1/2 cups (285g) granulated sugar
- ½ cup (118 ml) vegetable oil
- 2 tablespoons (28g) unsalted butter, melted
- 2 large eggs
- 2 egg yolks
- 1 tablespoon (15ml) vanilla extract
- 1/2 cup (120g) sour cream
- 2 ½ cups (350g) all-purpose flour
- 2 teaspoons (7.5g) baking powder
- 1 teaspoon (4g) baking soda
- 1 teaspoon (5g) salt
- 1 1/3 cup (315ml) buttermilk or milk
For the Filling
- 1 can (14oz) Sweetened Condensed Milk
For the Topping
- 12 ounces mascarpone cheese
- 2 cups (472) heavy whipping cream
- 1 cup (130g) powdered sugar
- 1 teaspoon pure vanilla extract
- 1 6-ounce container fresh blueberries, rinsed and dried
- 2 1lb containers of strawberries, rinsed and dried
Instructions
For the Cake
- Preheat the oven to 350°F.
- In a large mixing bowl, combine the sugar, vegetable oil, butter, eggs. egg yolks and vanilla extract. Beat on medium speed until well incorporated. Scrape down the bowl as needed. Next mix in the sour cream and beat until well combined.
- In a separate bowl, combine the remaining dry ingredients. Alternate adding half the dry ingredients and half the buttermilk at a time and mix just until the flour starts to incorporate. Then add remaining dry ingredients and buttermilk and beat until well combined. Use a spatula to scrape down the sides of the bowl and stir the batter from the bottom to the top to ensure it’s well mixed.
- To color the cake batter, divide the batter into three bowls. For the white (undeyed batter), measure out 2 cups of cake batter and set side. Divide the remaining batter between other two bowls, about 1 ½ cups each. Use a couple of drops of food coloring in each bowl (1 for red and 1 for blue) and mix thoroughly.
- Alternate and layer adding the 3 different cake batter colors in a 9-inch by 13-inch pan, swirl occasionally with a knife. Bake at 350°F for 25-30 minutes, keeping a careful eye on the baking during the last few minutes. Test for doneness with a toothpick. If inserted into the center of the cake, the toothpick should come out clean. Remove from the oven and allow it to cool completely.
For the Filling:
- Take the end of a wooden spoon or another round object and poke holes all over the top of your cake. Pour a can of sweetened condensed milk over top of the cake and spread gently with a spatula.
For the topping
- Place the mixing bowl and whisk attachment in the freezer for 5 to 10 minutes to chill.
- Spoon the mascarpone cream into your bowl and beat on a medium-low speed (speed 3 on your stand mixer). Slowly pour in the heavy cream, about 1 cup, allowing the mascarpone cheese to turn to a liquid consistency.
- Add the remaining heavy cream then increase the mixing speed to high (speed 8-10) and beat it until soft peaks form.
- Next, add the powdered sugar and vanilla extract, beating on low until sugar is incorporated. Continuing beating at a high speed until stiff peaks form.
- Set aside 2 cups of the prepared whipped cream in a large piping bag filled with a 1M piping tip.
Decorating
- Rinse and thoroughly dry the berries. Thinly slice the strawberries length-wise. You will not need 2 full containers, so pick out the ones that a freshest and similar in size to one another.
- Spread the remaining frosting over top of the cake after you’ve filled it with the sweetened condensed milk.
- Line the blueberries in a rectangle 7 across the top and 6 down the side, placing side by side.
- Then start laying the strawberries down, one over top of the other in a row from left to right.
- Pipe a line of rosettes using the prepared whipped cream.
- Then continue placing the strawberries, and alternating with rows of piped rosettes. You may need to slice the strawberries for the final row in order to fit.
- Chill for at least 1 hour or overnight.


Notes
- You can use a cake mix instead of making a homemade cake
- Don’t have buttermilk? Make this easy substitute with lemon juice or vinegar.
- For the topping: Substitute Cool Whip for the topping instead of making whipped cream. If you’ve never made a mascarpone whipped cream before, read my full tutorial for helpful advice. The mascarpone can also be swapped out for cream cheese.
- Filling: If you don’t want sweetened condensed milk, this is also good with an instant vanilla pudding filling. Mix the pudding mix and milk and pour over top of the cake when it’s still in liquid consistency. Chill the cake until the pudding is set and then decorate.
- Storage and make-ahead options:
You can make the cake up to 2 days in advance, however, poke cakes need to be refrigerated once they’re filled and decorated. For the best results, I recommend adding the whipped topping and berries the day of serving however, you can frost and decorate it the night before if needed. In that case, be sure to really dry the berries and pat away extra moisture off the strawberries with a paper towel.
Nutrition
- Serving Size: 1 slice
- Calories: 502
- Sugar: 40.9 g
- Sodium: 308.9 mg
- Fat: 26.9 g
- Saturated Fat: 18.4 g
- Carbohydrates: 60.3 g
- Fiber: 2.1 g
- Protein: 6.9 g
- Cholesterol: 95.7 mg


This cake turned out beautifully and the flavor was amazing! The only issue I ran into was with the frosting instructions — specifically how the mascarpone whipped cream is listed.
The recipe instructions say: “12 oz mascarpone whipped cream,” which made me pause — it sounded like I needed to make mascarpone whipped cream separately ahead of time, and then use 12 oz of that in the frosting. Luckily, I caught the confusion before I started mixing and realized that what the recipe actually meant was 12 oz of mascarpone cheese, which gets whipped with the cream and sugar to make the frosting.
If the recipe were updated to say “12 oz mascarpone cheese” instead of “mascarpone whipped cream,” it would save readers from second-guessing or underbuying ingredients. Just a small wording tweak would make a big difference!
Otherwise, it’s a fantastic recipe — especially that mascarpone frosting. I’ll definitely make it again!
Hi Cristina, I am so glad you enjoyed the cake! Thank you for the additional feedback, I will go and make those updates so it’s more clear. You’re right, the text is misleading!
I made this cake for a birthday party. I made one change. I switched out the condensed milk with cheesecake pudding (since I had that in the cupboard). It was the most delicious cake I have ever eaten. The frosting is light and not too sweet. Everyone at the party raved over it and said it was the best cake they have ever had. Thank you for the recipe. I will be making it again.
Amazing Michelle! Thank you so much for sharing. Pudding is a wonderful filling!