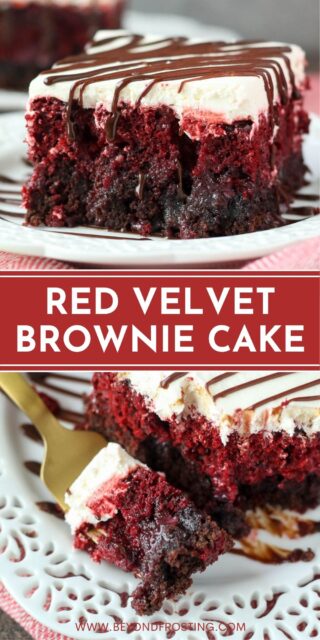
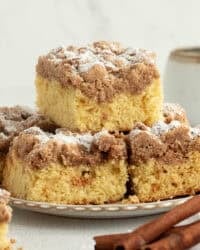
A fudgy brownie meets a moist and tender red velvet poke cake in this mouthwatering dessert. Topped with a simple cream cheese frosting and a drizzle of hot fudge, you’re going to obsess over this Red Velvet Poke Cake!

The Best Red Velvet Poke Cake
Imagine that the fudgiest brownie of all time had a baby with the most crave-worthy red velvet cake. This indulgent dessert is more delectable than anything you could dream up! It all bakes in the same pan at the same time with two separate box mixes.
Why You’ll Love This Poke Cake Recipe
- Easy. It’s an incredibly easy recipe that results in a truly heavenly treat.
- Decadent. The magic happens once the sweetened condensed milk soaks into the still-warm brownie cake. And the simple whipped cream cheese frosting on top is almost like a layer of no-bake cheesecake. You’re welcome! Oh, and don’t forget about the drizzle of hot fudge that finishes it off. Don’t you just want to sink your teeth right in?
- Crowd pleaser. This is the perfect recipe to take to potlucks or to whip up for gatherings. Everyone will devour this dessert and be so impressed by your baking prowess! (No need to tell them how easy it was to make this poke cake.)
If you’re a poke cake lover like me, you may also want to check out my top 15 most popular poke cakes!

What You’ll Need
Here’s a quick look at what you’ll need to make a red velvet poke cake. Be sure to scroll down to the recipe card below for a full ingredient list.
For the Red Velvet Brownie Cake
- Red Velvet Cake Mix: Use your favorite brand.
- Fudge Brownie Mix: Make sure it’s the “family size” for a 9×13 inch pan
- Egg, Oil & Water: Each mix will give you the specifics on what exactly to use and how much.
- Sweetened Condensed Milk: This keeps the cake super soft and moist.
For the Whipped Cream Cheese Frosting
- Cream Cheese: Brought to room temperature.
- Cool Whip: Or Homemade Whipped Cream.
- Hot Fudge: To garnish the cake.

How to Make a Red Velvet Poke Cake
This recipe could not be simpler or more straightforward. You just have to make the cake and brownie batters, pour them into a pan, bake, poke, pour in the sweetened condensed milk, add the frosting and slice it up!
- Preheat Oven: Preheat the oven to 350°F.
- Make Cake Batter: Add the cake mix and the ingredients listed on the box to a mixing bowl. Mix well until all of the ingredients are combined. Pour the batter into a 9×13-inch pan.
- Make Brownie Batter: Add the brownie mix and the ingredients listed on the box to a different mixing bowl. Mix until everything is well combined. Pour the brownie batter overtop the cake batter.
- Bake: Bake your brownie cake in the preheated oven for 30-35 minutes. Remove the cake from the oven and allow it to cool for at least 30 minutes.
- Poke Holes: While the cake is still warm, use the end of a wooden spoon or another round object to poke holes all over the top of the cake.
- Add Condensed Milk: Pour the sweetened condensed milk evenly overtop the cake until the can is empty. Allow the cake to absorb the condensed milk until it has cooled completely.
- Make Topping: Add the cream cheese and the Cool Whip to a mixing bowl. Beat on medium speed for a few minutes until well combined. Spread the frosting over the completely cooled cake. Add a drizzle of hot fudge if desired.
- Enjoy! Cut and serve the cake or refrigerate it in an airtight container if you’re not enjoying it immediately.

Tips for Success
That’s all there is to it! Though I do have a few helpful tips and tricks to make sure your poke cake comes out perfectly every time:
- Watch the clock. Be careful not to overbake the cake. Take it out just before all of the brownie areas are fully baked – they’ll continue to set as the cake cools. The cook time will vary by oven and the type of pan used, so keep a close eye on your cake, especially in those last few minutes of baking.
- Don’t skip the sweetened condensed milk. Since this cake has to be stored in the fridge due to the cream cheese topping, the condensed milk helps it stay wonderfully moist and tender. It really wouldn’t be the same without it!
- Add the condensed milk while the cake is warm. Your cake should not be hot when you pour in the sweetened condensed milk, but it should definitely still be warm. I suggest letting it cool for about 30-40 minutes.
- Want to make a homemade topping? If you’d prefer not to use Cool Whip, then I would suggest making this cream cheese whipped cream, which is essentially the same topping, just made with whipped cream instead of Cool Whip.

Variation Ideas
You can easily get creative with this cake by making an adjustment or two to the recipe. Here are a few clever ideas!
- Different cake mix: I adore the red velvet and brownie combo, but this treat would also taste amazing with any other flavor of cake. There are tons of possibilities! This recipe was inspired by Cookies & Cups who made a funfetti version.
- Nutella instead of hot fudge: Everyone loves chocolate hazelnut spread, and you can certainly drizzle it over this cake instead of the hot fudge if you’d like. Simply scoop some Nutella into a plastic bag, cut off the corner and squeeze it out over the cake.
- Chocolate cream cheese frosting instead of Cool Whip: If you’re a die-hard chocoholic, you may want to forego the frosting included with this recipe in favor of some Chocolate Whipped Cream Frosting. It’s super easy to prepare!
- Caramel drizzle: If you’re a fan of topping your brownies with caramel sauce, you’re going to love drizzling it over this cake as well. The caramel drizzle makes this poke cake reminiscent of a Better Than Sex cake.
How to Store a Poke Cake
Cover the top of your baking dish tightly with saran wrap or cut your cake and store the slices in an airtight container. Either way, the cake will keep in the fridge for 3-4 days.
Can I Freeze It?
If you leave off the whipped cream cheese topping and add it after the thawing process is complete, you can freeze this cake for up to 1 month. Wrap it tightly in plastic wrap and store it in a freezer-safe container. Thaw it out in the fridge before frosting and serving it.
Print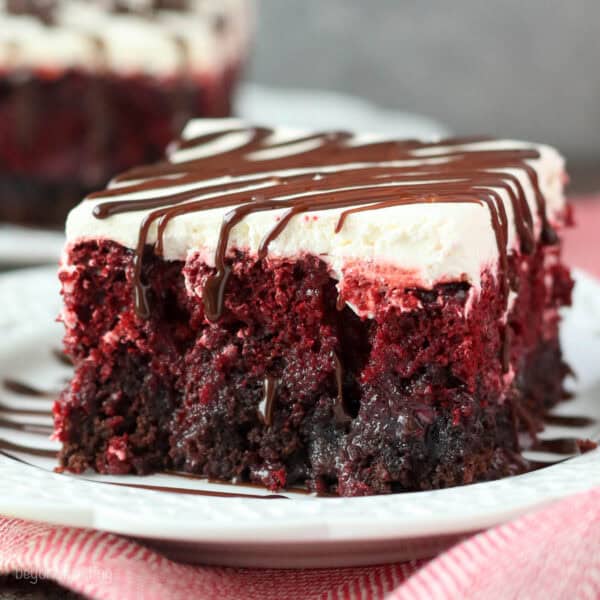
Red Velvet Poke Cake
- Prep Time: 20 minutes
- Cook Time: 28 minutes
- Total Time: 48 minutes
- Yield: 15
- Category: Dessert
- Method: Oven
- Cuisine: American
Description
A fudgy brownie meets a moist and tender red velvet poke cake in this mouthwatering dessert. Topped with a light 2-ingredient cream cheese frosting and a drizzle of hot fudge, you’re going to obsess over this Red Velvet Poke Cake!
Ingredients
For the Red Velvet Brownie Cake
- 1 Box (15oz) Red velvet cake mix
- (plus ingredients on the box- egg, oil, water)
- 1 Box (18oz) Fudge brownie mix
- (plus ingredients on the box- egg, oil, water)
- 1 jar (14 oz) Sweetened condensed milk
For the Whipped Cream Cheese Frosting
- 1 pk (8oz) Cream cheese, at room temperature
- 1 container (8oz) Cool Whip, thawed – or Homemade Whipped Cream
- Hot Fudge for garnish
Instructions
- Preheat oven to 350°F.
- In a mixing bowl, combine red velvet cake mix with ingredients list on the box. Mix well until all ingredients are combined. Pour batter into a 9×13” pan.
- In a mixing bowl, combine brownie mix with ingredients listed on the box. Mix well until all ingredients are combined. Pour brownie batter over top of red velvet batter.
- Bake in preheated oven for 30-35 minutes. Remove from oven and allow cake to cool for at least 30 minutes.
- While the cake is still warm, take the end of a wooden spoon or another round object and poke holes all over the top of your cake.
- Pour can of sweetened condensed milk over the top of cake and allow it to absorb in the cake until cake is cooled. Let set until completely cooled.
- While cake is cooling, prepare the chocolate cream cheese topping – in a mixing bowl, combine the cream cheese with the Cool Whip (or whipped cream). Beat on medium speed for a few minutes until well combined. Spread over the completely cooled cake. Garnish with hot fudge.
- After adding the cream cheese frosting, the cake must be refrigerated.
Notes
- Homemade topping: If you’d prefer not to use Cool Whip, then I would suggest making this cream cheese whipped cream, which is essentially the same topping, just made with whipped cream instead of Cool Whip.
- To Store: Keep cake in an airtight container in the fridge for 3-4 days.
- To Freeze: Leave off cream cheese topping, wrap cake tightly in plastic wrap and store in a freezer-safe container for up to 1 month. Thaw in the fridge before frosting and serving.
- Baking times: The cook time will vary by oven and the type of pan used, so keep a close eye on your cake, especially in those last few minutes of baking. Take it out just before all of the brownie areas are fully baked – they’ll continue to set as the cake cools. Over baking will cause this cake to be dry.
Nutrition
- Serving Size: 1 slice
- Calories: 629
- Sugar: 52.9 g
- Sodium: 433.9 mg
- Fat: 33.2 g
- Carbohydrates: 76.2 g
- Fiber: 0 g
- Protein: 8.5 g
- Cholesterol: 89.4 mg
Filed Under:
Discover More Dreamy Red Velvet Recipes
There’s something so luxurious about a red velvet dessert. You’re sure to enjoy the following recipes!
- Homemade Red Velet Cupcakes


Gorgeous and yummy!
Oh… I always hate being home by myself too. I usually sleep with a bat because I freak out at night… haha.. I know I”m weird.
You are killing me with these sweet treats girl, they are always gooey and dripping with something and the chocolate… oh the chocolate! YUM! Pinned this one! 🙂
Ok…now I hate that I’ve gone low carb! I saw the picture and HAD to look at this recipe. Maybe I’ll make it for the hubs for Valentine’s day and just taste it! Lol!
HAHA! Yes, this is by far not a low carb recipe LOL, but I think you made it for your Husband, he would be willing to give you a bite!
These look amazing! To clarify: the brownie mix you used – was that for a 9×13 pan or the smaller 8×8? Thanks!
Hi Dawn! The brownie mix was for a 9×13″ pan.
Thanks for sharing this with us at our Marvelous Monday Party! Pinning and hope to see you again next week! We love your treats!!
Aw thanks so much Deb!
Magical. Just magical 🙂 Pinned and shared on FB!
Thank you Trish and thanks for sharing!
Oh my! I think I am in love!!!! Thank you for sharing such a wonderful recipe!
You’re welcome Amy. Thank you!
This seriously looks unbelievably divine!! Totally drooling here!!
Thanks Jocelyn!
I don’t usually eat sweets, but I have a soft spot for red velvet cake. This looks absolutely delicious! Also, I love the little stand you used in your photographs. So cute!
Thanks Anna! It’s the Martha Stewart collection at Macy’s. I bought 3 of them and I seriously use them ALL the time.
I wonder if I can do these as cupcakes? We’re having “cupcake wars” at work this Friday and I’m sure those would be the big winner!!
Hi Dena- perhaps that possible, the cupcakes will be a little gooey, so don’t poke the holes all the way to the bottom! Let me know how it works out!
so far, so good … the milk was a bit gooey … I took them out of the wrappers and put them in a 9 oz plastic wine glass …. ready for a fork and cupcake wars tomorrow!
That’s great Dena! I hope you had fun with your Cupcakes Wars!
I’m already in love with this dessert and haven’t even try it. I must make this soon!! I also made Red Velvet Gooey Bars! This time of the year brings the red velvet out in all of us!
I know right?! Everyone thing on Pinterest is Red Velvet!
This looks absolutely amazing!! Thanks for sharing!
Thank you Brenda!
This looks amazing! Are you really supposed to combine the hardened chocolate with the cream cheese? From your picture, it looks like you just broke up the chocolate and used it as a garnish on top.
Hi Jen- there are two different chocolate in this. The white chocolate cheesecake frosting is what the hardened chocolate is mixed in. I used milk chocolate shavings for a garnish. I hope that helps. Thanks!
I”m sorry I’m a little confused. I was reading all your comments and you mention white chocolate cheesecake frosting. I dont see anything about white chocolate above in the recipe. Sorry if I’m just missing something.
The original recipe was slightly different, it was updated in 2017 and I eliminated the white chocolate
You had me at the frosting. These look gooey-lishous. Nicely presented too.
Thank you Miss Debbie!
This looks and sounds amazing! I love the cake/brownie combo!
I know what you mean about baking when you have the house to yourself – I go crazy trying to get as much done as I can. Enjoy the baking time! 🙂
Totally- I photographed 5 recipes today, that a total record for me! Just trying to catch up before BYBC 🙂
We love red velvet this time of year. I’m always on the look out for new recipes, this looks delicious! Can’t wait to try it 🙂
Thanks Layla!
Your desserts are always so decadent and amazing Julianne! I love this Red Velvet Brownie Cake! I actually just made red velvet gooey bars myself though very different from yours. I love how you combined these with three of my favorite things; red velvet, brownies, and cheesecake!!! Great combination. Pinned!!
Oh I was totally going to try a red velvet gooey bar. I can’t wait to see yours!
This cake looks insane, good insane. I don’t know what I’d do if I piece was put in front of me!
Thank you Susan!
I totally understand, my boyfriend is still on winter break so I’ve been using my free time to catch up on all things baking before he gets back. This cake looks absolutely decadent and I’m just afraid that once I start digging my fork into it I won’t be able to stop! Frosting+cake+brownies what’s not to like!?
Hahah sometimes I worry that I am trying to get TOO much done!
Whats the oven temp?
Cake and brownies in the same pan!? Ahh, this looks incredible! Just like the red velvet waffles. White Chocolate Cheesecake Frosting sounds like something I could eat with a spoon, but I’m sure it’s better on this cake. Love how gooey and chocolaty this is!
YES! Cake and brownies in the same pan! I die.