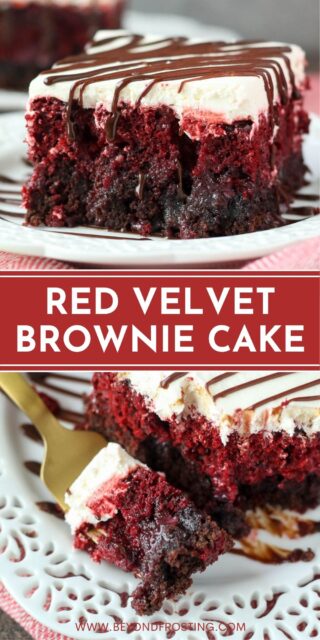
A fudgy brownie meets a moist and tender red velvet poke cake in this mouthwatering dessert. Topped with a simple cream cheese frosting and a drizzle of hot fudge, you’re going to obsess over this Red Velvet Poke Cake!

The Best Red Velvet Poke Cake
Imagine that the fudgiest brownie of all time had a baby with the most crave-worthy red velvet cake. This indulgent dessert is more delectable than anything you could dream up! It all bakes in the same pan at the same time with two separate box mixes.
Why You’ll Love This Poke Cake Recipe
- Easy. It’s an incredibly easy recipe that results in a truly heavenly treat.
- Decadent. The magic happens once the sweetened condensed milk soaks into the still-warm brownie cake. And the simple whipped cream cheese frosting on top is almost like a layer of no-bake cheesecake. You’re welcome! Oh, and don’t forget about the drizzle of hot fudge that finishes it off. Don’t you just want to sink your teeth right in?
- Crowd pleaser. This is the perfect recipe to take to potlucks or to whip up for gatherings. Everyone will devour this dessert and be so impressed by your baking prowess! (No need to tell them how easy it was to make this poke cake.)
If you’re a poke cake lover like me, you may also want to check out my top 15 most popular poke cakes!

What You’ll Need
Here’s a quick look at what you’ll need to make a red velvet poke cake. Be sure to scroll down to the recipe card below for a full ingredient list.
For the Red Velvet Brownie Cake
- Red Velvet Cake Mix: Use your favorite brand.
- Fudge Brownie Mix: Make sure it’s the “family size” for a 9×13 inch pan
- Egg, Oil & Water: Each mix will give you the specifics on what exactly to use and how much.
- Sweetened Condensed Milk: This keeps the cake super soft and moist.
For the Whipped Cream Cheese Frosting
- Cream Cheese: Brought to room temperature.
- Cool Whip: Or Homemade Whipped Cream.
- Hot Fudge: To garnish the cake.

How to Make a Red Velvet Poke Cake
This recipe could not be simpler or more straightforward. You just have to make the cake and brownie batters, pour them into a pan, bake, poke, pour in the sweetened condensed milk, add the frosting and slice it up!
- Preheat Oven: Preheat the oven to 350°F.
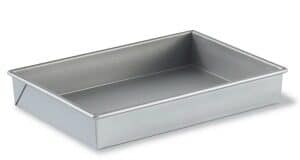
- Make Cake Batter: Add the cake mix and the ingredients listed on the box to a mixing bowl. Mix well until all of the ingredients are combined. Pour the batter into a 9×13-inch pan.
- Make Brownie Batter: Add the brownie mix and the ingredients listed on the box to a different mixing bowl. Mix until everything is well combined. Pour the brownie batter overtop the cake batter.
- Bake: Bake your brownie cake in the preheated oven for 30-35 minutes. Remove the cake from the oven and allow it to cool for at least 30 minutes.
- Poke Holes: While the cake is still warm, use the end of a wooden spoon or another round object to poke holes all over the top of the cake.
- Add Condensed Milk: Pour the sweetened condensed milk evenly overtop the cake until the can is empty. Allow the cake to absorb the condensed milk until it has cooled completely.
- Make Topping: Add the cream cheese and the Cool Whip to a mixing bowl. Beat on medium speed for a few minutes until well combined. Spread the frosting over the completely cooled cake. Add a drizzle of hot fudge if desired.
- Enjoy! Cut and serve the cake or refrigerate it in an airtight container if you’re not enjoying it immediately.

Tips for Success
That’s all there is to it! Though I do have a few helpful tips and tricks to make sure your poke cake comes out perfectly every time:
- Watch the clock. Be careful not to overbake the cake. Take it out just before all of the brownie areas are fully baked – they’ll continue to set as the cake cools. The cook time will vary by oven and the type of pan used, so keep a close eye on your cake, especially in those last few minutes of baking.
- Don’t skip the sweetened condensed milk. Since this cake has to be stored in the fridge due to the cream cheese topping, the condensed milk helps it stay wonderfully moist and tender. It really wouldn’t be the same without it!
- Add the condensed milk while the cake is warm. Your cake should not be hot when you pour in the sweetened condensed milk, but it should definitely still be warm. I suggest letting it cool for about 30-40 minutes.
- Want to make a homemade topping? If you’d prefer not to use Cool Whip, then I would suggest making this cream cheese whipped cream, which is essentially the same topping, just made with whipped cream instead of Cool Whip.

Variation Ideas
You can easily get creative with this cake by making an adjustment or two to the recipe. Here are a few clever ideas!
- Different cake mix: I adore the red velvet and brownie combo, but this treat would also taste amazing with any other flavor of cake. There are tons of possibilities! This recipe was inspired by Cookies & Cups who made a funfetti version.
- Nutella instead of hot fudge: Everyone loves chocolate hazelnut spread, and you can certainly drizzle it over this cake instead of the hot fudge if you’d like. Simply scoop some Nutella into a plastic bag, cut off the corner and squeeze it out over the cake.
- Chocolate cream cheese frosting instead of Cool Whip: If you’re a die-hard chocoholic, you may want to forego the frosting included with this recipe in favor of some Chocolate Whipped Cream Frosting. It’s super easy to prepare!
- Caramel drizzle: If you’re a fan of topping your brownies with caramel sauce, you’re going to love drizzling it over this cake as well. The caramel drizzle makes this poke cake reminiscent of a Better Than Sex cake.
How to Store a Poke Cake
Cover the top of your baking dish tightly with saran wrap or cut your cake and store the slices in an airtight container. Either way, the cake will keep in the fridge for 3-4 days.
Can I Freeze It?
If you leave off the whipped cream cheese topping and add it after the thawing process is complete, you can freeze this cake for up to 1 month. Wrap it tightly in plastic wrap and store it in a freezer-safe container. Thaw it out in the fridge before frosting and serving it.
Print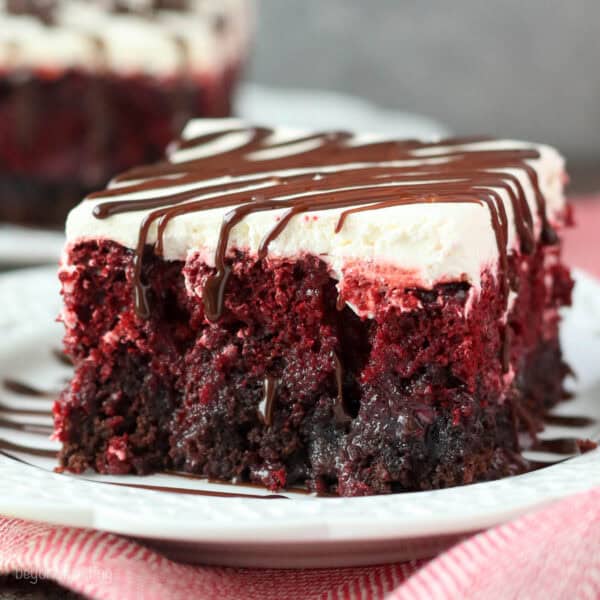
Red Velvet Poke Cake
- Prep Time: 20 minutes
- Cook Time: 28 minutes
- Total Time: 48 minutes
- Yield: 15
- Category: Dessert
- Method: Oven
- Cuisine: American
Description
A fudgy brownie meets a moist and tender red velvet poke cake in this mouthwatering dessert. Topped with a light 2-ingredient cream cheese frosting and a drizzle of hot fudge, you’re going to obsess over this Red Velvet Poke Cake!
Ingredients
For the Red Velvet Brownie Cake
- 1 Box (15oz) Red velvet cake mix
- (plus ingredients on the box- egg, oil, water)
- 1 Box (18oz) Fudge brownie mix
- (plus ingredients on the box- egg, oil, water)
- 1 jar (14 oz) Sweetened condensed milk
For the Whipped Cream Cheese Frosting
- 1 pk (8oz) Cream cheese, at room temperature
- 1 container (8oz) Cool Whip, thawed – or Homemade Whipped Cream
- Hot Fudge for garnish
Instructions
- Preheat oven to 350°F.
- In a mixing bowl, combine red velvet cake mix with ingredients list on the box. Mix well until all ingredients are combined. Pour batter into a 9×13” pan.
- In a mixing bowl, combine brownie mix with ingredients listed on the box. Mix well until all ingredients are combined. Pour brownie batter over top of red velvet batter.
- Bake in preheated oven for 30-35 minutes. Remove from oven and allow cake to cool for at least 30 minutes.
- While the cake is still warm, take the end of a wooden spoon or another round object and poke holes all over the top of your cake.
- Pour can of sweetened condensed milk over the top of cake and allow it to absorb in the cake until cake is cooled. Let set until completely cooled.
- While cake is cooling, prepare the chocolate cream cheese topping – in a mixing bowl, combine the cream cheese with the Cool Whip (or whipped cream). Beat on medium speed for a few minutes until well combined. Spread over the completely cooled cake. Garnish with hot fudge.
- After adding the cream cheese frosting, the cake must be refrigerated.
Notes
- Homemade topping: If you’d prefer not to use Cool Whip, then I would suggest making this cream cheese whipped cream, which is essentially the same topping, just made with whipped cream instead of Cool Whip.
- To Store: Keep cake in an airtight container in the fridge for 3-4 days.
- To Freeze: Leave off cream cheese topping, wrap cake tightly in plastic wrap and store in a freezer-safe container for up to 1 month. Thaw in the fridge before frosting and serving.
- Baking times: The cook time will vary by oven and the type of pan used, so keep a close eye on your cake, especially in those last few minutes of baking. Take it out just before all of the brownie areas are fully baked – they’ll continue to set as the cake cools. Over baking will cause this cake to be dry.
Nutrition
- Serving Size: 1 slice
- Calories: 629
- Sugar: 52.9 g
- Sodium: 433.9 mg
- Fat: 33.2 g
- Carbohydrates: 76.2 g
- Fiber: 0 g
- Protein: 8.5 g
- Cholesterol: 89.4 mg
Filed Under:
Discover More Dreamy Red Velvet Recipes
There’s something so luxurious about a red velvet dessert. You’re sure to enjoy the following recipes!
- Homemade Red Velet Cupcakes


Has anyone tried to make this into cupcakes? Wondering how it would come out.
I have not but interested to know if anyone else has
Hi can you please do a video on the recipe.
There is already a video included in this recipe. If you are not seeing it, it’s probably due to your internet settings
I had to bake the cake/brownie mixture about 1 hour before a toothpick would come out clean. Otherwise, I followed the recipe precisely and written and it was a huge hit for a birthday dinner party. It was sweet but not too rich, and very moist, but not wet. I will definitely be making this recipe again, not only was it delicious but very easy to make! Thank you Beyond Frosting for the recipe!
Thank you for sharing Danielle! An hour seems like a long time but each type of pan and oven will be a little different. I am glad you enjoyed it!
The recipe says nothing about what temperature to have the cool whip and cream cheese before mixing them. I kept the cool whip Frozen and the cream cheese room temperature and they aren’t not mixing!!!! The cream cheese is suspended as lumps in the cool whip. Really gross consistency. Clarification should be included in the body of the recipe
Hi Beth- Sorry for the confusion. Frozen whipped cream (or any frozen item really) will not incporoate with another substance very easily, let alone something at room temperature. The whipped cream should be thawed before using.
Hi can you use red velvet cupcake mix for this? I am having a hard time finding red velvet cake mix where I am located… if yes, then would I have to use fudge cake mix?
Thanks!!
Hi Tesla, I am not sure the difference between cupcake mix and cake mix, but as long as the overall weight is the same it should be fine. By fudge cake mix, I assume you’re referring to brownie mix? Are you unable to locate brownie mix?
Will this cake taste good and not be too soggy if I make it the night before and serve it after lunch the next day?
Hi Alice, it is considered a “wet” cake since its soaked in the sweetened condensed milk.
Hi, just wondering if the cake is supposed to be cooked through or if it will be jiggly still? After 35 min the center of my cake was still quite jiggly. I am cooking it longer and hoping it doesn’t get too dry? Thanks!
Hi Jen, it should’t be jiggly but the brownie might still be fudgy
I am am making this cake for my husband for his birthday as he loves red Velvet and also fudgy brownies.
The best of both worlds I’m happy I came across your recipe:)
Awesome Rachel!! I hope you enjoy!
Can you please clarify if the brownie or cake goes on bottom? Your picture shows brownie on bottom but recipe says cake. I followed the recipe and had issues with the cake being done. It doesn’t look very pretty. Getting ready to frost and hope it turns out ok!
Hi Jill, the cake mix goes in first and the brownie mix on top, you can also refer to the video to watch this! The brownie mix is thicker than the cake mix, so most of it will naturally sink to the bottom as it’s baked. Which is why you see in the photos that the brownie appears to be mostly on the bottom.
This has become one of our favorite cakes! I’m making it again for Valentine’s Day. I’m keeping the chocolate in the frosting, though-we love it that way!
Thanks again for such a delicious recipe. 😉
Stop with the cool whip please! it is not a food should NOT be eaten by anyone.
People do not understand it is a chemical with no real ingredient it will cause harm even in “moderation” I beg you to stop.
Hi Eileen, I offer it in my recipes because for the same number of people who dislike Cool Whip, I get equal number of questions asking if Cool Whip can be used instead. Some people choose to use it for ease of use but also some people in more rural areas chose to use it because it’s more accessible and can be stored frozen.
I dont really like sheet pan cake… Just cuz im really picky and want ut to be stacked and prettier… Would it be possable to make this in 2 9 inch round pans and stack it or would it fall apart
Hi Judi, I do not recommend doing that with a poke cake as this is meant to be a “wet” cake
I clearly read something wrong 🙁
No way can the chocolate, cream cheese and cool whip all be mixed together. I could barely scoop it, let alone spread it.
Oh well….lots of wasted ingredients, but we just had it with cool whip!
Hi Sheri. I am not sure how long you mixed the chocolate and cream cheese for. It should be very well mixed. The Cool Whip mixed with the cream cheese should not be overly thick. It will be more firm that just cream cheese alone, but it should be spreadable. I am glad you were able to enjoy it anyway! Please message me if you have any further questions, I would like for you to be able to try it again sometime!
oh my gawd, girl!! I just saw this on Pinterest!!! wow-za!!!! love this cake!
Thanks Alice! It is a wonderful, filling dessert. Lots of chocolate!
It all looks amazing and I would have tried it myself, but this is like making something semi homemade.,… I don’t do anything semi homemade… Now if you would have made the red velvet cake from scratch I could have got on board, but as it is I think not….. Enjoy, Ty, but no thanks
Hi Bonnie, I am sure you could substitute a homemade red velvet cake if that is your preference, although the baking time might change.
Im making this today!!!!
How did it go? I hope you like it!
Hi! I’m currently baking this cake for my boyfriend’s birthday, and I was wondering what the cool whip was for and what I needed to do with it?
Hi Phoebe, the Cool whip or whipped cream is used in the cream cheese frosting. See step #10! I hope you like it!
Hi! I’ve been reading your blog for a long time now and finally got the courage to go ahead and give you a shout
out from Houston Texas! Just wanted to tell you keep up the
fantastic job!
Yeah! THanks for saying hi! I hope you enjoy my content and as always, if there is something you want to see, drop me a line on Facebook or Twitter!
Made this for work today and everyone loved it. It took a much longer baking time than 28 minutes–about 10-15 more minutes. And my brownie mixed did a weird thing. Even though I poured the red velvet mix first, the brownie layer sunk to the bottom and formed into a crust. I also melted dark chocolate for the cream cheese frosting. Next time, I’ll use white chocolate because I think yours looks prettier. 🙂 Thanks for the recipe!
Hi Wendy. Even though you pour the brownie mix on top, it will swirl itself into the red velvet cake. The cake will rise a bit above the brownie mix as well, but that’s what the frosting is for 🙂 I am glad you enjoyed it!
I made this red velvet brownie cake and it turned into more of a pudding than a cake because I left it in the
oven for the maximum amount of time and the brownie mix did not bake at all. I was scared to leave it in longer than the thirty minutes because I didn’t want the red velvet cake to burn. That was the only part that baked. I was very disappointed because it looked really delicious in the picture.
Hi Kaitlyn, I am sorry to hear the recipe did not work out for you. I tried it twice and found that when I made the recipe using the same brand for both the cake mix and the brownies, I was more successful. I notice that the brownie layer in mine was still a little fudgey. Sometimes you have to add a few minutes as the baking time varies by oven. I hope you will try this again.
I made this it was absolutely fabulous!!! I had to leave cake in for almost an hour. The center was still mush at 30 minutes…
Do you really need to add the sweet milk? And could you do the brownie layer on bottom?
Thanks!
Hi Maria- I made this recipe the first time without the milk. Due to extended baking time and the need to refrigerate the cake after frosting, I do recommend adding the sweet milk to help keep the cake moist. Otherwise, I found it to be a little too dry for my liking. It adds incredible flavor as well. However, it’s you’re cake so make it any way you like 🙂