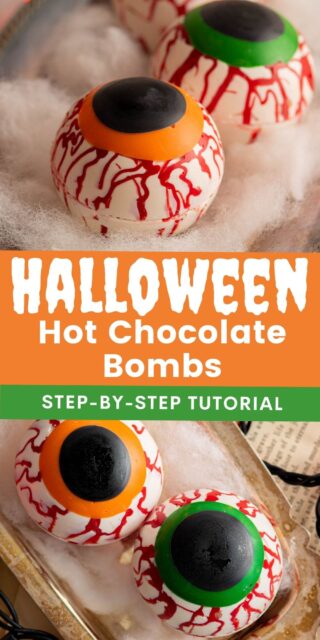
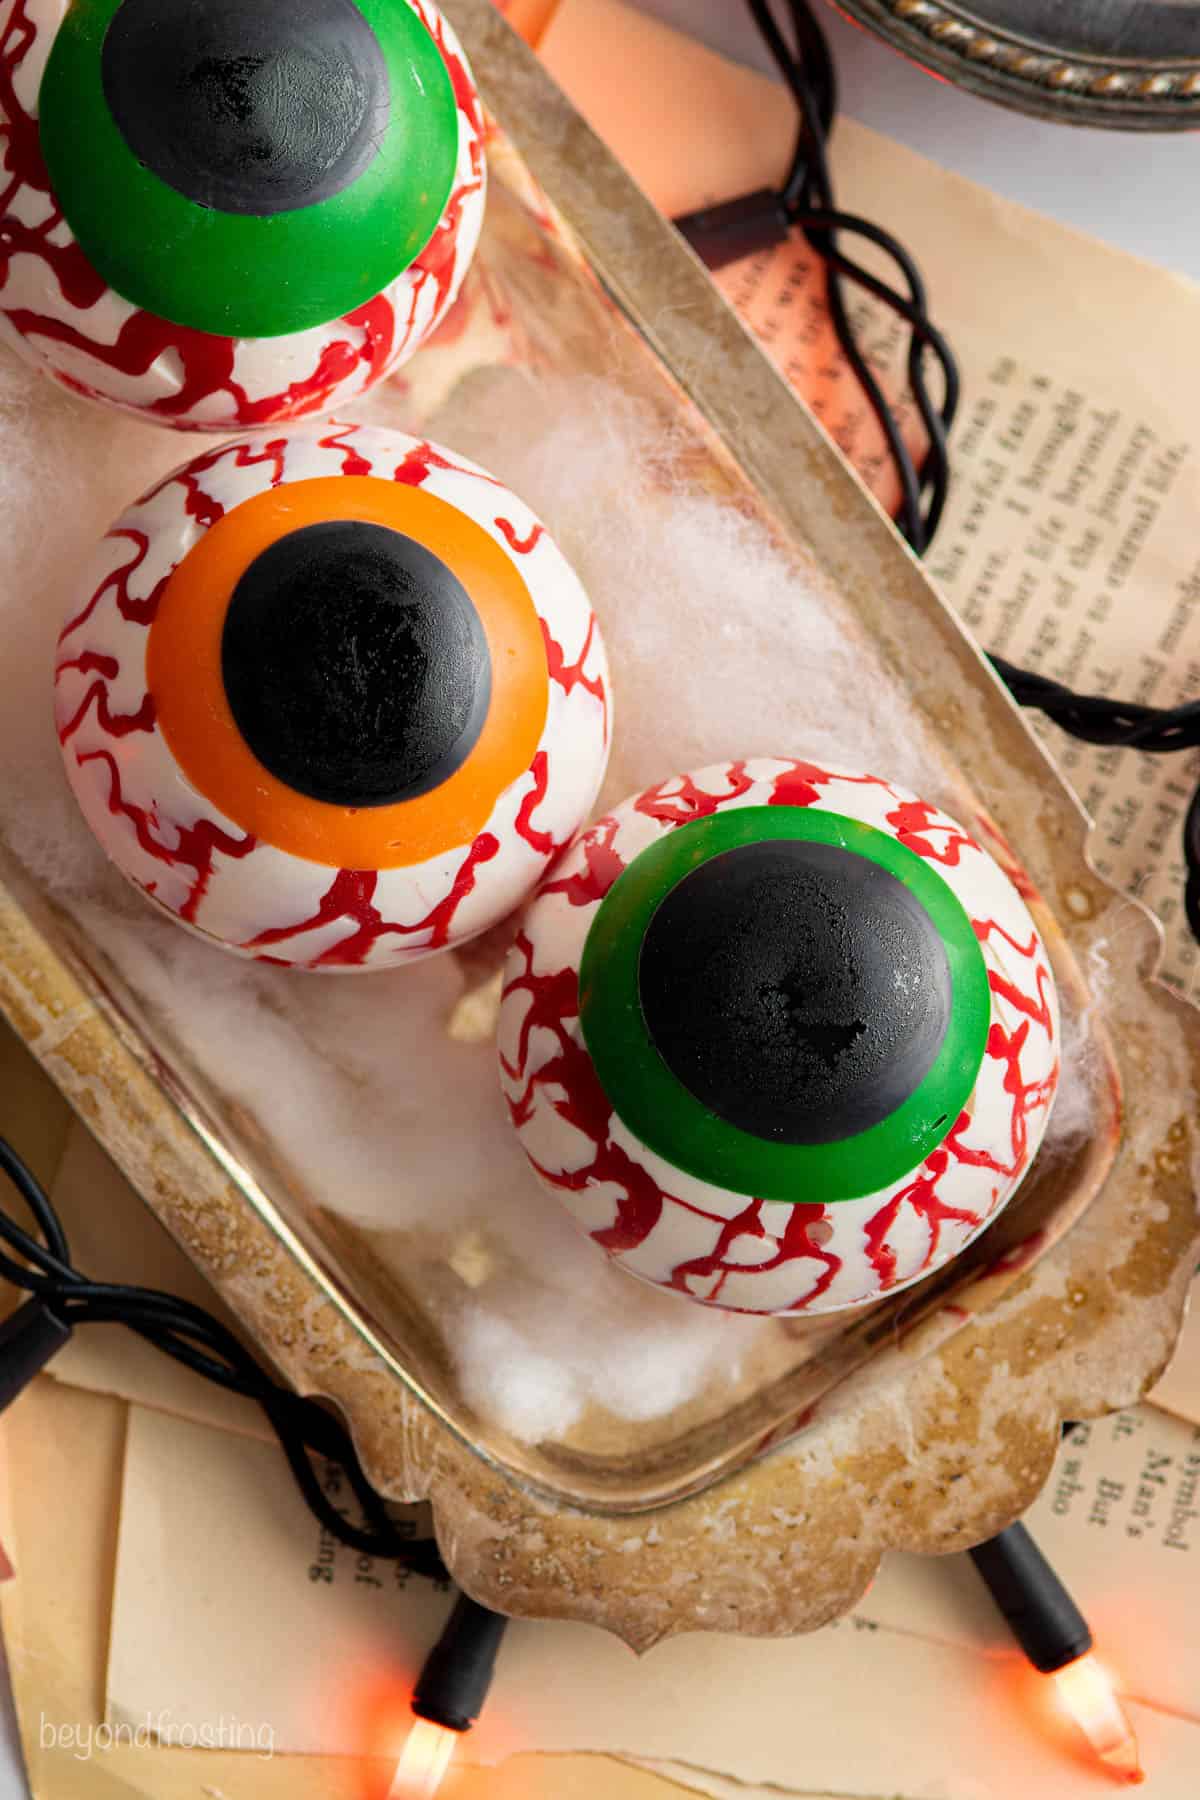
These popular hot chocolate bombs are decorated for Halloween to look like Spooky Eyeballs for a fun and festive treat. See just how easy they are to make! Inside they’re filled with hot cocoa mix and mini marshmallows.
Looking for more easy Halloween recipe ideas? Try this Spooky Oreo Dip or easy Mummy Wrapped Hot Dogs.

Easy Halloween Recipe
Tis the season for all things cute and spooky! I love a good seasonal treat but Halloween is especially fun because it can be done in so many different ways.
These Halloween Hot Chocolate Bombs are a fun seasonal twist on a classic hot cocoa bomb. I don’t know where you live, but growing up on the east coast we often went trick or treating in the rain or even in the snow some years. So, coming home to a cup of hot chocolate after a long night trick or treating was always a good idea.
Hot Chocolate Bombs are actually fairly easy to make, you just need a little bit of time and use caution when handling them. But they make great gifts and what a fun way to surprise the kids on Halloween.

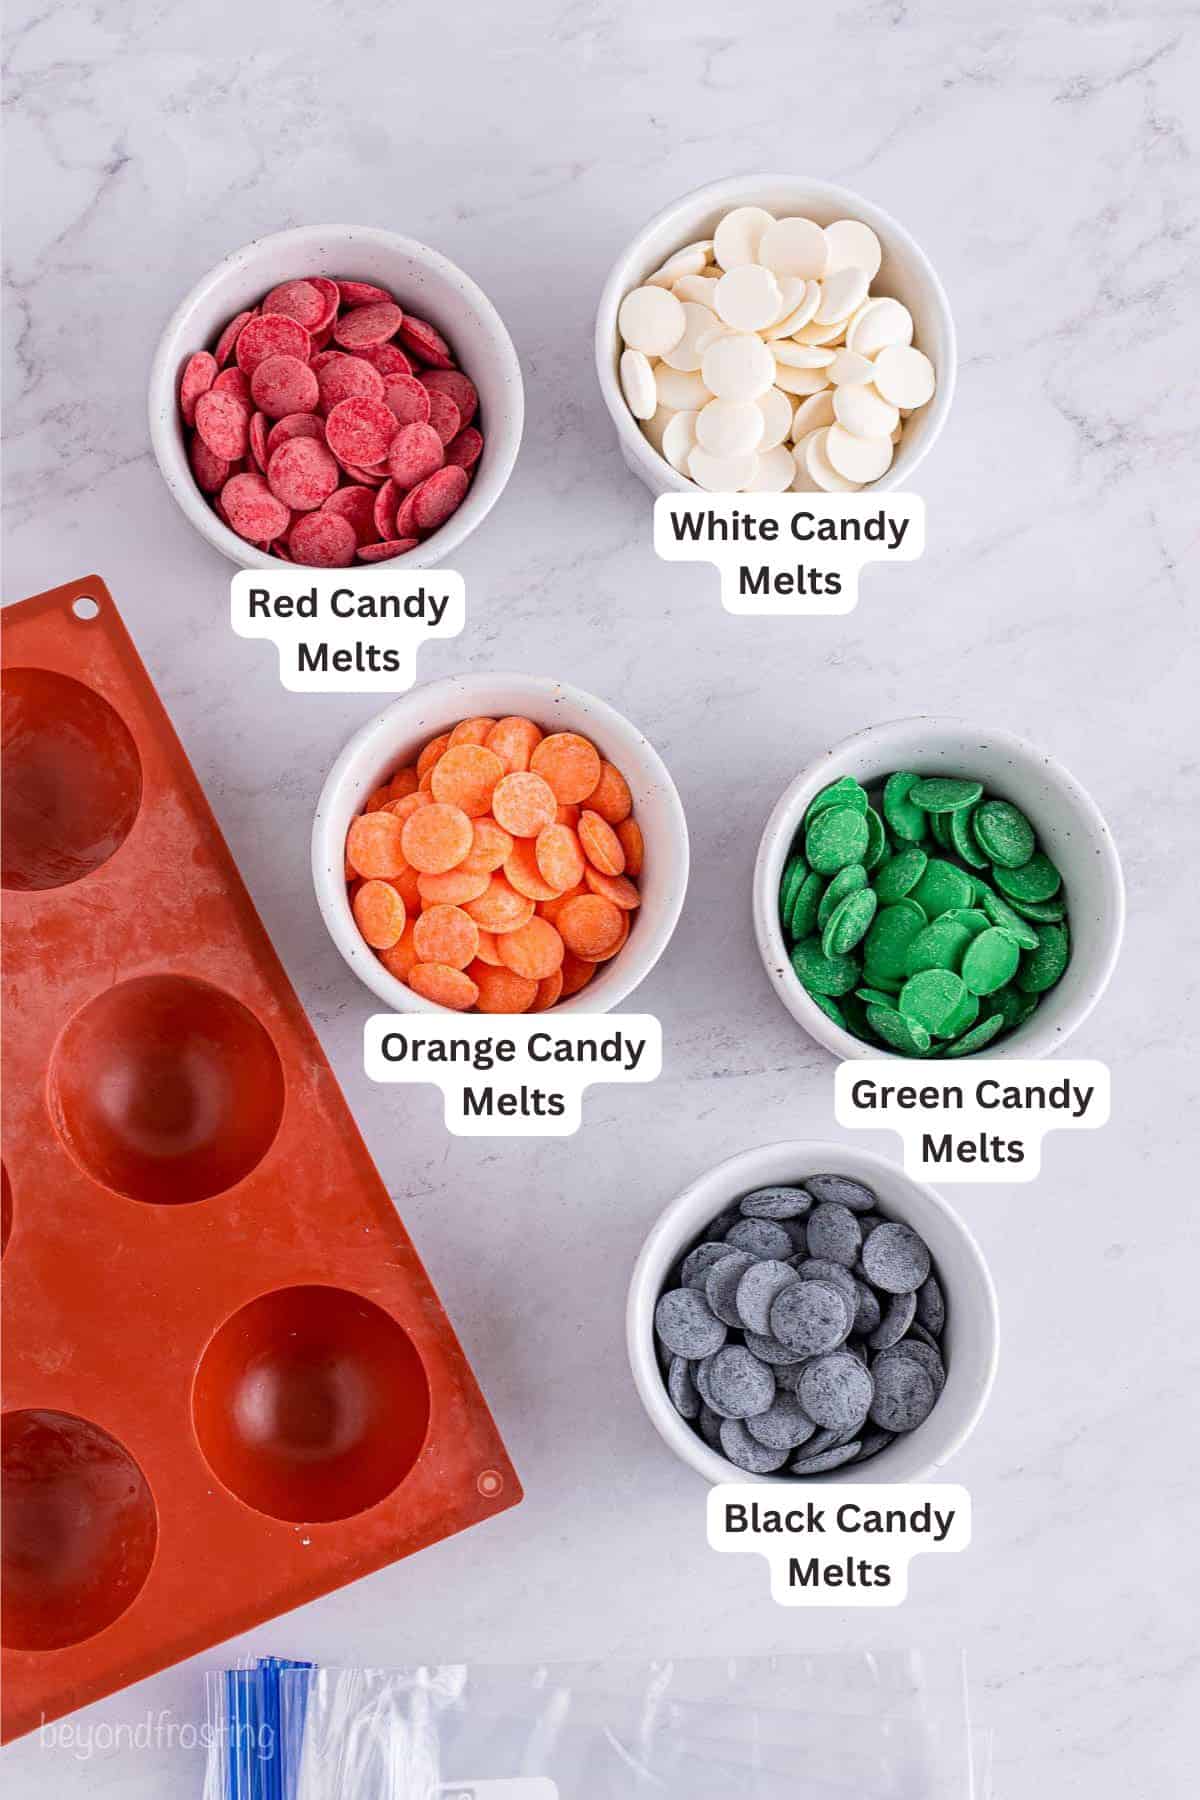
Ingredients and Tools You’ll Need
I’ve linked to all the supplies below but they are much cheaper in stores like Walmart or Michaels and sometimes they even have smaller quantities. Usually, around Halloween, some grocery stores will also carry some of them. You’ll need 1/4 cup of each color for 6 eyes, so you won’t need very much. You can also just make them all one color instead of using both green and orange.
- Black candy melts
- Green candy melts
- Orange candy melts
- Red candy melts
- White candy melts or Ghirardelli melting wafers
- Powdered hot cocoa mix
- Mini marshmallows
- Silicone mold
- Small piping bags or Ziploc bags
How to Make Halloween Hot Chocolate Bombs
If you’ve never made hot chocolate bombs before, I have a full and detailed tutorial with lots of tips that can be helpful.
Top Side of The Eye
Whenever the instructions call for melting candy melts or chocolate, be sure to melt them in a microwave-safe bowl at 50% power to prevent them from burning. If they are burned or start to seize, you’ll have to start over. I recommend melting in 20-30 second intervals and stirring each time.
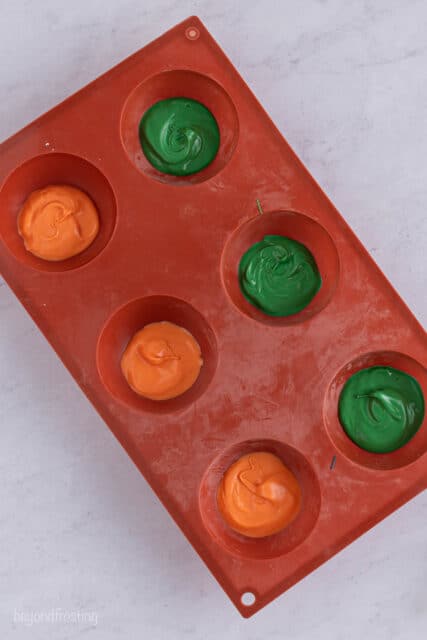
Melt the black candy then spoon into a piping bag then cut the corner to make a dime-sized hole. Pipe a quarter-sized circle into the center of each silicone mold. Place into the freezer for 5 minutes to set.
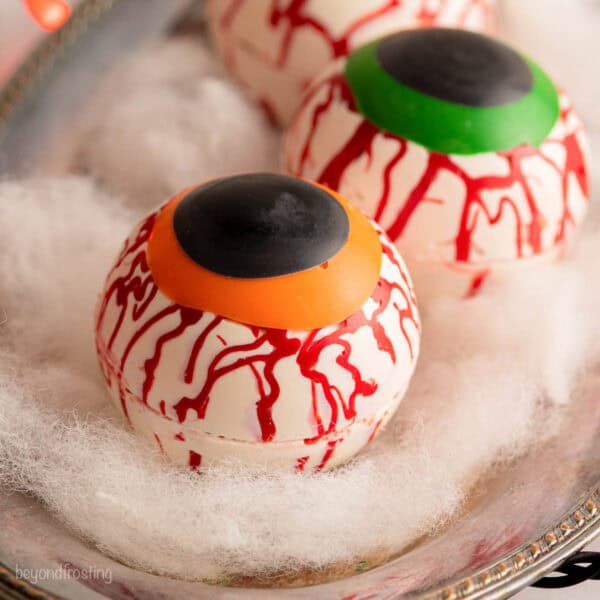
Separately melt the green and orange candy pour into two separate piping bags, cut off the corner of the bag. Pipe a 1” round circle on top of the black candy melts. You want the orange or green circle to be large enough to create an iris, but you do not want it so big that it seems out of proportion to the rest of the eye. Once all of the 6 eyes are done, place them back into the freezer for 5 minutes until set.

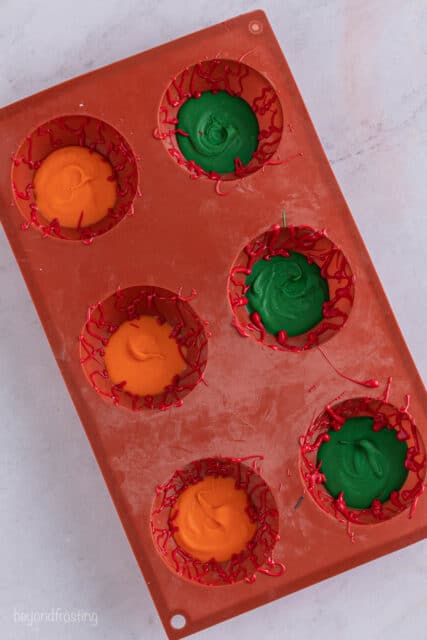
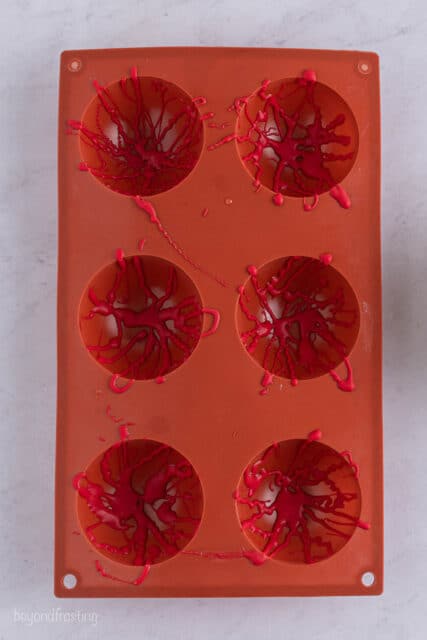
Melt half of the red candy melts and pour into a piping bag. Snip only the tip off the piping bag. Pipe a bunch of squiggly lines going up the sides of each mold to create a bloodshot look. Place back into the freezer for 5 minutes until set.
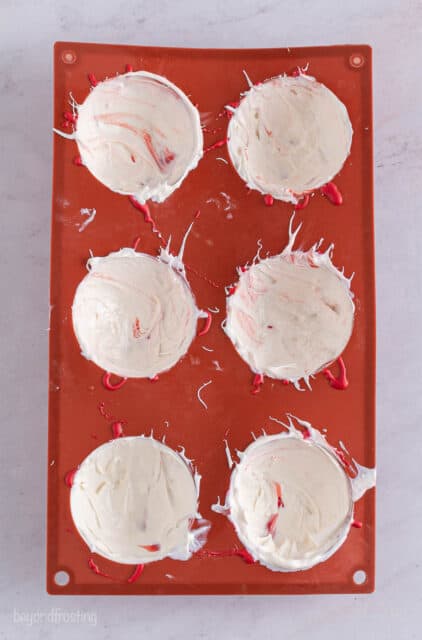
Melt half of the white candy melts (or chocolate wafers). Spoon into the cavities of the mold one at atime and swirl it around to coat the outside. If it’s too thin, add additional chocolate (Note this could take longer depending on thickness). You may need to melt additional chocolate if needed. Trim away excess white around the edges using knife.
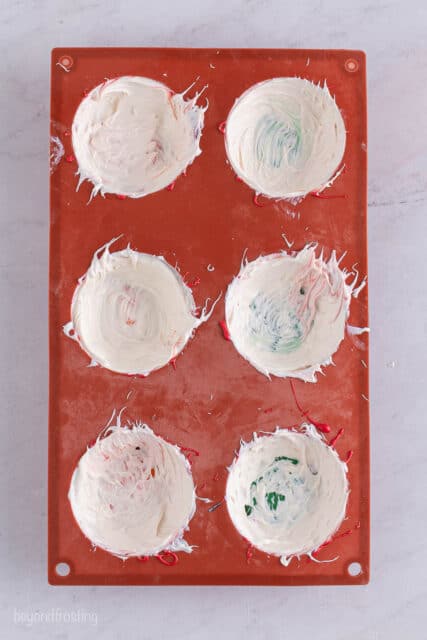
Refrigerate until set: Refrigerate for 10 minutes or until set. Once they’re completely set, remove the shells from the mold and wipe it clean. Set them aside.
Bottom Side of The Eye
Melt the remaining red candy melts, make the piping bag and pipe a bunch of squiggly lines going up the sides of each mold to create a bloodshot look. Place back into the freezer for 5 minutes until set.
Melt half of the white candy melts (or wafers). Spoon into the cavities of the mold one at atime and swirl it around to coat the outside.
Refrigerate until set: Once set, carefully remove them from the molds.
How To Assemble The Eyes
Heat a plate: Boil about ¾ cups of water either on the stovetop or in the microwave. Place a plate over top of the measuring cup to warm the plate.
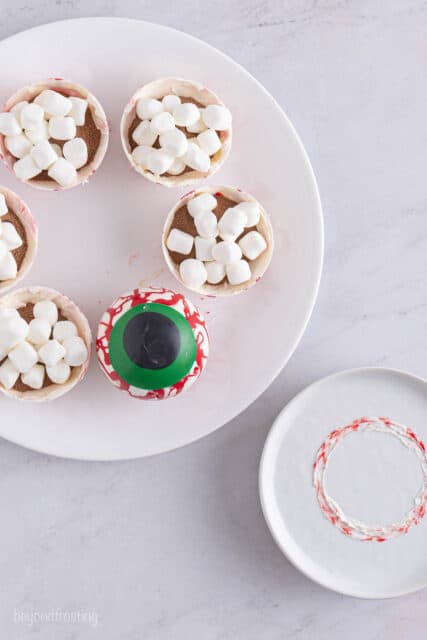
Press the top shell on your heated plate briefly to heat the edges. Quickly flip over the shell and fill with 1 tablespoon of hot chocolate mix and a couple of mini marshmallows. Do not over stuff.
Repeat with the bottom side of the eye, then gently press the two shells together, being careful not to press too hard so you don’t crack your bottom shell. Refrigerate for 10-15 minutes to set.
Serve: Place a hot chocolate bomb in the bottom of a mug. Heat milk in the microwave until desired consistency, pour warm milk over the chocolate bomb. Stir until combined.

Candy Melts vs White Chocolate
Hot chocolate bombs can be made either with candy melts or white chocolate. For the colored portions of the eyeballs, it’s easiest to use candy melts. Whenever you are melting white chocolate or candy melts, be sure to microwave them at 50% power to prevent them from burning. Low and slow is the way to go.
- For the shell coating, I prefer to use white chocolate (like these Ghirardelli Wafers), simply because the taste is so much better. But there are positives and negatives to either option.
- White chocolate won’t be true white, so if you want true white color for the eyes, then I recommend using Wilton bright white candy melts.
- Candy melts tend to be thicker than chocolate, but either one you use may require an additional coating or two if it appears to be too thin once it’s been poured in the molds.
Ways to Serve The Hot Chocolate
Grab your favorite spooky mug and let’s make these melt! Simply drop the hot chocolate bomb in the bottom of the mug and pour warm milk over top. Watch the chocolate melt and then stir the hot chocolate until it’s well combined. Serve this with some whipped cream and a side of pumpkin bread.

More Tips for Perfect Hot Chocolate Bombs
- Don’t add more than the recommended amount of candy melts to each mold as it will create too thick of a shell and you will not be able to fill it as much.
- Don’t overstuff them or it will be difficult to attach them together. If you are having a hard time attaching them, try removing a couple of marshmallows.
How To Store Them
These should be stored in a cool dry place until ready to use. They can be kept in an airtight container for one week. These make the cutest gifts for teachers, friends, and neighbors. Package them up in cellophane bags with a seasonal ribbon.
Halloween Hot Chocolate Bombs
- Prep Time: 30 minutes
- Chill time: 30 minutes
- Total Time: 60 minutes
- Yield: 6
- Category: Dessert
- Method: Microwave
- Cuisine: American
Description
These popular hot chocolate bombs are decorated for Halloween to look like Spooky Eyeballs for a fun and festive treat. See just how easy they are to make! Inside they’re filled with hot cocoa mix and mini marshmallows.
Ingredients
- ¼ cup black candy melts
- ¼ cup green candy melts
- ¼ cup orange candy melts
- ¼ cup red candy melts
- 1 cup white candy melts or Ghirardelli melting wafers
- 6 tablespoons powdered hot cocoa mix
- ½ cup mini marshmallows
Instructions
Melting the Chocolate
- Whenever the instructions call for melting candy melts or chocolate, be sure to melt them in a microwave-safe bowl at 50% power to prevent them from burning. If they are burned or start to seize, you’ll have to start over. I recommend melting in 20-30 second intervals and stirring each time.
Top side of eyes:
- Melt the black candy melts until melted and smooth. Spoon into a piping bag or small Ziploc bag. Cut the corner to make a dime-sized hole. Pipe a quarter-sized circle into the center of each silicone mold. Place into the freezer for 5 minutes to set.
- Separately melt the green and orange candy melts pour into two piping separate piping bags, cut off the corner of the bag. Pipe a 1” round circle on top of the black candy melts. Once all of the 6 eyes are done, place them back into the freezer for 5 minutes until set.
- Next melt half of the red candy melts and place them into a piping bag. Snip only the tip off the piping bag. Pipe a bunch of squiggly lines going up the sides of each mold to create a bloodshot look. Place back into the freezer for 5 minutes until set.
- Finally, melt half of the white candy melts (or chocolate wafers) until melted and smooth. Coat the cavities of the mold one at time. Put a spoonful of melted chocolate in each cavity and swirl it around to coat the outside. If it’s thin, add additional chocolate (Note this could take longer depending on thickness). Melt additional chocolate if needed.
- Refrigerate for 10 minutes or until set. Once they’re completely set, remove the shells from the mold and wipe it clean.
Bottom side of eye:
- Melt the red candy melts pour into a piping bag with the tip cut off. Pipe a bunch of squiggly lines going up the sides of each mold. Place back into the freezer for 5 minutes until set.
- Melt the remaining white candy melts. Coat the cavities one at a time as described above. Once all are coated, place back into the refridgerator for 10 minutes or until set.
To assemble:
- Boil about ¾ cups of water either on the stovetop or in the microwave. Place a plate over top of the measuring cup to warm the plate.
- Press the top of the eye on your heated plate briefly to heat the edges. Quickly flip over the shell and fill with 1 tablespoon of hot chocolate mix and a couple of mini marshmallows. Do not over stuff.
- Repeat the above with the bottom side of the eye and gently press the two shells together, being careful not to press too hard so you don’t crack your bottom shell. Refrigerate for 10-15 minutes to set.
To serve
- Place a chocolate bomb in the bottom of a mug. Heat milk in the microwave until desired consistency, pour warm milk over the chocolate bomb. Stir until combined. Serve with whipped cream.
Notes
These should be stored in a cool dry place until ready to use. They can be kept in an airtight container for one week.


These look so fun for Halloween!!