
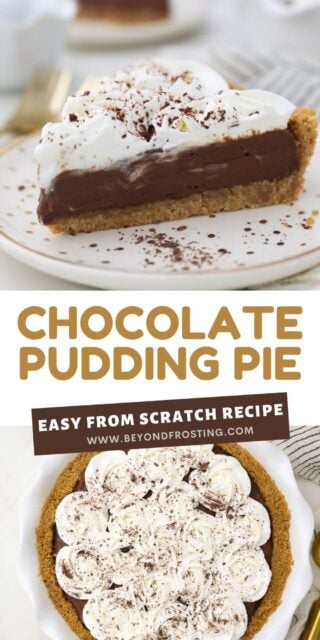
My old-fashioned chocolate pudding pie recipe is made from scratch with homemade chocolate pudding and a buttery graham cracker crust. It’s a no-bake dessert apart from par-baking the crust, perfect for any holiday celebration, from the 4th of July to Thanksgiving and Christmas!
This post is sponsored by American Dairy Association Mideast. All opinions are my own.

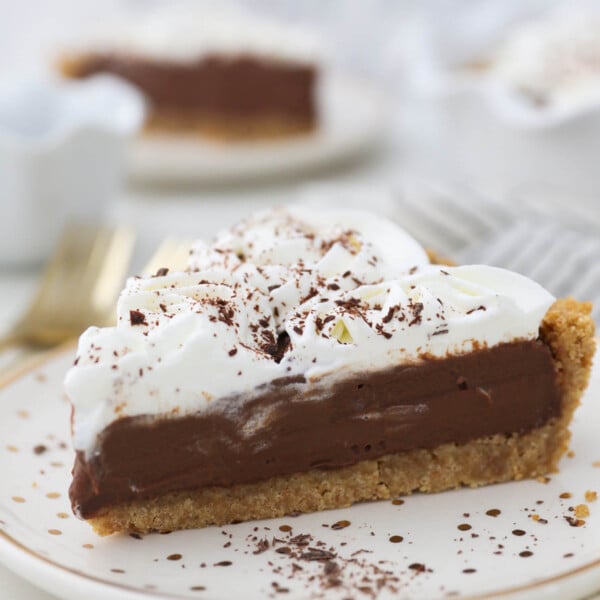
This chocolate pudding pie is rich but light, and you’ll have no problem polishing off a slice. Trust me, I speak from experience. The combination of the graham cracker pie crust with the silky homemade pudding and homemade whipped topping is just to-die-for. Top with some chocolate shavings for a presentation worthy of your holiday dessert table!
Why I Know You’ll Love This Easy Chocolate Pudding Pie Recipe
- Simple Ingredients. The filling is made with 7 easy ingredients like milk, sugar, egg yolks, cocoa powder, and real chocolate.
- Easy to Prepare: The filling takes just 15 minutes to prepare.
- Make it ahead of time. You’ll need to allow several hours for it to cool and set.
- It’s almost no-bake! The graham cracker crust should be baked for 10 minutes to help bind the crust together and make it a little crispy, but once that’s done the oven can go off.

Today, I am partnering with my friends at American Dairy Association Mideast to bring you dessert. I’m honored to have been working with them for several years now, and I love sharing the stories of the hard-working dairy farmers who put food on our tables. These guys work 365 days a year caring for their cows, including holidays.
Dairy is an essential ingredient in my kitchen and in my daily diet. Milk is packed with calcium and protein. Did you know that milk also adds a bit of sweetness to recipes and encourages the browning reactions in desserts like pie crust and cookies? And of course, it’s an essential ingredient for pudding.
Ingredient Notes
Three ingredients are especially important in making a perfect pudding pie, as I’ve noted below. Scroll down to the recipe card for the full list and measurements.
- Whole milk – Whole milk is higher in fat, which adds richness to the pudding. It also helps to produce a nice, thick consistency.
- Chocolate – High-quality chocolate is important because this is where the flavor comes from. I prefer dark chocolate, at least 72% cocoa, but if you like milk or semi-sweet chocolate, that will also work. I recommend using a chocolate bar because they melt smoothly. I don’t like to use chocolate chips because they are coated, so once melted, they have an oilier texture.
- Egg yolks – This adds a velvety texture and richness to the pudding. They also help to thicken the pudding.

First, Make the Perfect Crust
Personally, I love the graham cracker pie crust in this recipe, but you can make this pie with an Oreo crust or a flaky, all-butter pie crust like I use for my classic chocolate pie, if you prefer. To make the graham cracker crust:
- Combine the crust ingredients in a bowl until the crumbs are well-coated.
- Press into a 9-inch pie plate until densely packed.
- Bake for 8 to 10 minutes. The crust will need to cool completely before you add the no-bake filling.

How to Make a Chocolate Pudding Pie
This chocolate pudding pie does require some hands-on time as you make the pudding from scratch, but truly, the hardest part is waiting for it to set before diving in! Be sure to bake and cool the crust in advance (see above). Then, follow these steps to prepare your chocolate pudding pie:
Prepare the Pudding
- Prepare the milk mixture. First, whisk together the milk, sugar, and cocoa powder in a saucepan over medium-low heat until warm. The sugar should dissolve.
- Temper the eggs. Next, gently whisk the egg yolks in a bowl. Add a small amount of the warmed milk to the eggs, whisking quickly so the yolks don’t scramble. Then, return the tempered eggs to the milk mixture and whisk to combine.
- Thicken the pudding. Now, combine cornstarch with a bit of the warm milk mixture to make a slurry. Add it back to the saucepan, and cook the pudding slowly over medium heat. As the mixture thickens, it will coat the side of the pan, and the bubbles on top will start to disappear. Once the milk starts to lightly boil, and large bubbles are breaking the surface, it’s time to add the chocolate.
- Add the chocolate. Slowly add the chocolate and continue whisking until it’s melted. Pay close attention and continue whisking until you see large bubbles starting to break the surface again. Remove from the heat and immediately stir in the vanilla extract.
Assemble the Pie
- Strain the pudding. Lastly, you’ll strain the pudding through a fine mesh sieve back into the bowl. Transfer the pudding to your pie crust.
- Chill. Gently press plastic wrap directly against the surface of the pudding, poking a few holes to allow the heat to escape. Cool the pie on the counter for 30 minutes to 1 hour. Afterward, refrigerate for at least 2 to 4 hours. Make sure the pudding is completely set before you add the whipped topping.


How Do I Know When the Pudding Is Done?
After you’ve added the chocolate, stir continuously, and watch closely for large bubbles to start to break the surface. This means your chocolate pudding is ready! The consistency of the pudding should be thick, but pourable and it will further thicken as it sets.
Add the Whipped Topping
After the chocolate pudding pie has chilled and set in the fridge, prepare the easy homemade whipped cream for serving.
- Whip the heavy cream. Beat the heavy whipping cream in the chilled bowl, using an electric mixer on high.
- Add powdered sugar. Once soft peaks form, slowly add in the powdered sugar. Beat until stiff peaks form.
- Top the pie. Spread the topping over the cooled and set pudding. Top with chocolate shavings if desired.

Tips for the Best Pudding Pie
- Slowly heat the milk. You should be using medium to medium-low heat. If you think the milk is burning or sticking to the bottom of the pan, turn down the heat and be sure to stir frequently.
- Make a slurry with the cornstarch. Take a couple of tablespoons of the warmed milk and whisk it into the cornstarch, then pour it back into the saucepan. This allows the corn starch to dissolve more easily and helps eliminate any grainy texture.
- Strain the pudding. Strain the pudding through a fine sieve into a bowl or directly into the cooled pie crust to remove any dry ingredients that did not fully dissolve. Don’t scrap the bottom of the saucepan; you don’t want any of that in your pie filling.
- Cover the surface of the pudding with plastic wrap. This is to prevent skin from forming. I recommend using a toothpick to poke a couple of holes to vent the warm air as well. Cool on the counter for 30-60 minutes before refrigerating to prevent further condensation.
- How to easily slice the pie. Now it’s always difficult to cleanly remove the first slice of any pie, but if you take a knife or angled spatula and gently slide it along the outside edge of the crust, it will help to loosen it up before you lift the slice out.
Serving Suggestion
If you don’t want to make the homemade whipped topping, you can also use Cool Whip or whipped cream from the store. I also like to add some chocolate shavings for the presentation.

Can I Make This Ahead Of Time?
Yes! It keeps very well in the refrigerator, but it’s best consumed within the first 48 hours, as the graham cracker crust will start to soften after that. I recommend preparing your pie within 24 hours of serving whenever possible. Keep the chocolate pie refrigerated until it’s time to add the topping and serve.
How to Store Chocolate Pudding Pie
- Refrigerate. This pudding pie must be kept in the fridge. Once cooled, you can add the homemade whipped cream and then store the pie covered or in an airtight container. Whenever possible, however, it’s best to add the topping before serving. I don’t recommend freezing pudding pies as the texture of the pudding changes after thawing.
For more information about dairy nutrition, to find delicious new recipes, and to meet Ohio and West Virginia dairy farmers, visit Drink-Milk.com, and follow the American Dairy Association Mideast on Facebook, Twitter, Instagram, and Pinterest.
More Homemade Pie Recipes
Chocolate Pudding Pie
- Prep Time: 10 minutes (plus cooling time)
- Cook Time: 15 minutes
- Total Time: 4 hours
- Yield: 8 servings
- Category: Pie
- Method: Stovetop
- Cuisine: American
Description
This old-fashioned chocolate pudding pie recipe is made from scratch with homemade chocolate pudding and a buttery graham cracker crust. It’s an almost no-bake dessert, perfect for holidays and celebrations!
Ingredients
For the Crust
- 1 ½ cups (135g) graham cracker crumbs
- ¼ cup (55g) packed light brown sugar
- 7 tablespoons (98g) butter, melted
For the Pudding
- 3 cups whole milk
- ½ cup (95g) granulated sugar
- 1 tablespoon (7g) cocoa powder
- 2 large egg yolks
- 3 tablespoons (28g) corn starch
- 8 ounces (226g) dark chocolate bar, chopped
- 2 teaspoons pure vanilla extract
For the Topping
- ¾ cup (177ml) heavy whipping cream
- 3 tablespoons (24g) powdered sugar
- Chocolate shavings (optional)
Instructions
For the Crust
- Combine the ingredients in a medium-sized bowl and mix thoroughly until the crumbs are well coated. Press into a 9-inch pie plate until densely packed
- Bake at 325°F for 8-10 minutes. Remove from oven and cool completely.
For the Pudding
- Heat the milk with dry ingredients: In a medium saucepan, whisk the milk, sugar, and cocoa powder together and heat over medium-low heat until warm.
- Temper the egg yolks: In a small bowl, gently whisk 2 egg yolks. Add 2-3 tablespoons of the warmed milk into the egg yolks and whisk, then pour the yolks back into the pudding and whisk to combine.
- Make a slurry with the cornstarch: Add 2-3 tablespoons of the warmed milk and whisk into the cornstarch, then pour back into the saucepan and whisk to combine.
- Cook until thickened: Continue whisking the pudding until it starts to thicken and lightly bubble, approximately 10-15 minutes. The mixture will start to coat the outside of the pan as it thickens. Ensure it’s thickened before moving on to the next step.
- Add the chocolate: Slowly add the chocolate and continue whisking until it’s completely incorporated. Cook for 2-4 minutes, until bubbles start to break the surface, stirring constantly.
- Add the vanilla: Remove the pudding from the heat and whisk in the vanilla extract.
- Strain the pudding: Strain the pudding through a fine sieve into a bowl and then transfer to the prepared pie crust. Cover with clear plastic wrap (placed directly on the surface of the pudding), then poke a few holes in the plastic wrap with a toothpick.
- Cool and refrigerate: Allow the pudding to cool on the counter for 30-60 minutes before refrigerating. Refrigerate for 2-4 hours until the pudding has cooled and is firm.
For the Whipped Cream
- Chill the bowl: Once the pie is completely cooled and set, prepare the whipped cream. Chill a mixing bowl in the freezer for 10 minutes. Pour the heavy whipping cream into the chilled bowl. Use an electric mixer to beat the heavy cream on high speed until soft peaks form.
- Add the powdered sugar: Slowly add the powdered sugar and continue beating on high speed until stiff peaks form. Spread over the top of the pudding. Top with chocolate shavings (optional).
Notes
- Storing this pie: This pie must be refrigerated and it’s best consumed within the first 48 hours, as the graham cracker crust will start to soften after that. I recommend preparing 24 hours in advance of serving whenever possible.
- Chocolate bars are best for this recipe instead of chocolate chips. I prefer dark chocolate, but any type of chocolate will work,
- Pro tip for slicing: Once sliced, take a knife or angled spatula and gently slide it along the outside edge of the crust, it will help to loosen it up before you lift the slice out.
Nutrition
- Serving Size: 1 slice
- Calories: 547
- Sugar: 42g
- Sodium: 159mg
- Fat: 33g
- Carbohydrates: 58g
- Fiber: 3g
- Protein: 7g
- Cholesterol: 108mg

My pie is not very sweet. Is it supposed to be. I used Lindt dark chocolate.
That would depend on the chocolate specifically. Anything over 60% cocoa would be far less sweet. But I can’t say the pie is meant to be overly sweet in general. Did you make any alternations?
What type of chocolate bar? A candy bar, like Hershey’s or baking chocolate (sweetened, semi-sweet, etc.?)??
A chocolate bar, and I would recommend a higher quality bar than Hershey’s. I generally use Ghirardelli 60% cocoa or darker.
WOW! I made this pie & shared it with 3 neighbors and my husband. They all gave it 5 stars. As for the cook, myself, I also give it 5 stars. It was easy to make, didn’t take long, and was the best chocolate pie ever. Thank you!
As a matter of fact, I’m making your banana cream pie next, then your coconut cream pie.
This plan is HIGHLY approved by me. Thank you so much!
I had to make the pudding twice very closely following the instructions and both times it was completely clunky as if the corn starch stuck together in little clumps. Do not recommend
If you properly dissolved the cornstarch in the milk, there would be no way for the clumps of cornstarch to bind together. Is it possible the sugar and cocoa were not fully dissolved?
Hi, looks delicious..I would like to make it!
however I could not find the tin or dish size
would be grateful for info
Thanks
Oh my goodness, you are correct! Thank you for letting me know. I just updated this to callout a 9-inch pie plate.
How about using chocolate milk?? Would you do less chocolate bar??
I have not tested it, but I would probably make it as is, and if it’s too sweet for you, then next time adjust the ratios.
This pie was so luscious and delicious!! My whole family raved about it and it was the first time making one for me. The recipe is easy to follow
Wow Thank you Kathryn!! SO happy you enjoyed it, and glad to hear it was easy to make!