
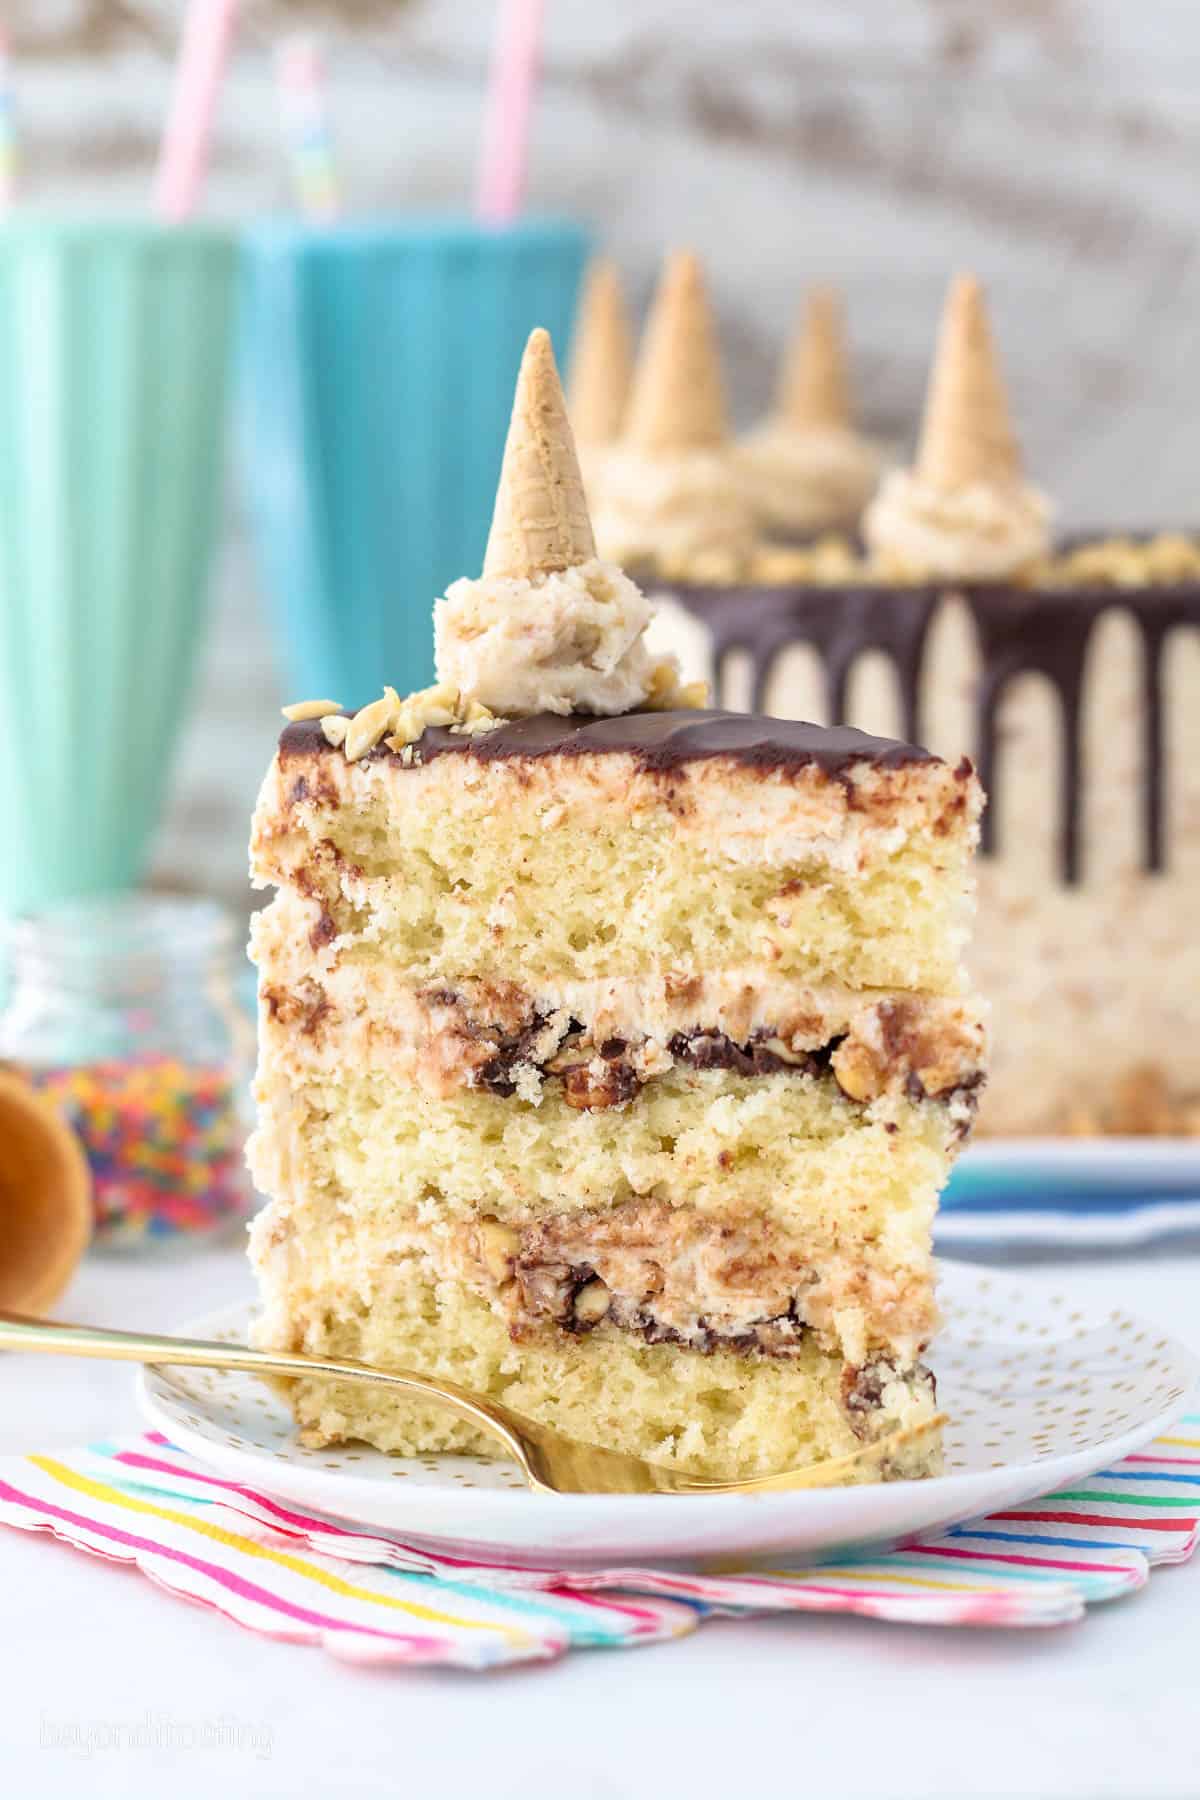
This Drumstick Cake Recipe is a total showstopper! It’s made with layers of moist vanilla cake filled with fudgy chocolate ganache, chopped peanuts, and a waffle cone frosting.
Easy Vanilla Cake with Waffle Cone Frosting
Remember drumsticks?! Those crispy waffle cones with vanilla ice cream covered in chocolate shells and salty peanuts with a perfect bite of waffle cone and fudge at the very bottom.
Those are what inspired this Drumstick Cake Recipe! It can sit out on the counter longer than ice cream can, but it’s filled with all of the flavors you’d expect in a classic drumstick ice cream cone….moist vanilla cake with layers of chocolate ganache fudge, peanuts, and a waffle cone frosting.
It doesn’t get better than this! But if you need more inspirating, I’ve got a whole collection of mouthwatering cake ideas.
Key Ingredients
- Vanilla Bean Paste – I love to use vanilla bean paste for the most authentic vanilla flavor. If you don’t have vanilla bean paste, feel free to use vanilla extract.
- Sour Cream – This makes the cake super moist. Substitute with plain or Greek yogurt.
- Milk – I used nonfat, but whatever you have on hand will work.
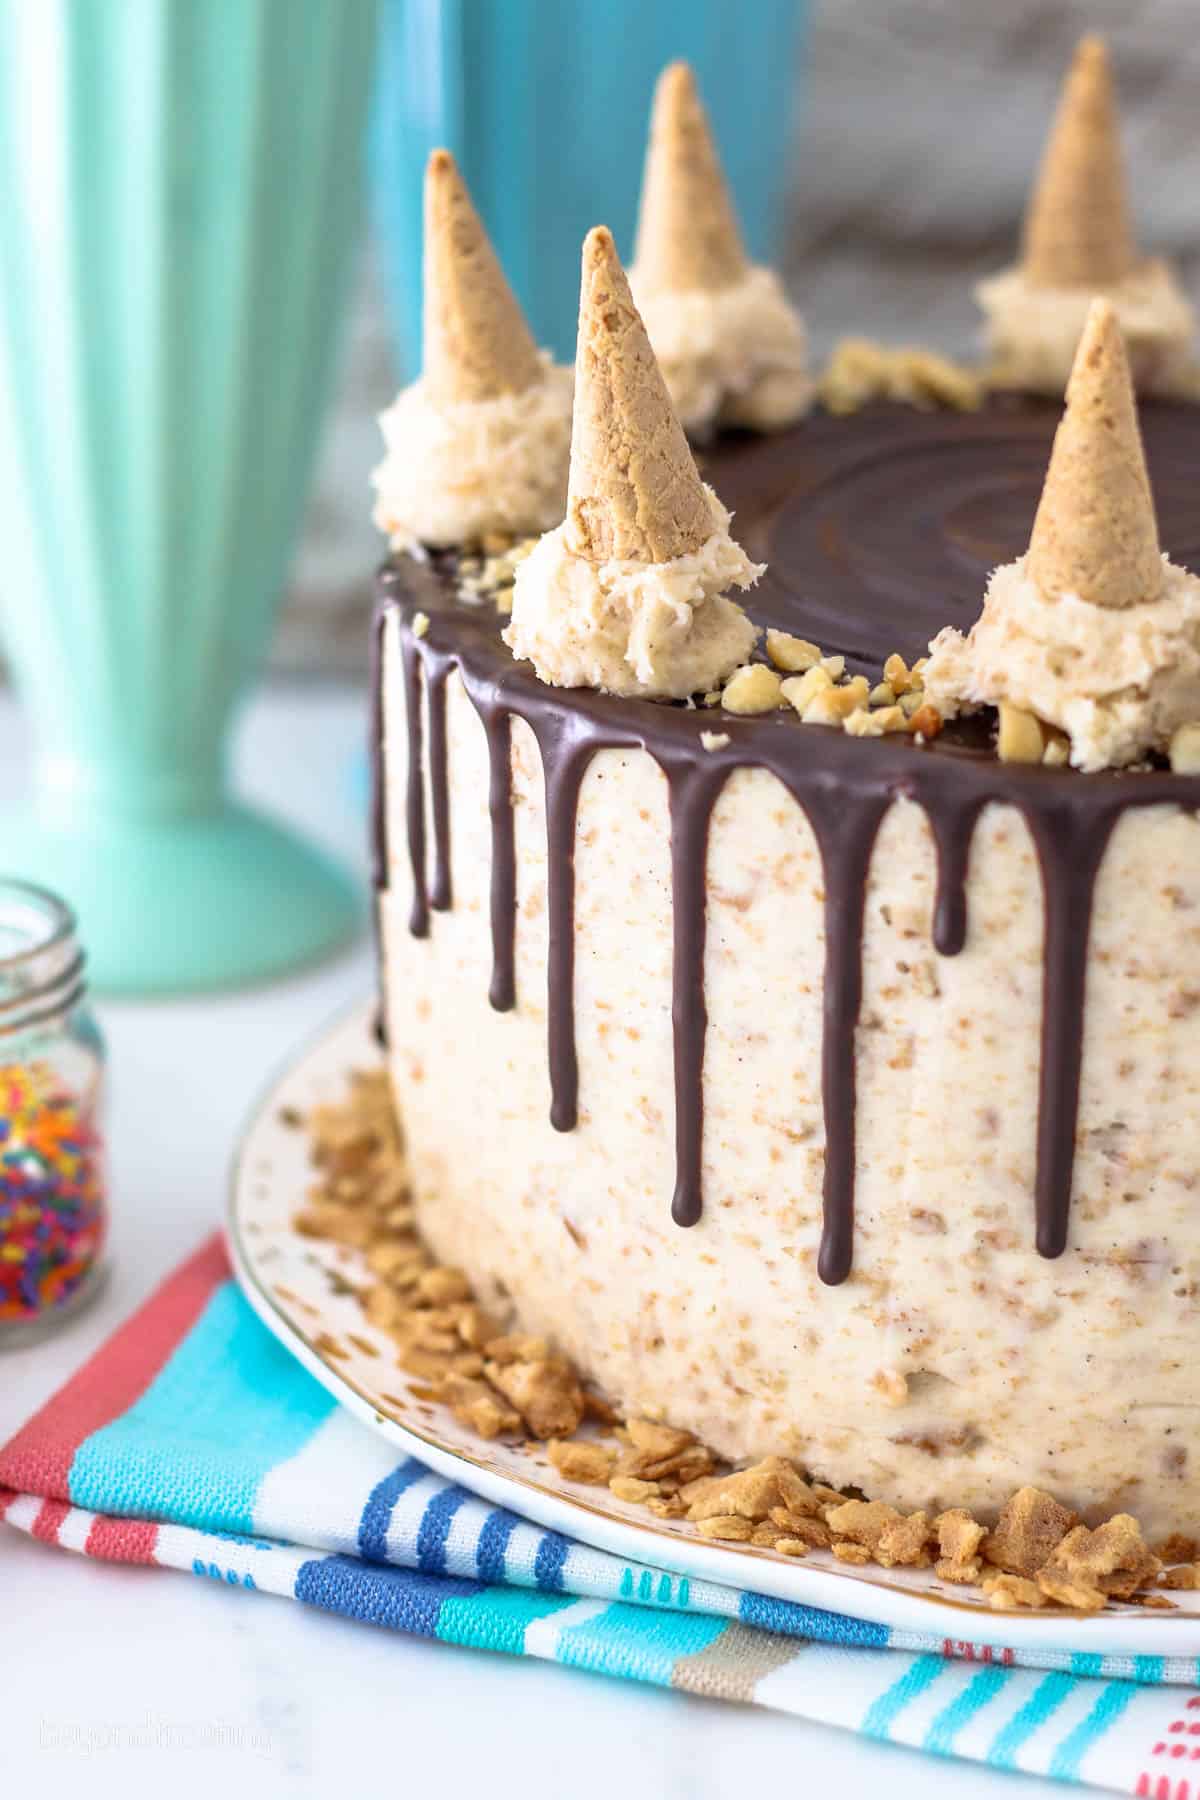
- Waffle Cones – We’re mixing crushed waffle cones right into the frosting, then using additional crushed waffle cone for garnish.
- Heavy Whipping Cream – If you don’t have heavy whipping cream for the frosting, you can use milk instead.
How to Make Drumstick Cake
This delicious drumstick cake looks more complicated than it actually is. Once you get into it, you’ll see just how easily it comes together! Here’s a breakdown of the recipe:
Cake
- Combine the wet ingredients: In a large bowl, combine sugar, oil, eggs, and vanilla bean paste. Beat until well-incorporated, then scrape down the bowl. Add in the sour cream and beat well.
- Add the dry ingredients: In a separate bowl, combine all of the dry ingredients Add half the dry ingredients to the wet batter, then pour in half the milk. Mix until just incorporated, then repeat with the remaining dry ingredients and milk.
- Divide and bake: Divide the batter evenly between three lined and greased baking pans. Bake at 350ºF until a toothpick comes out of the center of each cake clean, then remove from the oven and cool completely.
Frosting and Filling
- Beat the butter: Cut the butter into pieces, then use a paddle attachment to whip the butter until it’s whipped and fluffy.
- Grind the waffle cone: In a food processor, grind the waffle cones into a fine crumb.
- Combine: Slowly add the powdered sugar to the butter, alternating with the vanilla bean paste and whipping cream. Mix until incorporated, then increase the speed to high and beat until fully combined. Add in the ground waffle cone and whip until mixed and fluffy.
- Make the ganache: In a microwave-safe bowl, combine chocolate and whipping cream. Melt in 30-second increments and stir until combined, then cool.
Assembly
- Level the cake: If there is any doming on the cake, cut it off so it’s nice and level.
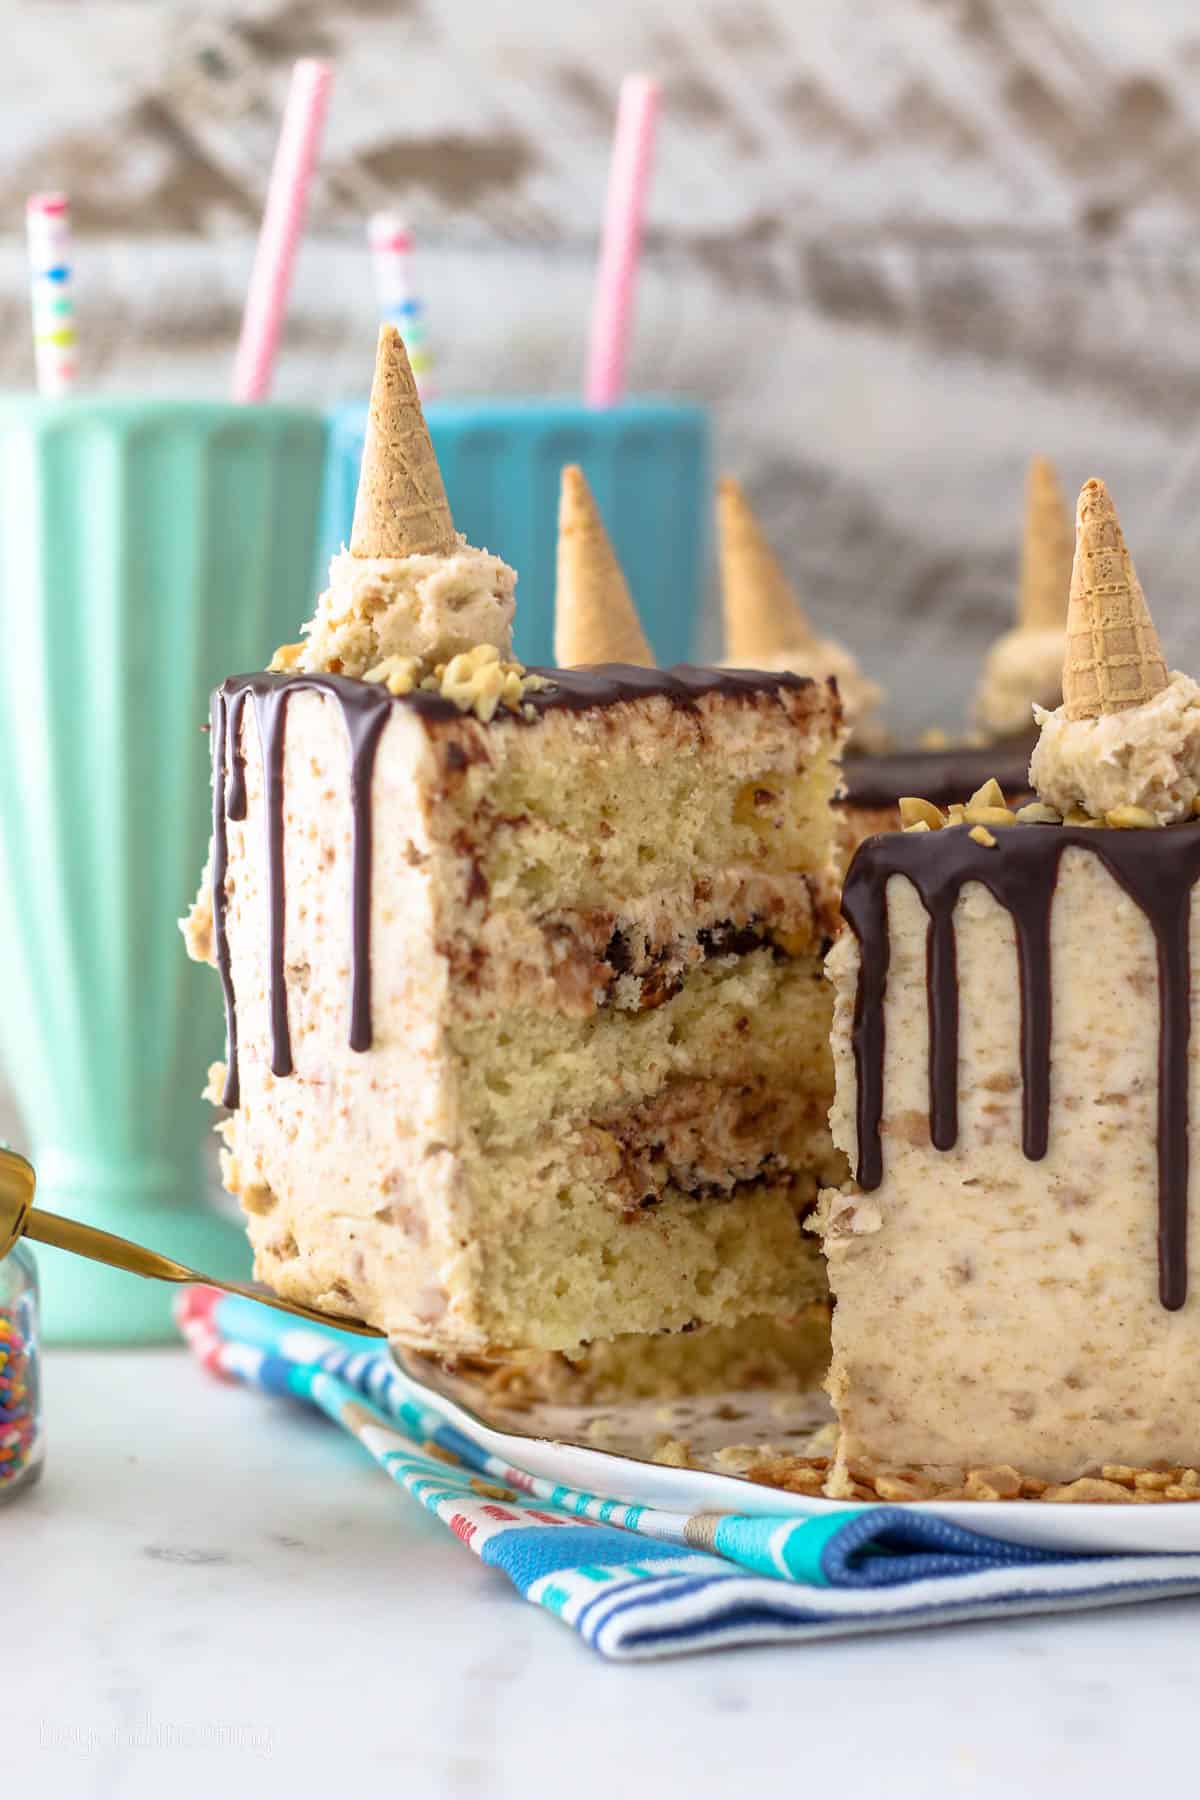
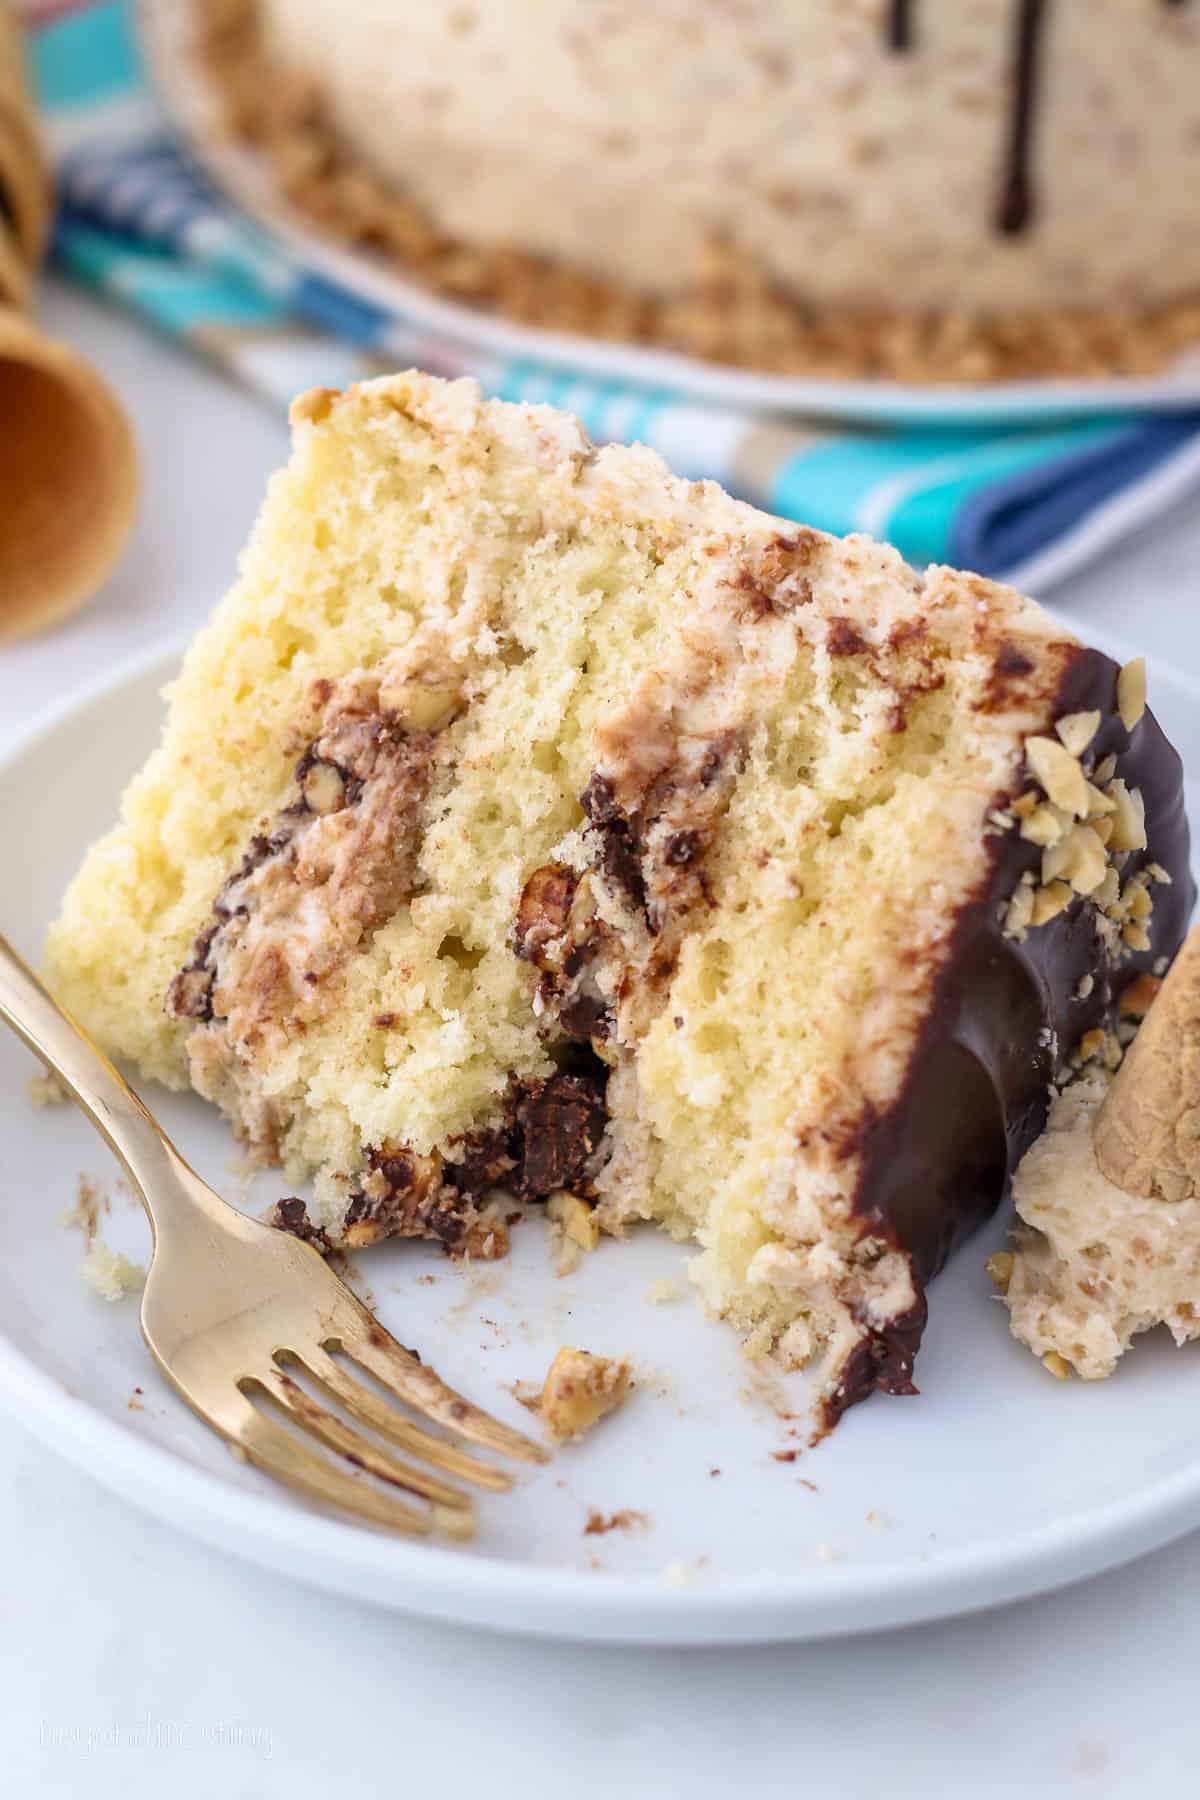
- Layer the cake: Transfer 1/2 of the frosting into a large piping bag, then pipe a thick dam around the outside edge of one layer of the cake. Spread half of the ganache in the middle, top with half of the chopped peanuts, then pipe a very thin layer of frosting over the top. Add the second layer, repeat the steps, then finish with the third cake layer.
- Top it off and chill: Use the piping bag to fill gaps between layers. Spread a thin layer of frosting around the top and edges of the cake, then pipe the frosting along the outside edge of the top of the cake. Use an offset spatula to create a smooth edge. Place in the fridge for 20 minutes.
- Add more ganache: Follow the same instructions to make the additional ganache, then use a spoon or piping bag to drizzle the ganache along the edges of the cake. Let set it completely.
- Add the cones: Use a small cookie scoop to scoop 8 dollops of frosting on the top of the cake. Slice the bottom of 8 waffle cones off, then set upside down on top of the frosting. Garnish with chopped nuts.
What Are the Nuts on Drumsticks?
Classic drumstick ice cream cones are coated in a layer of crushed, roasted peanuts. With that in mind, that’s what I used for this recipe!
That’s definitely not to say you have to use peanuts though. Feel free to swap the peanuts out for crushed walnuts, pecans, almonds, pistachios, you name it. You could also just leave the nuts off entirely if that’s your preference.
Recipe Tips and Notes
- Grease and line the cake pans. A layer of parchment paper on the bottom and a thin layer of cooking spray on the sides makes it so much easier to remove the cake from the pans after baking.
- Use bake even strips. These help the cake layers bake nice and flat so they layer easily. If the tops are too dome-shaped, you’ll need to slice them off to make the layers flatter.
- Start the frosting with cold butter. This is my secret to the best, fluffiest frosting. The butter must be whipped to be fluffy and spreadable before adding any powdered sugar.
- Grind the waffle cones into a fine crumb. The smaller pieces make it so much easier to spread and pipe the frosting.
- Filing and stacking. If you’ve never made a layer cake before, here is my quick tutorial for making layer cakes.
How to Store Finished Drumstick Cake
A fully assembled drumstick cake can be stored in an airtight container at room temperature for up to 3 days or in the fridge for up to 1 week. Serve at room temperature.
More Layer Cake Recipes You’ll Love
Print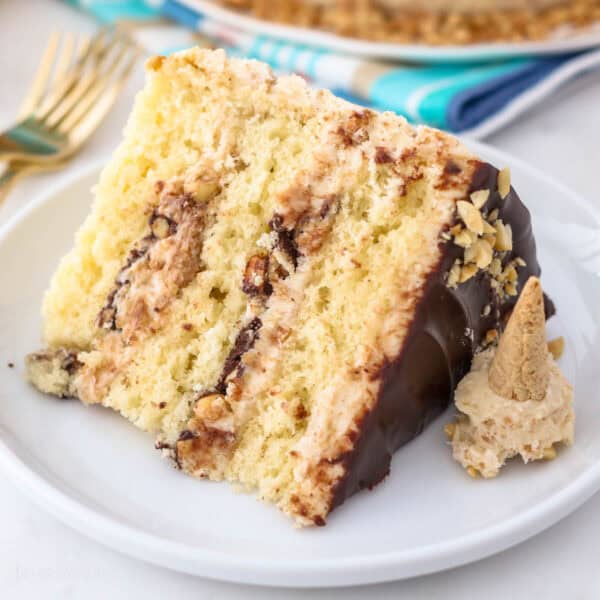
Drumstick Cake Recipe
- Prep Time: 1 hour
- Cook Time: 20 minutes
- Total Time: 1 hour and 20 minutes
- Yield: 10-12 servings
- Category: Dessert
- Method: Oven
- Cuisine: American
Description
This Drumstick Cake Recipe is a total showstopper! It’s made with layers of moist vanilla cake filled with fudgy chocolate ganache, chopped peanuts, and a waffle cone frosting.
Ingredients
For the Cake:
- 2 cups (380g) granulated sugar
- ½ cup (118 ml) vegetable oil
- 3 large eggs, at room temperature
- 1 tablespoon (14.8 ml) vanilla extract
- ½ cup(118 ml) sour cream, at room temperature
- 2 ½ cups (350 g) all-purpose flour, sifted
- 3 teaspoons (11.2 g) baking powder
- 1 teaspoon (5 g) salt
- 1 ¼ cups (296 ml) milk (I use nonfat), at room temperature
For the Frosting:
- 12 Waffle Cones, crushed
- 3 cups (668.5g) unsalted Butter, cold
- 9 cups (1171g) powdered Sugar
- 3 tablespoons (44ml) heavy whipping cream, or milk
- 2 tablespoons (30ml) vanilla bean paste, or extract
For the Ganache Filling:
- 3 ounces (85g) dark chocolate, chopped
- 6 tablespoons (90ml) heavy whipping cream
- 1 cup (161g) chopped peanuts
For the Topping:
- 2 ounces (57g) dark chocolate, chopped
- 2 tablespoons (30ml) heavy whipping cream
- 8 Waffle Cones
Instructions
For the Cake:
- Preheat the oven to 350°F. Prepare three 8-inch round baking pans, line the bottom with parchment paper and grease the sides. Prepare your bake even strips if desired.
- In a large mixing bowl, combine the sugar, vegetable oil, eggs and vanilla bean paste. Beat on medium speed until the eggs and oil are well incorporated and the batter is lighter in color, about 2 minutes. Scrape down the bowl as needed.
- Next mix in the sour cream and beat until well combined.
- Combine the dry ingredients in a separate bowl. Add half the dry ingredients, beat on low speed while pouring in half of the milk. Mix just until the flour starts to incorporate.
- Finally add the remaining dry ingredients, mixing on low speed while pouring in the remaining milk and beating until all of the ingredients are well combined. Use a spatula to scrape down the sides of the bowl and stir the batter from the bottom to the top to ensure it’s well mixed.
- Divide the batter evenly between the three pans, about 1 2/3 cups of batter per pan. Bake at 350°F for 20-23 minutes. Rotate your pans in the oven halfway through baking.
- Test the cake for doneness by inserting a toothpick into the center of the cake. If the toothpick comes out clean, your cake is done. Remove from the oven and allow to cool completely.
For the Frosting:
- Cut the butter into pieces. Using the paddle attachment, whip the butter for 5-7 minutes, scraping down the bowl occasionally. Beat until the butter looks light in color.
- In a food processor, grind the waffle cones into a fine crumb. Set aside.
- Slowly add the powdered sugar, 3 cups at a time, adding the heavy whipping cream and vanilla bean paste intermittently, mixing on low speed until it’s incorporated into the butter. Then increase the speed to high and beat for 60 seconds. Repeat until all your powdered sugar has been added.
- Finally, add the waffle cones and whip the frosting for 60-90 seconds at a high speed to whip additional air into your frosting.
For the Ganache Filling:
- In a microwave-safe bowl, combine the chocolate and heavy whipping cream. Melt the chocolate in the microwave at 50% power in 30-second increments and stir until completely combined.
Allow to cool and thicken.
To Assemble the Cake:
- Place half of the frosting in a large piping bag fitted with a large open round tip, or simply cut off the end of the piping bag.
- Pipe a thick dam around the outside edge of the cake, then spread half the ganache filling in the middle of the cake and top with half the chopped peanuts. Pipe a thin layer of frosting over top, and gently spread evenly.
- Add the second layer of cake and repeat the above steps using the remaining ganache filling and peanuts. Next, add the final layer of cake on top.
- Use your piping bag to fill in any gaps between your layers and to create a crumb coat on the top and edges of the cake. To finish, pipe the frosting along the outside edge of the cake using a large open round tip or a cake icer tip. Then use an offset spatula or icing smoother to create a smooth edge.
- You should have at least 1 cup of leftover frosting.
- Refrigerate this cake for 20 minutes and prepare the ganache topping following the same instructions as listed above. The ganache must be cool enough that it will run down your cake and stop. Test this by drizzling the chocolate down the side of the glass to ensure it’s not too runny.
- Use a spoon or piping bag to drizzle the ganache along the edges of the cake.
- The ganache must be set before adding the topping. Use a small cookie scoop (about ½ tablespoon in size), and scoop 8 dollops of the frosting on top. Slice the bottom of the waffle cones off, about 2 inches tall, and place on top of the frosting. Store in an airtight container.

Nutrition
- Serving Size: 1/10 of recipe
- Calories: 1662
- Sugar: 160g
- Sodium: 328mg
- Fat: 86g
- Saturated Fat: 42g
- Carbohydrates: 208g
- Fiber: 2g
- Protein: 10g
Filed Under:
This recipe originally appeared on Food Fanatic.


For the ganache topping you show a 1:1 mixture in the recipe, but in your description you show 3:1 saying it should be thinner in order to drip down the sides. Would this be 2 oz chocolate to 6 oz of heavy cream, or would this make too much and the proportions should be less?
Hi Genie, thank you so much for pointing that out! It is correct, the ganache drip is a 3:1 ration. 6 tablespoons heavy whipped cream to 2 ounces chocolate. I usually heat 5 tablespoons of heavy cream and add the last tablespoon as needed to thin it out. I will get that updated, thank you!
We really enjoyed your cake, thank you for sharing your recipe! The cake was moist and had great flavor. The waffle cone frosting was genius. We loved the crunch. Thank you!
Amazing!! Thank you so much Pam!