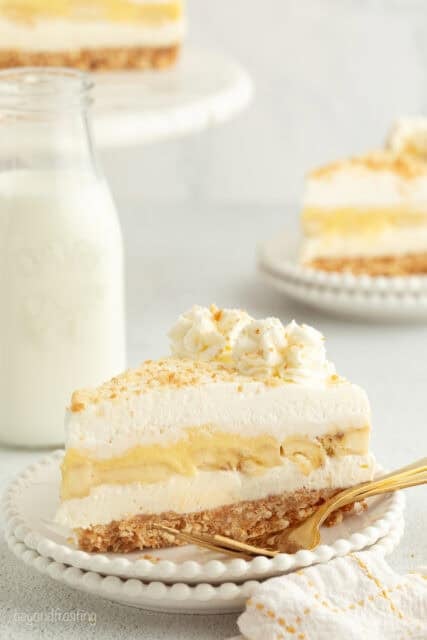
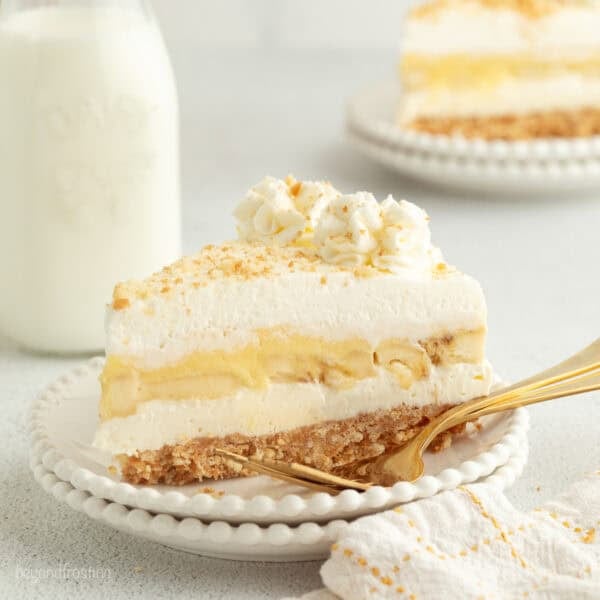
This no-bake banana pudding cheesecake features layers of creamy cheesecake filling, fresh banana slices, silky homemade pudding, and fluffy whipped cream in a crunchy vanilla wafer crust. It’s the perfect dessert to make ahead for a special occasion!

Today’s banana pudding cheesecake combines my banana pudding recipe with my favorite no-bake cheesecake and elements of a fluffy banana pudding pie. With all of its amazing no-bake layers, you’re going to need an extra-large fork to dig in. The creamy cheesecake filling and smooth vanilla pudding are an unexpected combination, paired with a buttery wafer crust, ripe banana slices, and light whipped cream topping.
There’s a reason the QVC Network featured this cheesecake when I debuted my cookbook live on In The Kitchen with David! If you have a warm-weather holiday, barbecue, or occasion coming up, this is a great dessert to prepare ahead of time.
About This No-Bake Banana Pudding Cheesecake
- Make-ahead magic. This dessert is assembled in layers and needs time to chill in the fridge. Prepare the crust and cheesecake layer together, and prepare the pudding layer ahead of time.
- 5 layers of bliss. You have a crunchy cookie crust, creamy cheesecake, rich homemade pudding, sweet banana slices, and finally, a thick layer of whipped cream to top it all off. If this sounds like a lot, don’t worry. Each component is easy to make, and I share a few short cuts you can take, like instant pudding and store-bought whipped topping, if you’re pressed for time.
- No oven! Best of all, you can give your oven a vacation when making this banana pudding cheesecake from scratch. None of the layers require baking. It’s the ultimate no-bake cheesecake for the banana lover in your life.

Ingredient Notes
Many of the ingredients overlap between the layers in this no-bake banana cheesecake. I’ve included notes on what you’ll need and possible substitutions below. Scroll to the printable recipe card for the exact recipe amounts.
- Egg Yolks – You’ll need just the beaten yolks to make a custardy base for the homemade pudding. Separate the eggs while they’re cold, as it’s easier this way.
- All-Purpose Flour – To thicken the pudding. You could also use cornstarch (you’ll need approximately half the amount of cornstarch as flour).
- Heavy Whipping Cream – You’ll need this for the pudding, cheesecake, and topping. Full-fat heavy cream yields the creamiest results.
- Cream Cheese – Use the cream cheese that comes in bricks, not tubs, and soften it before you start.
- Sugar – You’ll need granulated sugar to use in the pudding and cheesecake layers. In the whipped topping, powdered sugar (confectioners’ sugar) is essential for a smooth consistency.
- Fresh Bananas – Sliced into ¼ to ½-inch rounds. To keep the bananas from browning, brush them with a little lemon juice on both sides. Too much lemon impacts the flavor, however, so use it sparingly.
- Nilla Wafers – To grind up and combine with melted butter to make a no-bake crust. I assemble my cheesecake in a vanilla wafer crust, but you can make this recipe with a graham cracker crust or use Golden Oreos for an Oreo crust if you prefer.

Time-Saving Shortcuts
I always recommend making this banana pudding cheesecake from scratch when possible, but there are select shortcuts you can take if time isn’t on your side. We’ve all been there! Here’s what I’d suggest:
- Instant pudding. Swap the homemade pudding with a box of an instant vanilla pudding mix. You could even use instant banana pudding to play up the banana flavor.
- Cool Whip. Instead of homemade whipped cream, thaw out tubs of Cool Whip to use in the pudding, cheesecake, and topping layers.

How to Make No-Bake Banana Pudding Cheesecake
Whenever I’ve prepared this cheesecake over the years, I’ll often make the pudding and crust the night before, and add the fresh bananas and whipped topping before serving. While they will keep in the fridge, too, I prefer them fresh. Follow the steps below.
No-Bake Crust
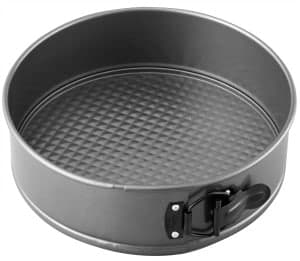
The perfect no-bake cheesecake comes down to a sturdy crust. If this is new territory for you, I have a full, step-by-step guide that covers how to make a no-bake crust in a springform pan.
- Prepare the pan. Grease the edges of a 9-inch springform pan. Alternatively, use a cake collar to line the inside of the pan for the cleanest edges.
- Make the crust. Grind the wafers into crumbs, and melt the butter. Combine the two and stir until you have a moist, sandy mixture. Press the crust mixture firmly into the bottom of your prepared pan.
- Chill the crust. Place the cheesecake crust into the fridge while you prepare the rest of the layers.

Make the Pudding
When preparing pudding from scratch, measure out all of the pudding ingredients before you start. This is a French cooking technique called mise en place (“everything in its place”), and it applies to baking, too! Once you start, the pudding comes together quickly. It’s best to have all of your ingredients ready to go.
- Beat the egg yolks. Whisk the eggs in a small bowl to lightly beat them.
- Combine the ingredients. Next, add the sugar, flour, and salt to a saucepan. Pour in the heavy cream and add the vanilla. Heat the mixture over medium-low heat for about 5 minutes, whisking constantly until the dry ingredients fully dissolve.
- Temper the eggs. When the cream mixture is warm but not boiling, whisk ¼ cup into the egg yolks to temper them. Immediately pour the tempered yolks into the saucepan with the rest of the mixture. Keep whisking over medium-low heat while the pudding starts to thicken.


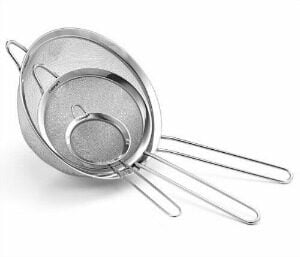
- Strain. Once the thickened pudding starts to bubble, take the pot off the heat. Pass the pudding through a mesh sieve into a bowl. This step is key to removing any small clumps that may not have fully dissolved.
- Cover and cool. Cover the pudding with plastic wrap, pressing it directly against the surface of the pudding. This will keep a “skin” from forming. Poke a few holes in the top of the plastic with a toothpick so steam can escape. Cool the pudding on the counter for 30 minutes, then move it to the fridge. Chill for 2 hours, until the pudding is cold.


Assemble the Cheesecake
While the pudding is in the fridge, prepare the cheesecake filling. Last but not least, you’ll put it all together!
- Make the no-bake filling. Beat the cream cheese in a bowl until it’s free of lumps, then add the sugar. Beat until it’s smooth and combined before adding the heavy cream and vanilla. The mixture should be smooth and creamy.
- Fill the crust. Take out your crust and pour in the cheesecake filling. Spread it in an even layer, and place the cheesecake into the fridge to chill, also for 2 hours.


- Add the banana slices. Arrange the banana slices on top of the cheesecake. I recommend aligning them on the outside of the cheesecake and working inward to make a full layer.
- Add the pudding. Next, spread the chilled pudding over the bananas.


Add the Whipped Cream
I’ll often wait until it’s time to serve before whipping the topping.
- Chill the bowl. First, place the mixing bowl into your freezer for 5-10 minutes.
- Whip the cream. Next, add the heavy cream to the cold bowl. Beat until it forms soft peaks. Then, add the powdered sugar and beat again until stiff peaks form. If you’d like, set aside 1 ¼ cups of the whipped cream to use for decorating. The rest you’ll spread on top as the final layer of the cheesecake.
- Top with whipped cream. Finally, add the whipped cream on top and spread it out smoothly. Use the reserved whipped cream from earlier to pipe a border along the top edge of the cheesecake. Sprinkle on the crushed vanilla wafers.
- Chill. Return the banana pudding cheesecake to the fridge for another 2-4 hours to allow all of the ingredients to properly set, then enjoy!
Cheesecake Topping Ideas
Want to top your no-bake banana pudding cheesecake with something other than vanilla wafer crumbs? Try one of these alternatives.
- Hot fudge sauce or salted caramel sauce
- Chopped pecans
- Toasted coconut
- White chocolate ganache

Tips for the Best Banana Pudding Cheesecake
- Temper the egg yolks. If you don’t pour some of your warm cream mixture into the eggs and whisk vigorously before you add the eggs to the saucepan, they’re going to heat up too rapidly and scramble. You have to temper them in order to keep them from cooking.
- Whisk constantly while the pudding cooks. It’s important to whisk the cream mixture continuously so that the dry ingredients dissolve completely. Once you add the tempered eggs to the hot saucepan, don’t stop whisking until the mixture thickens and bubbles. At that point, remove it from the heat.
- Different pan options. I always use my trusty springform pan for this recipe, but if you don’t have one, don’t worry. You can use a square 9-inch pan as long as it’s at least 3 inches tall to accommodate all those yummy layers.
- Prevent the bananas from browning. You can use the lemon juice trick mentioned in the Ingredients section earlier, or, another way to keep the bananas fresh in the assembled cheesecake is to cover the outside edge with whipped cream. That way, the bananas stay completely covered and will remain yellow for as long as the cake stays fresh! And you don’t even have to prepare any extra whipped cream to do so. This recipe makes plenty.

Storage Instructions
- Refrigerate. This banana pudding cheesecake will stay fresh in the fridge for up to 3 days after it’s made. Be sure to keep it in an airtight container, or make sure the pan is tightly covered.
- Freeze. It’s not my preference to freeze this cheesecake simply because of the variety of textures, and the consistency of the whipped cream topping may change. If you need to freeze it, place the entire cheesecake into a freezer-safe container and store it for up to 1 month. Thaw it out in the fridge before digging in.
More No-Bake Desserts
No-Bake Banana Pudding Cheesecake
- Prep Time: 90 minutes
- Cook Time: 0 minutes
- Total Time: 5 hours 30 minutes
- Yield: 10 slices
- Category: Dessert
- Method: No Bake
- Cuisine: American
Description
This banana pudding cheesecake has a creamy no-bake cheesecake filling, a blanket of fresh banana slices, silky homemade pudding, and fluffy whipped cream on top!
Ingredients
For the Homemade Pudding
- 2 large egg yolks, slightly beaten
- 1/3 cup (64 g) granulated sugar
- 2 tbsp (16 g) all-purpose flour
- Dash of salt
- 1 ½ cups (355 ml) heavy whipping cream
- ½ tsp vanilla extract
For the Crust
- 11 oz (312 g) vanilla wafers
- 1/2 cup (113 g) unsalted butter, melted
For the Cheesecake Filling
- 16 oz (454 g) cream cheese, softened
- ½ cup (96 g) granulated sugar
- 2 tbsp (30 ml) heavy whipping cream
- 1 tsp vanilla extract
For the Whipped Cream Topping
- 2 cups (473 ml) heavy whipping cream
- 1 ½ cups (195 g) powdered sugar
- 2 whole bananas, sliced
- 6–8 vanilla wafers, crushed
Instructions
Make the Pudding
- Measure out all of the ingredients for the pudding prior to starting. Place egg yolks in a separate bowl and whisk.
- In a medium-sized saucepan, add sugar, flour, and salt, and whisk to combine.
- Add the heavy whipping cream and vanilla extract, and heat the mixture on the stovetop over medium-low heat. Whisk constantly to dissolve the dry ingredients into the cream mixture.
- After 5 or so minutes, once the mixture is warm (but not boiling), pour about ¼ cup of the cream mixture into the egg yolks and whisk vigorously to temper. Immediately pour the egg yolks into the saucepan and continue whisking over medium-low heat to prevent the eggs from cooking. Whisk until the pudding starts to thicken.
- Once the mixture is thick and bubbly, remove it from the heat. Strain pudding through a fine sieve into a medium-size bowl.
- Immediately cover the top of the pudding with clear plastic wrap (directly on the surface of the pudding), and poke a few holes with a toothpick. Allow the pudding to cool for 30 minutes at room temperature, and then refrigerate for 2 hours until the pudding is cold.
Make the Crust
- Prepare a 9-inch springform pan by lightly greasing the edges of the pan with cooking spray and then wiping gently with a paper towel.
- Grind the wafers into fine crumbs using a food processor or blender. In a microwave-safe bowl, microwave the butter for 45-60 seconds until the butter is melted.
- Pour the melted butter into the cookie crumbs and stir until there are no dry crumbs left. Pour the crumbs into your springform pan and press firmly into the bottom to create a thick crust.
Make the Filling
- Beat cream cheese on medium-high speed for 2-3 minutes until it’s light and fluffy and free of lumps.
- Slowly add sugar into the cream cheese while continuing to beat the mixture, scraping down the bowl as needed.
- Next, add heavy whipping cream and vanilla extract. Beat until the filling is smooth and creamy.
- Pour cheesecake filling into the prepared pie crust, cover, and refrigerate for 2 hours.
Make the Topping
- Prepare the whipped cream by placing the mixing bowl in the freezer for 5-10 minutes to chill. Pour heavy whipping cream into the chilled bowl, and beat heavy cream on medium-high speed until it reaches soft peaks.
- Add powdered sugar and continue beating until stiff peaks form. Set aside t 1 ¼ cups of the whipped cream for piping the edge of the cake.
Assemble
- To assemble cheesecake, slice bananas about 1/2 inch thick. Start by aligning them on the outside of the cheesecake and work your way in toward the middle. Pour chilled pudding over the top of sliced bananas, spreading evenly. Add whipped cream on top and spread it smoothly.
- Use the prepared whipped cream to pipe a border along the top of the cheesecake. Garnish with crushed vanilla wafers. This cheesecake must be refrigerated for another 2-4 hours before serving to allow all the ingredients to set properly.
Notes
- To store: Keep cheesecake in an airtight container in the fridge for up to 3 days.
- To prepare ahead of time: Crust, cheesecake filling and pudding layer can all be prepared 24 hours in advance. I recommend assembling the cheesecake, including the bananas and whipped cream the day you intend to serve for best results. Allow 2 hours for the finished cheesecake to set prior to serving.
- Substitute instant pudding. Swap the homemade pudding with a box of an instant vanilla pudding mix. You could even use instant banana pudding to play up the banana flavor.
- Substitute with Cool Whip. Instead of homemade whipped cream for the topping, thaw out an 8-ounce tub of Cool Whip.
Nutrition
- Serving Size: 1 Slice
- Calories: 847
- Sugar: 51.3 g
- Sodium: 294.5 mg
- Fat: 61.9 g
- Carbohydrates: 69 g
- Fiber: 1.1 g
- Protein: 7.5 g
- Cholesterol: 203.3 mg


Interesting recipe and fun to make. . I used Jello pudding in the first one I made. I’ll use the pudding recipe the next time.
Everyone loved the end result. Totally delicious and I can see making it sugar free for my diabetic friend. .
Thank you for sharing this wonderful recipe.
Hi Patsy, thank you so much! I’m glad everyone loved it and hope you are able to make it again soon!
Great cheesecake. It was a lot of waiting before the next step, but the outcome was well worth it. My family loved it and I will defiantly make it again. Thank you so much for this recipe. I was wondering if you might have an orange cheesecake recipe that you would share. The recipes look so good but everything I have tried of yours was a big success so why would I not go with all your recipes.
I am SO happy you found this recipe. It is so delicious and I wish it got more attention! I do not currently have an orange cheesecake
I love no bake cookies YUM YUM!!!!
My favorite no Bake Treat is making a Pop Corn Cake
It is a cake made from pop corn and you decorate it with different candies. I usually make them at Christmas Time and use Red and Green M&M’s.
banana pudding
Love no bake cheesecakes.
I’m drooling over this cheesecake! Everything about it is incredible!
My favorite no-bake recipe is no bake cookies.
I love many no bake treats, but especially no bake cheesecakes! Thanks for the chance to win.
I absolutely LOVE banana pudding. I also love those no bake pb and chocolate bars!
I’m a NW girl, but I live in the South now. I think I could eat banana pudding everyday for breakfast 🙂
My favorite no bake treats are probably rice krispy treats because they’re easy to throw together, you can change the mix ins and the kids (old and young!) love them. But that banana cheesecake looks absolutely scrumptious!
I love to make no bake cheesecakes because when I try the baked kind they never turn out for me. Oh does this one ever look good! I’ve pinned to make once I get all the ingredients together 🙂
Banana pudding is my favorite! This banana cheesecake looks so yummy.
I love the new look of your blog! Yes, I remember David’s happy dance on QVC. This looks delicious. Happy 90 day book birthday.
I love layer bars, with melted chocolate and a cookie crust and cream cheese.