This step-by-step tutorial will teach you how to make a no-bake crust in a springform pan! I share all my tips for a sturdy, buttery no-bake cookie crust that holds up against any delicious dessert you fill it with. Plus, how to line the pan, shape the crust, and store it.
Afterward, use this crust for your favorite no-bake desserts, from pudding and marshmallow pie to lemon cream pie and no-bake pumpkin cheesecake.

While testing the recipes for my cookbook, I lost count of the number of no-bake crusts I made! There was a time when I purchased a dozen packages of Oreos for all the recipe testing I did. Since I have so many no-bake desserts on the site, I wanted to share how to make a perfect no-bake crust in a springform pan. This tutorial covers all the bases, from my easy no-bake crust “formula” to how to line the pan, shape the crust, and store it, with all of my tips and tricks along the way. I include a handy video, too, so you can see this tutorial in action!
What Is a Springform Pan?
Let’s start with the basics. A springform pan is a round baking pan with a removable side and bottom. The side of the pan is attached with a clamp, allowing you to release the spring when you want to remove the sides of the pan. Thus the name, “springform” pan.
There are lots of advantages to using a springform pan, but my top reasons are:
- It makes it easy to release desserts from the pan. The #1 reason to use a springform pan? It makes it cleaner and easier to remove the dessert. It’s ideal when it would otherwise be difficult or impossible to remove a no-bake treat with a crust, like lemon cream pie, from a traditional round baking pan.
- It has tall, deep-dish sides. You can make nice, deep-dish no-bake pies and cheesecakes since the sides of a springform pan usually reach 3 inches tall. A standard pie plate doesn’t allow for as much filling!
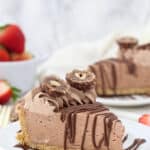
- Get clean, perfect edges. I love the tidy, clean look of desserts like my Oreo mousse cake, made in a springform pan. You can simply pop off the sides of the pan afterward for a nice, clean edge and perfect slices.

The Best Crust for a Springform Pan
There are all types of crusts that you can prepare in a springform pan. For no-bake desserts, it’s often a cookie crust, like a Graham cracker crust or Oreo crust. These are typically made from finely ground crumbs mixed with melted butter and sugar (some recipes use corn syrup or honey).
Cookie crusts are sturdy and hold their shape, and can be baked or left unbaked, making them ideal for springform pans. You can also make a deep-dish flaky pie crust in a springform pan, but that’s a tutorial for another day!

What Cookies Should I Use for a No-Bake Cheesecake Crust?
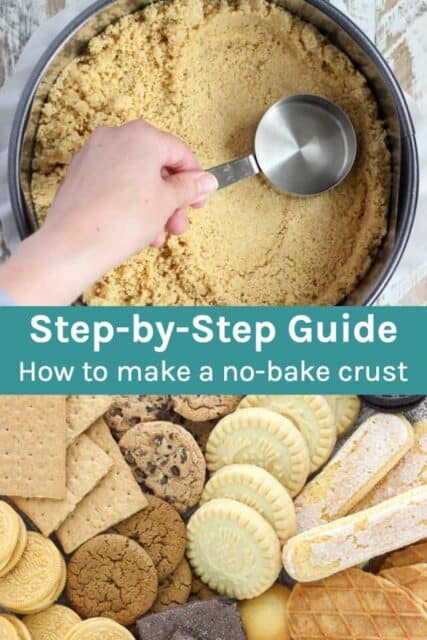
You’ll find crust recipes made from chocolate chip cookies, shortbread cookies, gingersnaps, Nilla wafers, peanut butter cookies, waffle cones, Ritz crackers or even potato chips.
Why is this crust ingredient so important? The type of cookie you use directly affects the amount of butter you need for the crust. Cookies like Oreos and shortbreads already have a high butter content, which means your crust recipe requires LESS butter than if you made it with a dryer cookie, like a Graham crackers or Nilla Wafers. Take the following examples:
Oreo Cookie Crust
For this tutorial, I use Golden Oreos. I used 8 tablespoons of butter for a 14-ounce package of Oreo cookies (about 3 ½ cups of ground cookie crumbs). This makes a nice, thick, and tall crust. I do not remove the filling of the Oreos.
Graham Cracker Crust
For a no-bake Graham cracker crust, I usually use about 2 ½ cups of Graham cracker crumbs with 8 tablespoons of melted butter. Oftentimes, I’ll also add brown sugar and/or cinnamon to the crust for sweetness and flavor.
Crust recipes also differ depending on the amount of filling. Be sure to refer to the recipe amounts and instructions for the individual recipe you’re using.


First, Prepare the Crust
- Grind the cookies. I prefer to use my food processor to grind cookies into fine crumbs. You can also use a blender, or even go the old-school method and crush up the cookies using a Ziploc bag and a rolling pin. As long as you don’t have any big crumbs left, you’ll be just fine!
- Next, mix the crust. I always use unsalted butter in my crust recipes, as it doesn’t overpower the other flavors. Melt the butter in the microwave and then stir it into the cookie crumbs.
Get the Right Consistency
Once the crumbs are well mixed into the butter, pinch the mixture between your fingers. If the crust sticks together, this means that your crust mixture has enough butter to hold the crust together in the pan. If you feel the crumbs are too dry, add more butter, 1 tablespoon at a time, until it reaches the right consistency.
There are still times when I press my crust into the pan and it crumbles, indicating that the mixture is dry. When this happens, I scrape the crust back into the bowl, add more butter, and remix it. Otherwise, a crust that doesn’t have enough butter may crack or crumble when you cut into it.


Step-By-Step: How to Make a No-Bake Crust in a Springform Pan
Now that you have your crust ready, it’s time to prepare your springform pan and assemble the crust inside it.
How to Line the Pan With Parchment Paper
My most commonly used pan is a 9-inch springform pan. I always line the bottom of my pans with parchment paper. This allows me to transfer the dessert inside onto another plate (this only works with desserts with stable fillings, and not a pudding pie, for example). Lining the pan also helps to prevent the crust from sticking to the bottom and sides of the pan.
There are two ways that you can do this:
- Trace the pan. You can cut out (or use a pre-cut) parchment circle. If you are cutting it yourself, just use a pencil and trace the bottom of the pan before cutting out the circle.
- The second way is the more common way, and it’s how I prepare my pan. Tear off a square of parchment paper. Lay this over the bottom of the springform pan, and close the sides of the pan around the paper. Afterward, trim the excess paper around the outside of the pan.


When Should I Use a Cake Collar?
Collaring is a technique where you line a pan just above the edge. A cake collar is a tool made from acetate, but you can also make one from parchment paper cut just taller than the height of the pan. I’ll use a collar if I am making a really tall cake, as the lining helps keep everything nice and even on the inside of the pan. It also helps to prevent the crust from sticking to the sides of the pan, since you can simply peel the collar away after you’ve removed the sides of the springform pan.
If you don’t have a cake collar for your springform pan, don’t worry! Just take a little cooking spray and coat the edges of the pan, wiping gently with a paper towel. This was a tip I learned from my friend Lindsay.
Assemble the Crust in the Springform Pan
Once your parchment is prepared, you’re ready to press the crust mixture into the bottom and up the sides of the pan.
- Add the crust to the pan. Pour your prepared crust mixture into the pan. Spread the crumbs around with your hands or a spatula.
- Start with the crust walls. Next, use a measuring cup to push the crumbs to the side to build up the walls for the crust. You may need to wipe the edges of the measuring cup as you work. Press the crust firmly against the walls of the pan and work your way around the edges.
- Press the crust into the bottom of the pan. Now, work your way into the middle of the pan, pressing the crust tightly against the bottom.
- My final step for a perfect-looking crust: Use an angled spatula or your fingers to gently even out the top edges of the crust. The angled spatula makes it easier to press the bottom of the crust and around the edges in precise locations.
Chill the Crust
Generally, I’ll refrigerate or freeze my crust for 20-30 minutes before I add the filling. This step is optional, but chilling the crust prevents it from tearing if I need to spread the filling inside.


Frequently Asked Questions
Do I Need to Blind-Bake the Crust?
Not necessarily. Some recipes call for blind baking a cookie crust for 10 minutes in a preheated oven. This is the same method you’d use to blind bake a flaky pie crust. It helps bind the crust together and creates a sturdier base, especially if you’re using a particularly wet or loose filling. However, I rarely blind-bake crusts for my no-bake recipes.
What Can I Use Instead of a Springform Pan?
In most cases, a deep dish or standard pie pan can be used as an alternative to a springform pan. However, it depends on the type of dessert you’re looking to prepare. Most springform pans are 3 inches tall, whereas standard pie plates and 9-inch square pans are not quite as deep, so the amount of crust and filling may need to be adjusted.
Normally, I’d recommend using a 9-inch square pan instead of a springform pan. To make it easier to remove the slices, be sure to line the pan with parchment paper. However, I don’t recommend trying to remove a whole dessert from a 9-inch standard pan, as the crust will likely buckle in the middle.

Try These Springform Pan Recipes


Make-Ahead, Storage, and Freezing
- Refrigerate. If you’re preparing your no-bake crust in advance, cover it tightly and keep it in the fridge until it’s time to fill it.
- Freeze. You can also freeze your crust inside the springform pan. Wrap it tightly in plastic wrap, then a layer of foil, and freeze the crust for up to 3 months. When you’re ready to use your crust, thaw it in the fridge before you fill it.
There you have it, folks! I hope you make all kinds of delicious no-bake desserts following this easy tutorial. And do share them in the comments! If you’re looking for even more springform pan tutorials, my friend Dorothy has a perfect shortbread crust. If you’re baking a cheesecake, check out Lindsay’s tutorial for preparing your springform pan for a water bath.
More Baking Tutorials
How to Make a No-Bake Crust in a Springform Pan
- Prep Time: 10 minutes
- Total Time: 10 minutes
- Yield: 9 inch crust
- Category: Desserts
- Method: No-Bake
- Cuisine: American
Description
Learn how to make a perfect no-bake crust in a springform pan! I share all my tips for a sturdy, buttery no-bake cookie crust. Plus, how to line the pan, shape the crust, and store it.
Ingredients
For the Crust:
- 1 package Oreo cookies (14 oz)
- 8 tablespoons unsalted butter
Instructions
- For the crust: Prepare a 9-inch springform pan by lightly greasing the edges of the pan with cooking spray, and then wiping gently with a paper towel. Line the bottom of the pan with parchment paper.
- Grind the cookies into a fine crumb using a food processor or blender. Do not remove the filling.
- In a small bowl, melt the butter in the microwave for 30 to 45 seconds. Pour the melted butter over the cookie crumbs and stir until the crumbs are well coated.
- Pour the crumbs into your springform pan and press firmly into the bottom and up on the sides to create a thick crust. Refrigerate the crust while you are preparing the filling.
Notes
- A full package of Oreos (14 oz) has 3 1/2 cups (315g) of crumbs and has 36 cookies
- 12 Oreos is about 1 1/4 cup (112g) of crumbs
- For flavored Oreos (Golden, Lemon etc 15 oz+) use 7 tablespoons melted butter. There are less cookies in this package but there’s more filling.
- Other crust options include: Shortbread cookies, graham crackers, Nilla Wafers, Nutter Butters, Chocolate Chip Cookies, Gingersnaps or shortbread cookies.
- For a graham cracker crust you need 2 ¼ cups graham crackers crumbs and 8 tablespoons unsalted butter
- For a 9-inch pie plate, reduce the crust to 24-26 Oreos and 6-7 tablespoons of butter
- For shortbread cookies, reduce to 6 tablespoons of butter since the cookies themselves have a lot of butter.
Filed Under:


Taking my no bake cheesecake to someone’s house. When do I remove the sides of the springform pan – no or when I get there?
I’d keep it in the pan until you get there if you can, just to help keep it well intact
O wow I have got to get me one of those. I just bought a springform pan online to use instead of my usual regular pie pan. Then while shopping I saw one a bit bigger and bought two of those. I got silicone spatulas to remove the cheesecakes, but now I read your page and am going to use parchment. And now I hear about this amazing cake spatula……ahhh thanks for all the tips!!!🥮🥮🥮🧁🧁🧁🍪🍪🍪🥧🥧🥧🍰🍰🍰
I just use your receipe to make the happy birthday cheesecake which i have borrow from the library, once all done, i need to put inside the freezer or just inside the fridge?
Your receipe are awesome!!
Hi Sybil, I am sorry I am not sure which recipe you’re referring to but generally cheesecakes just need to be refrigerated!
How do you remove the parchement paper at the bottom when the cake is done?
Hi Alfred, depends on the dessert. I like the parchment paper to hang over the edges, and most of them time, I can just slide it out. I also have a cake lifter which is a wide spatula that I can slide under my cakes.
I just bought a springform pan and got a recipe for a key lime pie. However, my husband purchased the ready made graham cracker crust. Can I break that up and use it in the springform pan?
Hi Lynn, I have never tried that before. You may need to add some additional butter it order for it to stick together again.
I’m making a no bake cheesecake today. I’ve never done it in a springform pan but would like to. I’m so scared it’ll stick though when I take the sides off the pan!
Hi Jenna, how did it turn out! Sometimes I find if I wipe down the inside of the pan with cooking spray that it will help. I also sometimes flash freeze the crust while I am preparing the filling and then try to remove the edges before I add the filling to see if any spots are sticking it will also help to line the insides of the pan with parchment paper.
I love these tips — thank you!
You are so welcome Joanne!
Love it! Such great tips! And man, that is one beautiful hand pouring the butter into the bowl. 😉
HA!
I agree, a pie looks SO much lovelier in a springform pan!! My biggest fear is that it will come apart when I slip the sides off, so I LOVE these tips!!
When Lindsay told me her trick for spray the sides of the pan it was life changing. Then I did buy a bunch of the acetate stripes, but I wash them and reuse them!