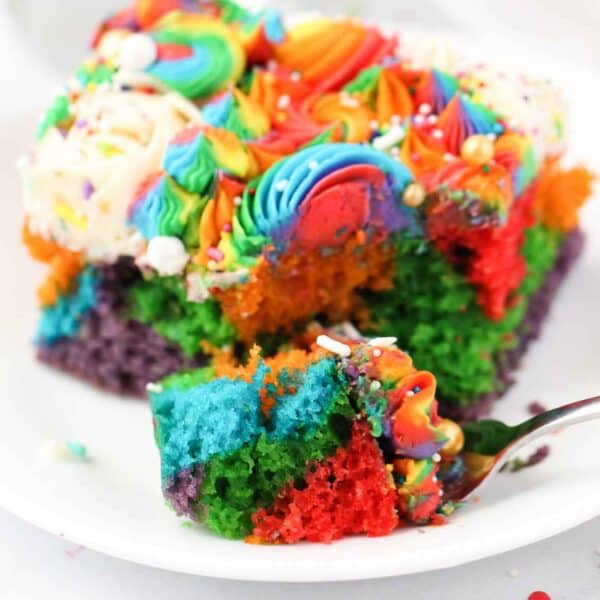
This bright and vibrant rainbow cake is such a fun and easy birthday cake idea! The moist yellow cake and buttercream frosting are swirled with the colors of the rainbow. I’ll show you how to color the batter and create a gorgeous rainbow tie-dye effect in the cake and frosting!

This rainbow cake is by far one of the brightest, most colorful desserts I’ve ever made! It shares that title with my rainbow cupcakes and rainbow cookies. The recipe combines my moist and fluffy yellow cake and classic buttercream, swirled with every color of the rainbow. To create the look, I divided the cake and frosting and dyed them with six different colors… and then the fun begins. My favorite part about making this cake is adding the colors to the cake pan and, of course, decorating the top with bright rainbow rosettes and swirls. Every time I make this cake, it looks a little different, but always delicious!
Why This Rainbow Cake Steals the Show
- Bright, vibrant colors. Since we’re using gel dye in both the cake and frosting, the colors shine through brightly without affecting the taste or texture of the cake. No muted colors or weird flavors in this cake!
- 100% unique. No rainbow cake is the same, so you know that every time you make it, you’re serving up something completely one-of-a-kind.
- Easier than it looks. This cake looks like it came straight out of a bakery, but it’s very easy to make at home using simple techniques. I’ll show you how to layer the batter and color the frosting to create a “tie-dye” effect.
- The perfect occasion cake. You can easily get 15 nice-sized pieces of cake from this recipe. If you’re serving a big group or adding this to a dessert buffet, you can easily cut smaller pieces to serve more. This cake is perfect for birthdays, picnics, showers, and any occasion. Be prepared for lots of oohs and ahhs and “how did you make this?!” from everyone!

Ingredient Notes
There are two parts to making this recipe. The yellow cake and the buttercream frosting. Both are simple recipes made with baking basics and pantry staples. I cover the important ingredients you’ll need below. Scroll to the recipe card for the printable recipe.
- Vegetable Oil – I use a combination of oil and butter in this cake to keep it moist, tender, and flavorful. Choose a neutral-flavored vegetable oil, like canola, and unsalted butter.
- Eggs – Whole eggs plus additional yolks.
- Sour Cream – In addition to the oil, sour cream contributes to a soft, moist cake. Greek or plain yogurt is a good substitute.
- Milk – Make this cake with buttermilk if you have it on hand. Otherwise, try a homemade buttermilk substitute. You can also use regular whole milk, 2%, or any kind you prefer.
- Gel Colors – I used the Wilton Color Right system to color my cake batter and frosting. You could also use AmeriColor. Unlike the water-based food coloring you find in grocery store baking aisles, gel dyes are more potent, and a little goes a long way. It’s key to the bright, vibrant colors pictured here.
- Frosting – I use my favorite vanilla frosting recipe. You’ll need COLD butter. You can use the same gel coloring that you use to dye the cake to dye the frosting, too.

How to Make a Rainbow Cake
I make this rainbow cake in a 9×13-inch baking pan.
- Preheat the oven. While the oven preheats to 350°F, grease the baking pan with cooking spray.
- Prepare the cake batter. Follow the directions to mix your wet and dry ingredients separately before combining them to make the yellow cake batter. Be careful not to overmix, or the cake will be dense.
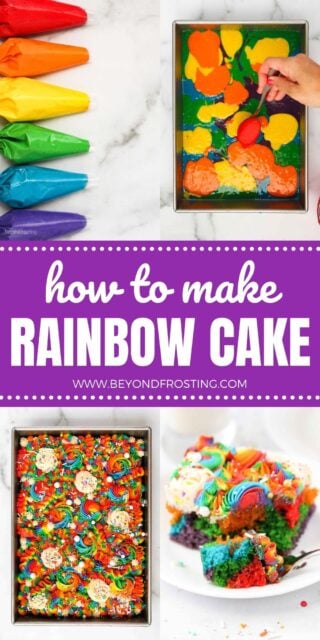
- Divide and color the batter. Next, divide the cake batter between 6 bowls. Dye each bowl a color of the rainbow: red, orange, yellow, green, blue, and purple. I include the specific amounts of gel coloring I used for each color in the printable recipe card after the post.
- Layer the batter in the pan. Start by spooning the first batter color into the pan.
- Add more colors. Now, alternate adding the other colors, dolloping and layering them over one another in the pan. I choose to layer the colors, and not actually swirl them together. I found that swirling the batter gives the cake a more muddy appearance.
- Bake. Bake the cake at 350ºF for 25-30 minutes. Afterward, allow the cake enough time to cool completely to room temperature before you frost it.


How to Make Rainbow Tie-Dye Frosting
Like the cake colors, refer to the recipe card for the recommended amounts of frosting per color.
- Whip the butter. Cut cold butter into pieces, and whip for several minutes until light in color.
- Add the other ingredients. Next, alternate adding powdered sugar with the liquid ingredients. Whip 1-2 minutes after each addition. Once the ingredients are incorporated, beat for several more minutes to whip additional air into the frosting.
- Color the frosting. Set aside 1 cup of undyed frosting. Then, divide the remaining frosting into 6 bowls. Dye each bowl a different color. Transfer each color to its own piping bag (see how to use a piping bag).
- Combine the frosting into multicolored bags. Now, tuck a new piping bag into a pint glass and fold the top of the bag over the edge to hold it open and in place. Afterward, pipe each color into the bag. Shake the bag to allow the colors to settle. Finally, cut off the end of the bag and drop it into a second piping bag fitted with the piping tip (see my tutorial on how to use piping tips for details).


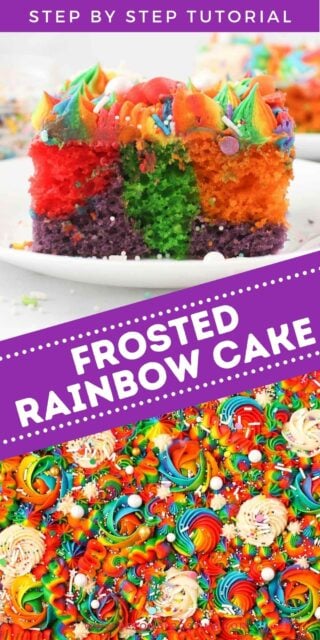
Frosting and Decorating the Cake
- Pipe the white rosettes first. I used a 1M star tip to pipe large rosettes over the cake. Set aside the remaining white frosting for later.
- Add the rainbow swirls. Next, use the same tip to pipe large rainbow swirls and then smaller rosettes. Finally, fill in the remaining areas using a Wilton petal tip 104 to create the ribbons.
- Fill in any gaps. Use the same piping tips, or a combination of tips like the Ateco 866 and Wilton 199 and 21, to pipe any remaining white and rainbow frosting over any unfrosted spots on the cake.


Helpful Tips
- Use the double piping bag method. To decorate this cake, I recommend using the double piping bag method. This means one piping bag is filled with frosting and the other just has a coupler and piping tips. This is the easiest way to decorate when using multiple piping tips. The coupler makes it so easy to switch between them. For more tips on working with piping bags, check out this post.
- Use gel colors. Gel colors are the best to color the frosting and the cake batter. They are super concentrated and produce beautiful colors without thinning out the batter. For this recipe, I used the Wilton Color Right system. You can also find similar products from AmeriColor.
- Make the perfect dyed buttercream. If this is your first time adding color to buttercream, check out my guide on how to color buttercream frosting.

Make-Ahead, Storage, and Freezing
- Store at room temperature. The frosted rainbow cake can be stored at room temperature in an airtight container. However, if you live in a warm climate, then I would recommend refrigerating and bringing the cake back to room temperature for serving. Enjoy leftovers within 2 days.
- Make-ahead. The vanilla frosting can be prepared ahead of time and stored in an airtight container. I recommend coloring it when you’re ready to decorate, or up to 24 hours before. If you make the frosting ahead of time, rewhip it for a few minutes before you use it.
- Freeze the cake. You can freeze both the rainbow cake and the buttercream frosting, but you should do so separately before the cake has been frosted. To freeze the cake, wrap it tightly in plastic wrap and aluminum foil, being sure the edges overlap. The cake will last in the freezer for up to 2 months.
- Freeze the frosting. The vanilla buttercream can be frozen in a Ziploc bag with the air pushed out and tightly sealed. Freeze it for up to 1 month. Allow the cake and frosting to thaw on the counter. The frosting should be whipped one more time before using it.
More Colorful Dessert Recipes
- Confetti Cake with Rainbow Chip Frosting
- Unicorn Cookies
- Funfetti Cupcakes
- Valentine’s Day Cake
- Red White and Blue Flag Cake
Rainbow Cake
- Prep Time: 60 minutes
- Cook Time: 28 minutes
- Total Time: 1 hour 28 minutes
- Yield: 15 slices
- Category: Cake
- Method: Baking
- Cuisine: American
Description
This easy rainbow cake recipe is a soft, moist yellow cake swirled with big, bright colors! I’ll show you how to create a gorgeous tie-dye effect in the homemade cake and frosting. It’s perfect for birthdays and special occasions.
Ingredients
For the Cake
- 1 1/2 cups (285g) granulated sugar
- ½ cup (118 ml) vegetable oil
- 2 tablespoons (28g) unsalted butter, melted
- 2 large eggs
- 2 egg yolks
- 1 tablespoon (15ml) vanilla extract
- 1/2 cup (118ml) sour cream
- 2 ½ cups (350g) all-purpose flour
- 2 teaspoons (7.5g) baking powder
- 1 teaspoon (4g) baking soda
- 1 teaspoon (5g) salt
- 1 1/3 cup (315ml) milk
- Gel colors for dying cake batter
For the Frosting
- 2 cups (452 g) unsalted butter, cold.
- 7 cups (911 g) powdered sugar
- 1 tablespoon (15 ml) pure vanilla extract
- 2-3 tablespoons (30ml) heavy whipping cream (or milk)
- Pinch of salt (optional)
- Gel colors for dying frosting
Instructions
For the Cake
- Preheat the oven to 350°F. Spray a 9-inch by 13-inch pan with cooking spray.
- In a large mixing bowl, combine the sugar, vegetable oil, butter, eggs, egg yolks and vanilla extract. Beat on medium speed until the eggs and oil are well incorporated and the batter is lighter in color, about 2 minutes. Scrape down the bowl as needed. Next mix in the sour cream and beat until well combined.
- In a separate bowl, combine the remaining dry ingredients. Alternate adding half the dry ingredients and half the milk at a time and mix just until the flour starts to incorporate. Then add remaining dry ingredients and milk and beat until well combined. Use a spatula to scrape down the sides of the bowl and stir the batter from the bottom to the top to ensure it’s well mixed.
- To dye the cake batter, divide it into 6 bowls about 3/4 cups + 2 tablespoons per bowl. Dye each of the 6 colors. See the notes section on the recipe card for specific recommendations.
- Spoon the batter in the pan, alternating between colors. Once finished, tap the pan on the counter a couple times to settle the batter. Bake at 350°F for 25-30 minutes. Test the cake for doneness by inserting a toothpick into the center of the cake. If the toothpick comes out clean, the cake is done. Remove from the oven and allow to cool completely.
For the Frosting
- Cut butter into pieces. Using the paddle attachment, whip the butter for 5-7 minutes, scraping down the bowl occasionally. Beat until the butter looks light in color.
- Alternate adding 2 cups of powdered sugar at a time with the liquid ingredients: vanilla extract & heavy cream. Ensure the powdered sugar is well combined, then and whip for 1-2 minutes before adding more powdered sugar. Repeat until all ingredients are added.
- Once all the powdered sugar has been added, increase speed to medium-high and beat for another 3-5 minutes to whip additional air into the frosting.
- Set aside 1 cup of undyed frosting. Then divide the remaining frosting into 6 bowls, about ½ cup each. Dye each of the 6 colors and then place each color into its own piping bag. See the notes section on the recipe card for specific recommendations.
To Decorate
- To fill a multicolored bag, place a piping bag in a pint glass, folding the bag over the top edge. Pipe a line of each color (except white) into the bag. Fill 2/3 full and shake the bag to allow the colors to settle. Make 2-3 bags until you run out of frosting. Cut off the end of the bag, and then drop it into a second piping bag fitted with the piping tip.
- Start with the white, piping large rosettes with a 1M and/or Ateco 866 piping tip. Reserve some of the white to fill in later.
- Next pipe rainbow rosettes with a 1M and/or Ateco 866 piping tip. Then start adding in smaller rosettes using Tip 21 and Tip 199. Fill in remaining large areas with a ribbon using petal tip 104, with the skinny end facing up.
- Continue to fill in the holes with remaining white and rainbow frosting using any variety of these tips until the cake is frosted.


Notes
- I used the Wilton Color Right system to dye the cake and frosting.
Dying the cake batter
- To make the red, orange, and yellow colors, add 3 drops of gel color
- To make the green, use 3 drops blue 2 drops yellow
- To make the blue, use 5 drops of gel color
- To make the purple use 4 drops pink 1 drop blue.
Dying the frosting
- To make the red, orange and yellow colors, use 3 drops of gel coloring
- To make the green, use 2 drops blue 2 drops yellow
- To make the blue, use 5 drops of gel color
- To make the purple, 2 drops pink 1 drop blue
Piping tips used
- Tip 1M for the Roses
- Ateco Tip 866
- Wilton Tip 199
- Wilton Tip 21
- Wilton Petal tip 104 for ribbons
Nutrition
- Serving Size: 1 slice
- Calories: 709
- Sugar: 76g
- Sodium: 270mg
- Fat: 36g
- Carbohydrates: 94g
- Fiber: .6g
- Protein: 4.9g
- Cholesterol: 122mg


It was nice to go through your recipe. Can these rainbow cakes could be refrigerated for couple of days?
Yes, storage instruction are listed under “How to Store & Make Ahead”.
The rainbow cake recipe is my favorite as my kids love it. I often bake this cake in my kitchen but with ghee instead of using veg oil and unsalted butter.
I’ve never worked with Ghee, thanks for sharing!