

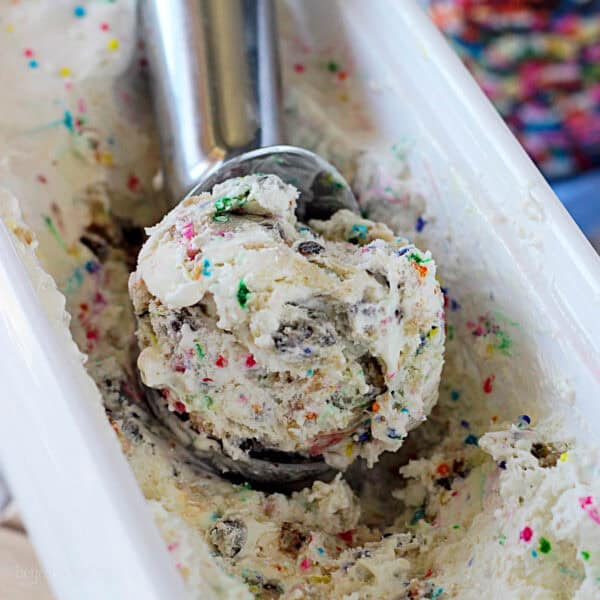
This birthday cake ice cream is a delicious combination of three favorite treats: cake, ice cream, and cookie dough. It’s a creamy no-churn ice cream recipe flavored with cake mix and swirled with chunks of edible cookie dough and colorful sprinkles.
No churning means no ice cream machine! You might also like my no-churn brownie batter ice cream or tiramisu ice cream recipes.

This birthday cake ice cream recipe adapts my Ninja Creami cake batter ice cream into an easy no-churn version, meaning you can make it without an ice cream maker. This time, I’ve kept the bright rainbow sprinkles and loaded the creamy cake batter ice cream base with big chunks of birthday cake-flavored cookie dough. Because who can resist cookie dough? I could eat this ice cream forever and ever.
About This Birthday Cake Ice Cream Recipe
- Just sweet enough. I always find the cake batter ice cream from the stores far too sweet. This homemade recipe gives me complete control over the ingredients, so it’s rich and creamy and still flavored like birthday cake, but not overly sweet and sugary.
- No ice cream machine. The ice cream base is a “no-churn” recipe, meaning it doesn’t require an ice cream maker. You simply mix two ingredients, sweetened condensed milk and Cool Whip, add in your cookie dough, and freeze.
- Egg-free cookie dough chunks. I include my edible cookie dough recipe, flavored with cake batter. All it takes is dry cake mix worked into the dough along with rainbow sprinkles and a little flavoring. I’ll show you how to heat-treat the cake mix and flour.

Ingredient Notes
You only need 3 ingredients to make your ice cream base! I cover these below, along with the other important ingredients in this birthday cake ice cream recipe. Scroll down to the printable recipe card below the post for the full ingredients list, amounts, and recipe details.
- Sweetened Condensed Milk – The texture of homemade ice cream relies on fat and sugar content, so make sure you’re buying full-fat sweetened condensed milk. Not to be confused with evaporated milk, which is unsweetened.
- Cake Mix – I use a classic yellow cake mix for an authentic birthday cake flavor. Similar to how you’d heat treat flour for edible cookie dough, I recommend heat-treating the cake mix in this recipe, as it contains raw flour. More on this below.
- Cool Whip – Thawed beforehand. You could also make homemade whipped cream using full-fat heavy cream.
- Cookie Dough – I use my easy edible cookie dough recipe that I’ve adapted to include yellow cake mix. You’ll also need softened butter, heat-treated flour, mini chocolate chips, sprinkles, and a handful of other basic pantry ingredients to make it. See the recipe card for details.
- Butter Extract – Only if you can find it. I love adding butter extract to the birthday cake cookie dough, along with vanilla for a richer flavor. Look for butter extract in baking stores and online.
Why Do I Need to Heat Treat Cake Mix?
Cake mix contains raw flour, and raw flour can harbor bacteria that can make you sick. For this reason, I suggest heat-treating the cake mix AND the flour in this recipe to 160ºF which is said to kill off any harmful bacteria. You can do this in one of two ways:
- Microwave. Heat the cake mix in a microwave-safe bowl in 30-second increments until it reaches 160ºF.
- Oven. Bake the cake mix (and the flour separately) on a lined baking sheet at 350ºF for 7-10 minutes, stirring halfway through.
In both cases, allow the heat-treated ingredients to cool completely before you use them. See my in-depth post on how to heat-treat flour for details.
How to Make No-Churn Birthday Cake Ice Cream
Since it’s not churned in a machine, this birthday cake ice cream needs additional time to freeze. I recommend 4-8 hours, or overnight (the longer you freeze it, the better). Follow the steps below to live out your Cold Stone Creamery dreams from home. Afterward, scroll down for the printable instructions in the recipe card.
- Make the cookie dough. First, cream softened butter with white and brown sugar. Then, add your heat-treated flour and cake mix, along with the remaining ingredients, to form the dough. Fold in the chocolate chips and sprinkles. Then, roll the dough into teaspoon-sized balls and set them aside.
- Prepare the ice cream base. Next, combine the sweetened condensed milk with additional heat-treated cake mix. Gently fold in the whipped topping so it’s well combined.
- Fold in the cookie dough. Fold the cookie dough chunks into the ice cream base. Lastly, transfer the ice cream to a freezer-safe container to freeze. Or, you can alternate layering the ice cream and cookie dough inside the container.
- Freeze. Chill the birthday cake ice cream in the freezer for at least 4 hours before serving.
Julianne’s Recipe Tips
- Use full-fat ingredients. The sweetened condensed milk should be full-fat for the creamiest homemade ice cream. The same goes for the heavy cream if you’re making the whipped cream from scratch. Dairy with a lower fat content contains more water, which makes the ice cream icy when it freezes.
- Freeze for long enough. Homemade ice cream is icier and softer than store-bought ice cream as it’s made without additives. Make sure to let the ice cream chill for at least 4 hours in the freezer before you serve it. Even better, let it freeze overnight.
- For easy serving, take this no-churn ice cream out of the freezer at least 15 minutes beforehand so it softens slightly before you scoop it. You can also run your ice cream scoop under warm water to make scooping smoother and easier.
- Different cake mixes. You can make this recipe with any cake mix flavor you’d like, so feel free to get creative! Red velvet, chocolate, vanilla, or funfetti are all fun options.
- Make sugar cookie dough instead. Try my edible sugar cookie dough as an alternative add-in.

Storing No-Churn Ice Cream
I store my homemade birthday cake ice cream in my favorite ice cream storage container. I bought mine from Williams-Sonoma, but you can find similar containers in stores and online. Otherwise, a similar container with a lid or a loaf pan tightly covered with plastic wrap will also work. Kept airtight, this ice cream lasts about 1 month in the freezer.
More Homemade Ice Cream Recipes
No-Churn Cake Batter Cookie Dough Ice Cream
- Prep Time: 20 minutes
- Freezing Time: 4 hours
- Total Time: 4 hours 20 minutes
- Yield: 6 cups
- Category: Dessert
- Method: Freezer
- Cuisine: American
Description
This no-churn birthday cake ice cream is flavored with cake mix and swirled with chunks of edible cookie dough and colorful sprinkles.
Ingredients
For the Ice Cream
- 1 Jar (14 oz) Sweetened condensed milk
- 1/2 Cup Yellow cake mix (dry)
- 1 tube (8oz) Cool Whip
For the Cookie Dough
- 1/2 Cup Unsalted butter (1 stick), softened
- 1/3 Cup Light brown sugar
- 1/2 Cup Granulated sugar
- 3/4 Cup All-purpose flour
- 1/2 Cup Yellow cake mix (dry)
- 1/4 teaspoon Salt
- 2 teaspoons Pure vanilla extract
- 1 teaspoon Butter extract (optional)
- 1 tablespoon Milk
- 1/2 Cup Mini chocolate chips
- 1/4 Cup Sprinkles
Instructions
- Cookie dough: Allow butter to come to room temperature or microwave for 10-15 seconds.
- Combine butter and both sugars in a medium-sized bowl. Mix with a handheld mixer until smooth. All chunks of sugar and butter should be broken up.
- Add flour, dry cake mix, and salt. Mix just until combined. The mixture will be crumbly.
- Add vanilla and butter extract, and milk. Mix until the dough is soft. Add chocolate chips and sprinkles last.
- Roll dough into balls, about 1 teaspoon for each. Set aside.
- Ice cream: Combine sweetened condensed milk and dry vanilla cake mix. Stir until cake mix is incorporated into the condensed milk.
- Add Cool Whip and mix until well combined.
- Gently fold cookie dough bites into ice cream batter. You can also alternate layers of the ice cream base with layers of cookie dough in your freezer container.
- Freeze until desired consistency, suggested 4-8 hours.
Nutrition
- Serving Size: 1
- Calories: 429
- Sugar: 27 g
- Sodium: 184 mg
- Fat: 26.9 g
- Carbohydrates: 42.9 g
- Fiber: 1.8 g
- Protein: 5.1 g
- Cholesterol: 43.6 mg


Hi! This looks amazing! Can I link back to your recipe in my ice cream round up post next week?
Sure Logan, Thank you for asking, but please do not repost my recipe. Thank you!
Cake batter cookie dough sounds like stuff dreams are made from. Loaded with butter, sugar, sprinkles, and magic. If I could marry this ice cream, I certainly would.
This ice cream looks absolutely amazing!
Obsessed with Cold Stone. Good thing there isn’t one around here! Two hour drive separates me from the heaven. But now I can make this at home. My hips thank you 🙂
YES!!!!!! That’s all I can say!!!
i wish it was hot enough here to justify having ice cream! i definitely am craving a scoop right now.. saving this recipe to recreate when summer arrives!
Wow! Most impressive ice cream ever! I love the colourful sprinkles – I must try!
bahaha! I don’t know why but your little fun fact about living in the home state of ben and jerrys cracked me up! I just imagine you all alone with no options other than Cherry Garcia….which wouldn’t necessarily be all that horrible come to think of it.
ANYWAYS your ice cream looks awesome. mmm cake batter frozen. pinned.
This is my dream ice cream! I am totally in love!
I think I might just skip lunch and have a double scoop of this ice cream! Love that it is no churn too!
There are so many amazing flavors out there. But there’s no way I could resist this one! My kids would love it too so that makes it a winner for sure!
Have a great Wednesday!
Totally dying over this ice cream! I absolutely love everything you put in it. Especially the cookie dough and sprinkles. 🙂 Love that this is no churn, too! Totally going to have to try this!
I am drooling over this ice cream! Cake batter and cookie dough?! Amazing! I could definitely eat this all day, every day, and then some! 🙂 Pinned!
Man, I love all ice cream. Coldstone, Ben and Jerry’s, you name it! And this one takes the cake! Batter, that is. So delicious!