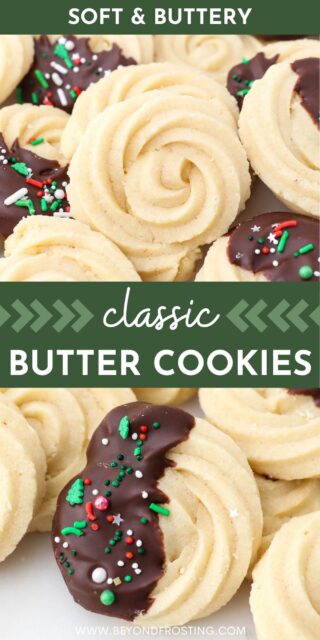
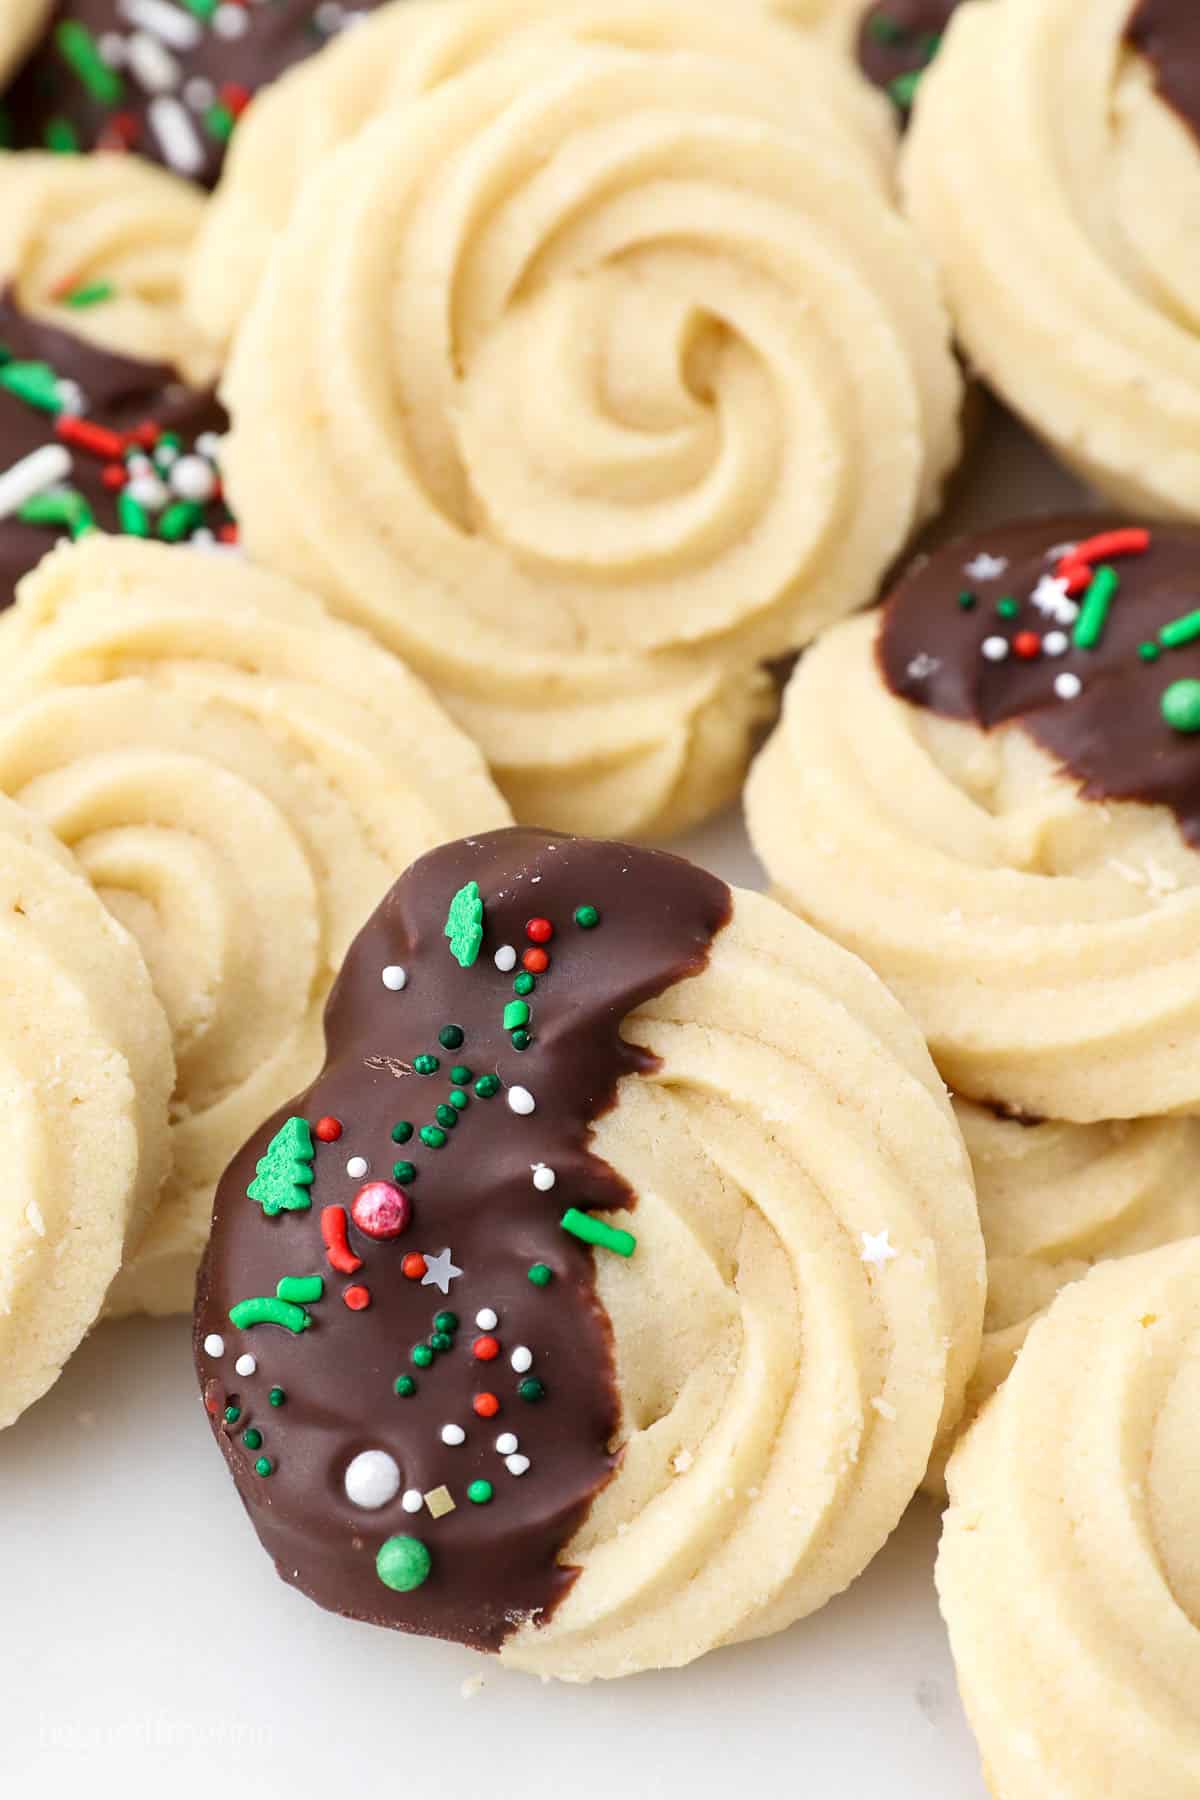
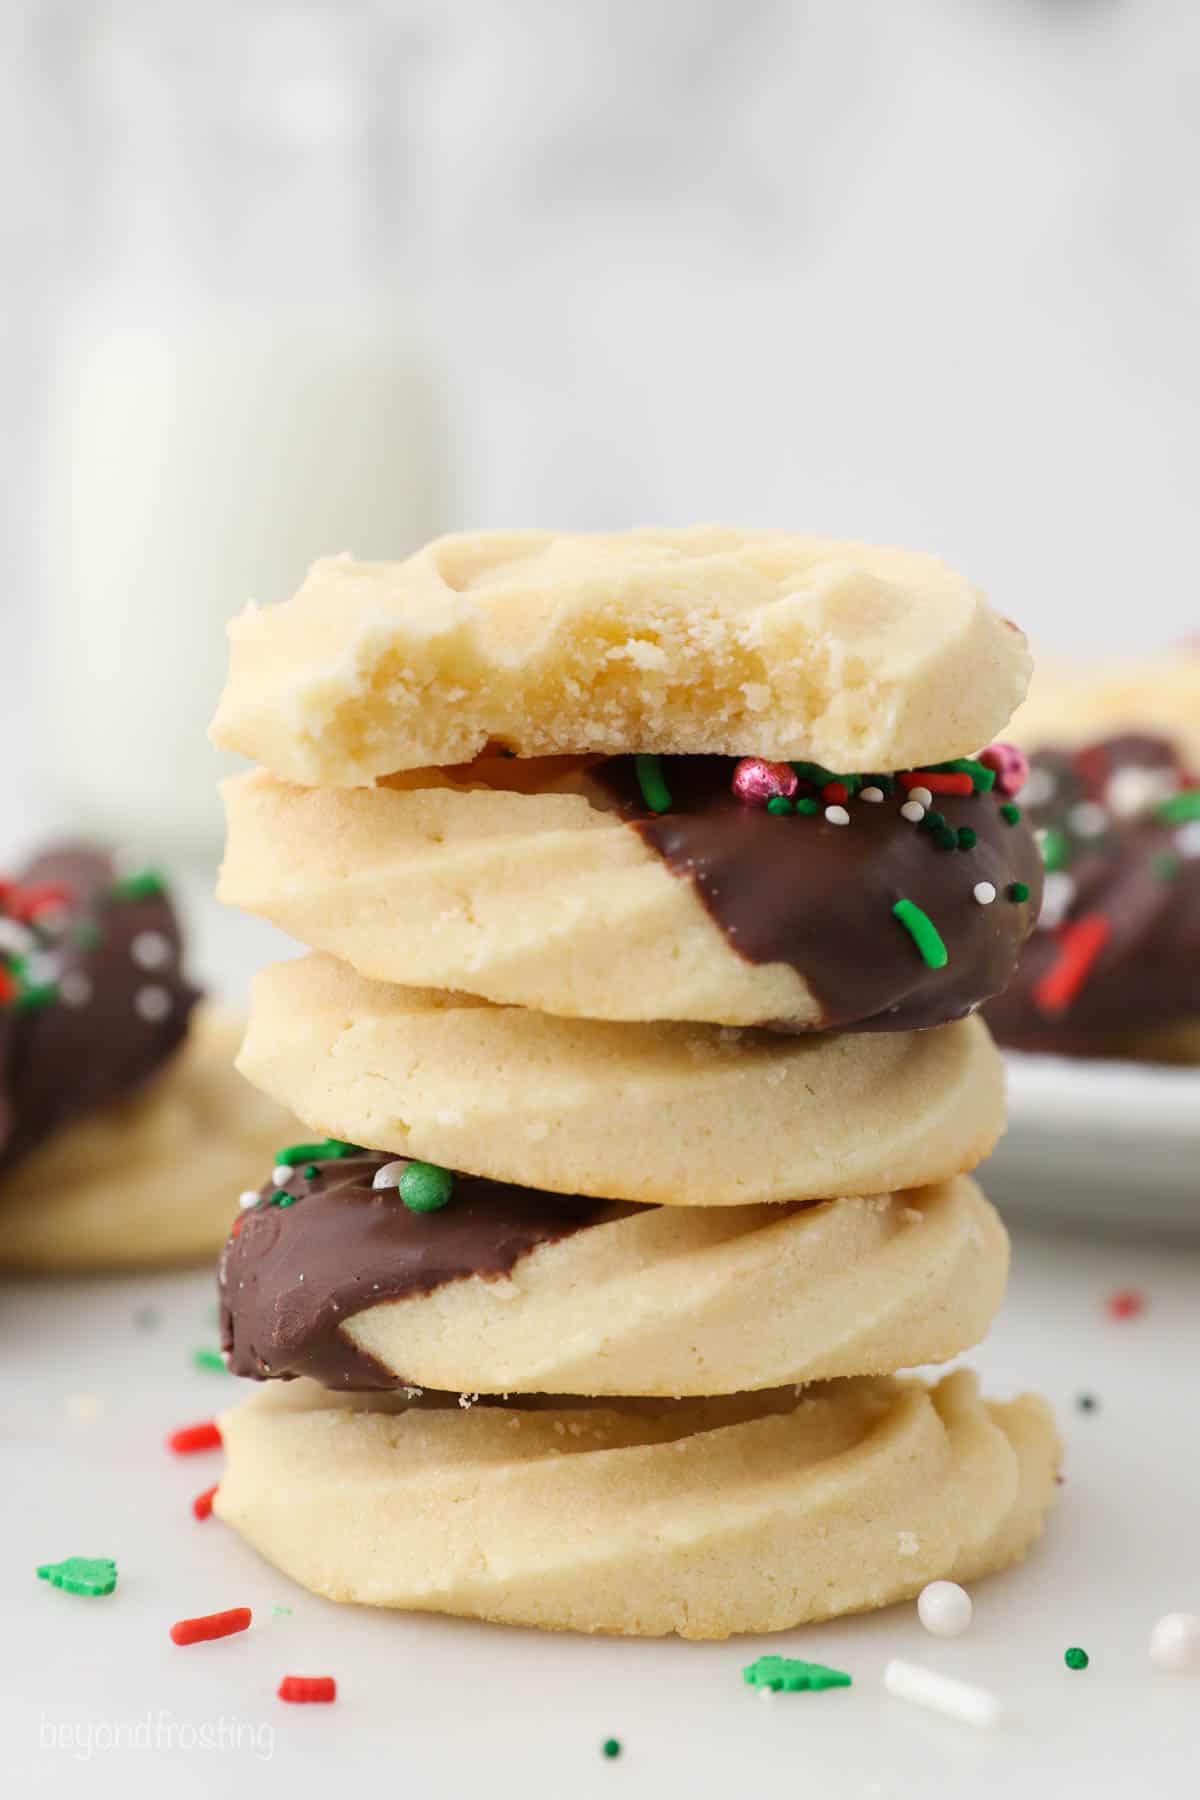
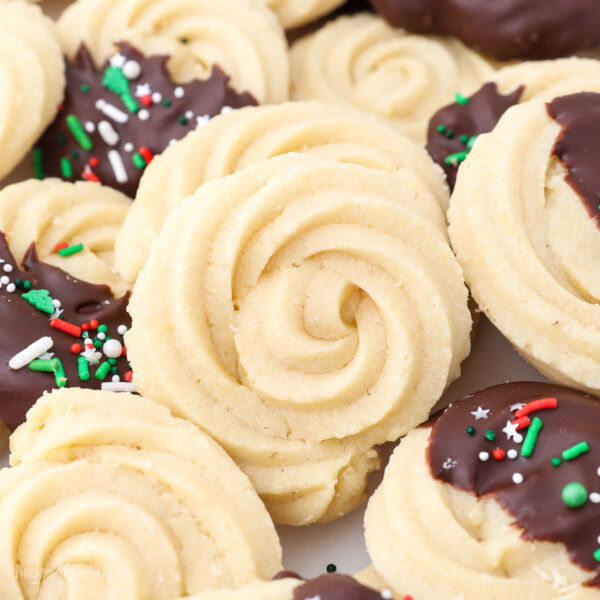
These soft, buttery swirl cookies are dipped in chocolate and finished with festive sprinkles for the perfect holiday treat. With their tender, melt-in-your-mouth texture and rich buttery flavor, these classic butter cookies belong on every Christmas cookie tray.
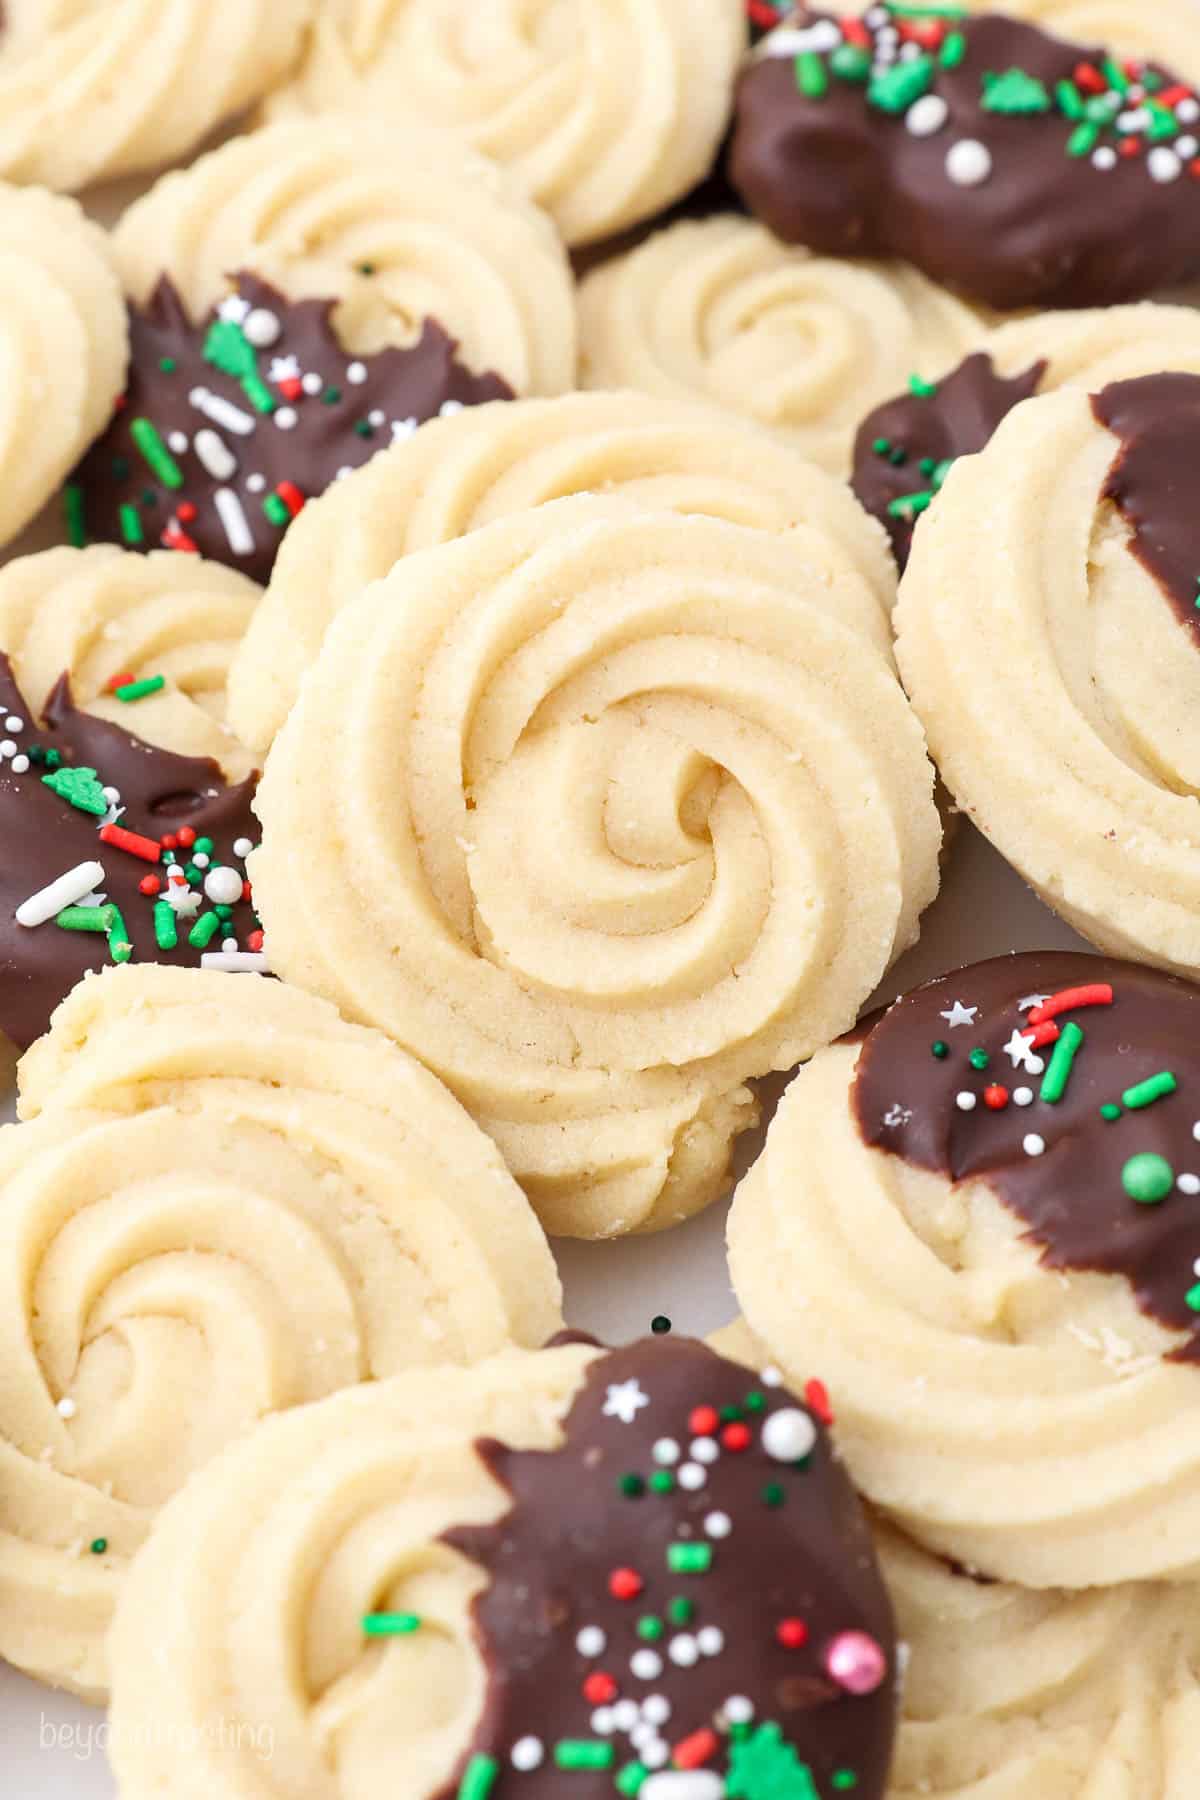
Butter cookies are a traditional Christmas treat that you’ll want to adapt for each and every holiday you celebrate. The cookie dough is piped onto the baking sheet rather than scooped, giving your cookies an eye-catching spiral design! Typically flavored with either vanilla or almond extract, you have the option of dipping them in chocolate or leaving them plain.
Whether or not you add the chocolate and sprinkles, these cookies are fancy enough for any special occasion. They’re also easy enough to whip up on a casual workday! After all, there’s never a bad time to indulge in a classic homemade butter cookie that melts in your mouth with each bite. These are also a great alternative to Spritz Cookies if you don’t have a cookie press.
What Makes These Classic Butter Cookies So Good?
- They’re rich, buttery, and simple. Just a handful of ingredients come together to create that classic flavor everyone expects from a true butter cookie.
- They hold their shape beautifully. Perfect for piping swirls and dipping in chocolate without losing those defined edges.
- The texture is spot on. Crisp on the outside with a tender, melt-in-your-mouth center.
- Easy to decorate. Dip them in chocolate, add sprinkles, or drizzle with icing to dress them up for any occasion.
- Perfect for holiday baking. They’re sturdy enough for cookie trays and gift boxes, and they stay fresh for days.
What You’ll Need
This recipe keeps things simple with a brief ingredient list composed of kitchen staples. Here’s the lineup:
- Unsalted Butter: At room temperature.
- Granulated Sugar
- Egg yolks: ditch the egg whites or save for later.
- All-Purpose Flour Be sure to measure your flour accurately by using a food scale or the spoon and level method of filling the measuring cup.
- Salt
- Vanilla Extract: Or almond extract.
- Milk: This softens the dough and makes it easier to pipe.
- Ghirardelli Chocolate Wafers: Optional, to be melted for dipping.
- Sprinkles: These are also optional – they won’t stick to the cookies unless they’ve been dipped in chocolate.
How to Make Butter Cookies
Let’s dive into the process of putting together these cookies. One thing to note is that you should work in batches, baking one tray at a time in the center oven rack. Overloading the oven will cause uneven baking, as trays on the bottom tend to heat faster and brown the bottoms of the cookies too quickly.
Make the Cookies
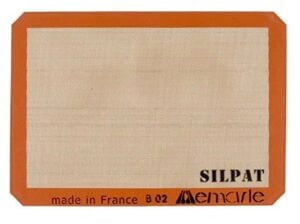
- Prep for Baking: Preheat the oven to 350°F and line a large cookie sheet. I strongly suggest lining it with a silicone baking mat rather than parchment paper – you need something for the dough to stick to.
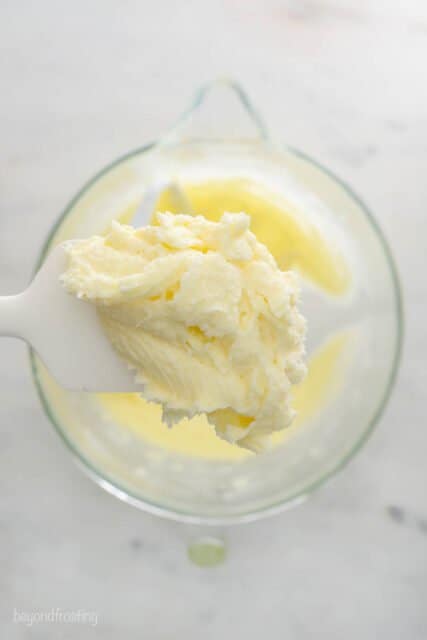
- Cream Butter & Sugar: In a stand mixer, combine the butter with the sugar and beat on medium speed until the mixture is well combined.
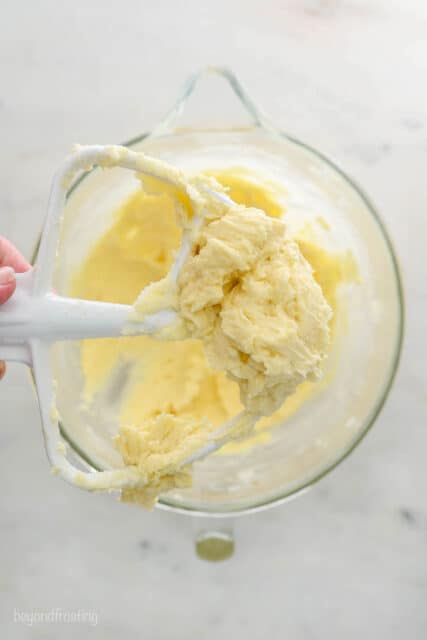
- Add Egg Yolks & Extract: Add the egg yolks and the vanilla or almond extract, beating until well combined.
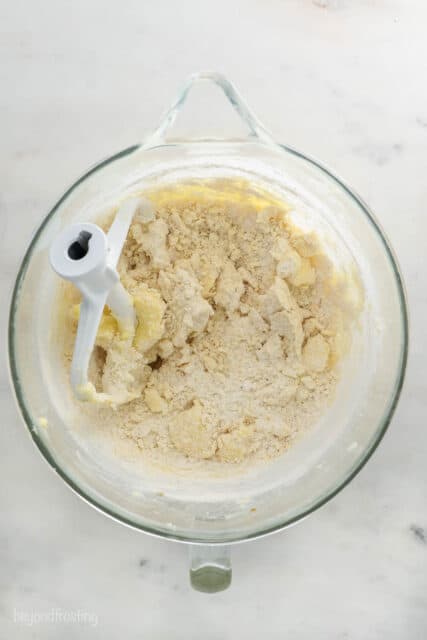
- Add Dry Ingredients: Add the dry ingredients and beat. At this point, you should notice that the dough is starting to form.
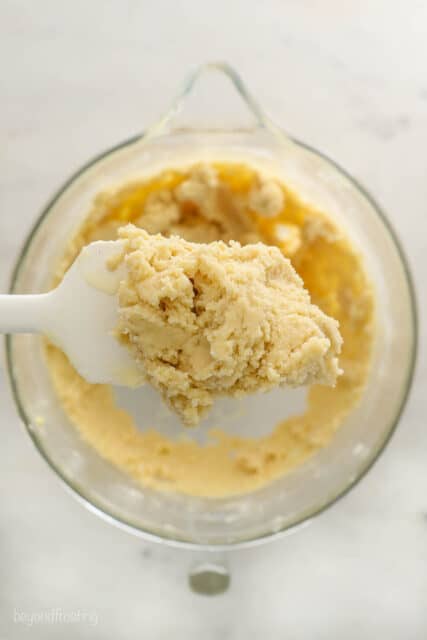
- Add Milk: Add the milk and finish beating until the dough is stiff.
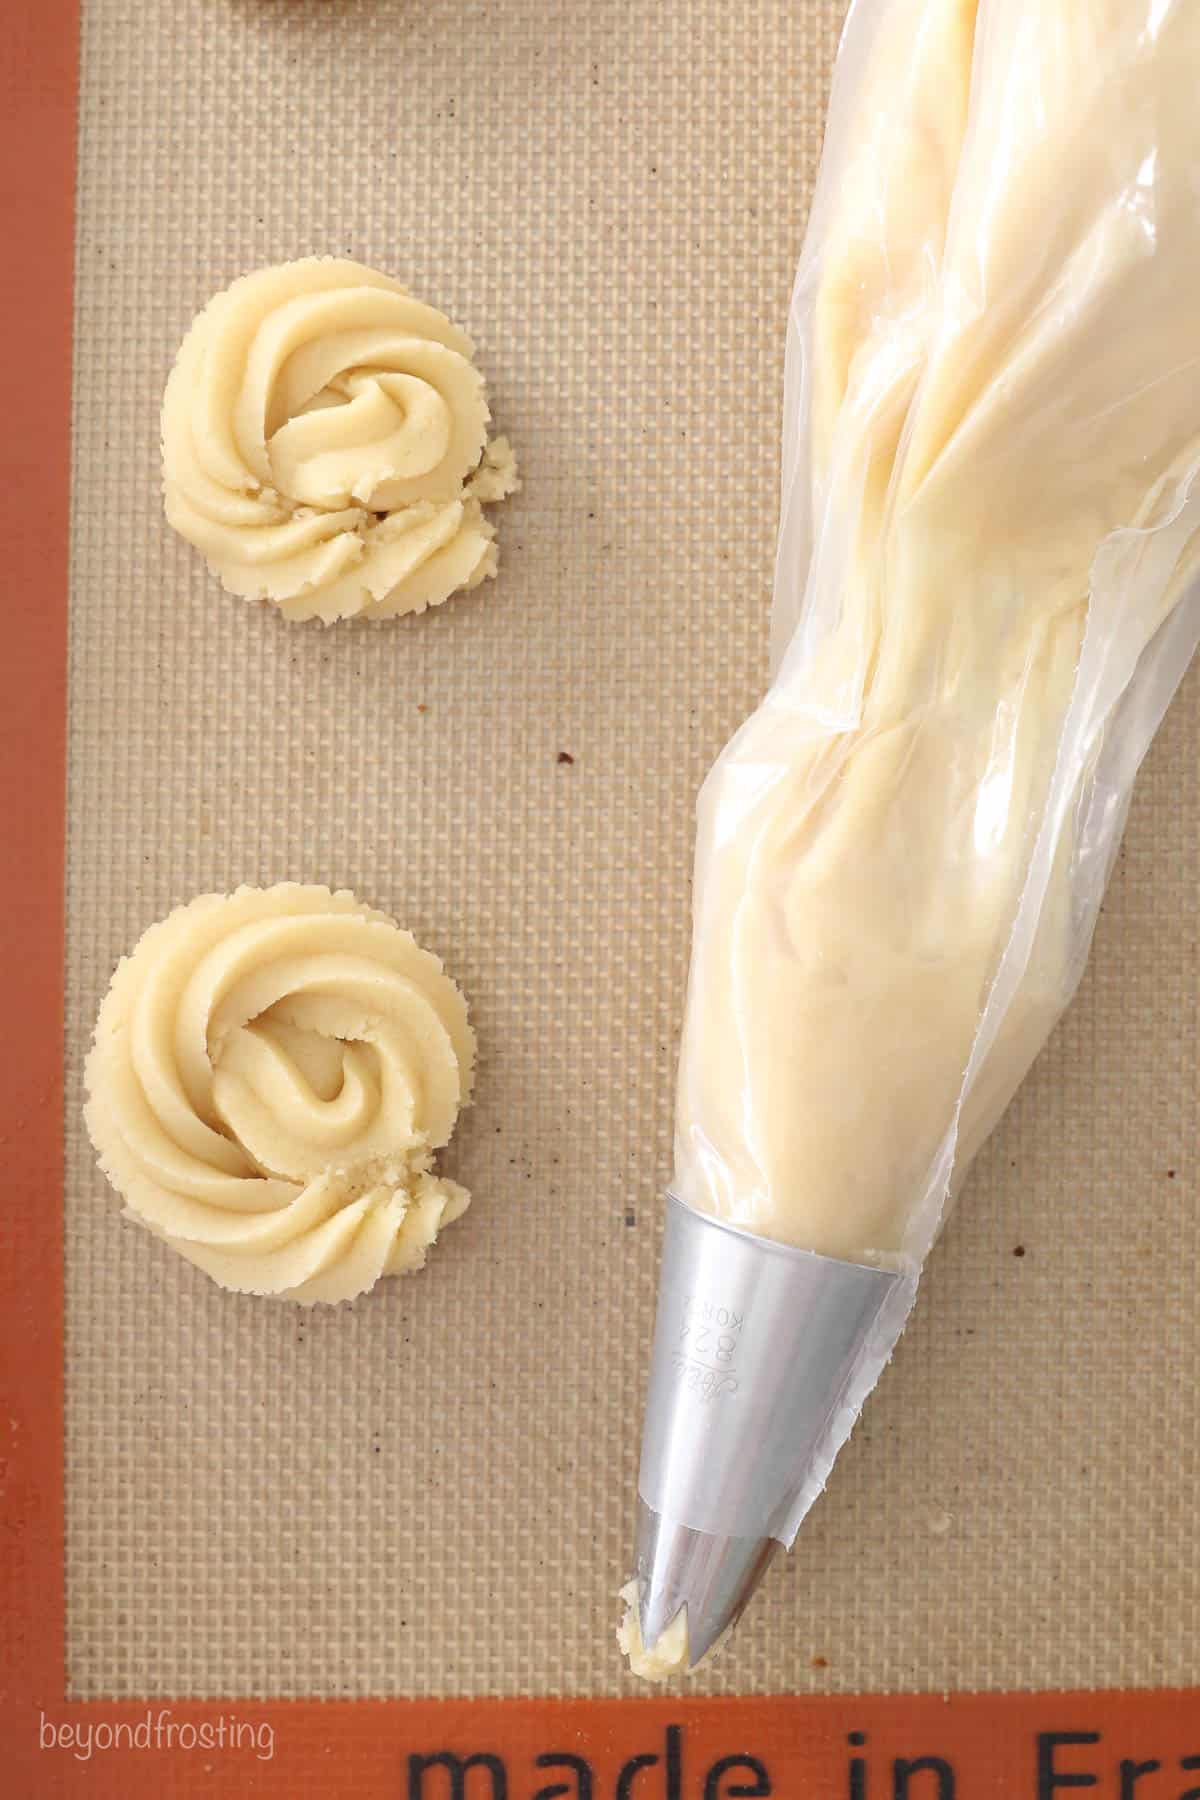
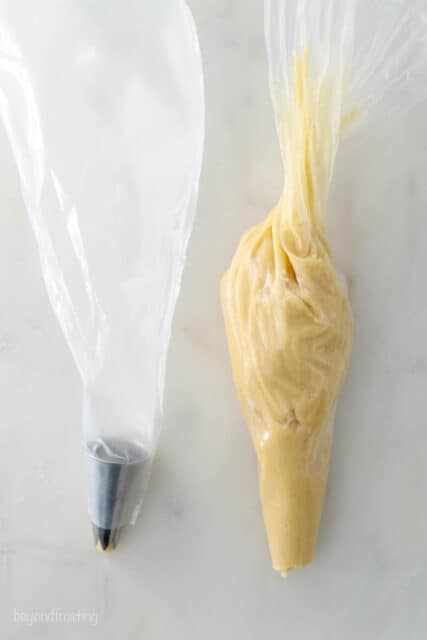
- Prep for Piping: Fit a large piping bag with an Ateco 825 tip or a similar open star piping tip. Add about 1 cup of cookie dough into a separate large piping bag, pressing it into the bottom of the bag. Drop the dough-filled bag into the one with the piping tip. This double-bagging process helps ensure the bag won’t pop from the pressure.
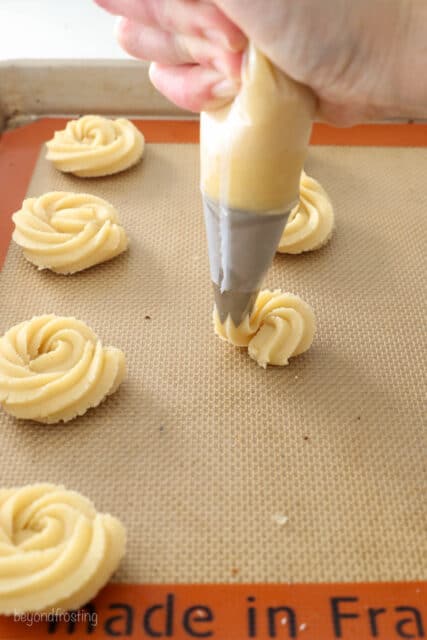
- Pipe Dough Swirls: Pipe out large swirls, about 1 ½ inches wide, and place them 2 inches apart from each other on the room temperature baking sheet.
This can be frustrating to do. The first couple might not be the same size, or it might feel too stiff, but as you work your way through the bag, it does get easier. You’ll need two hands, you can see how I am squeezing just above the piping tip. The good news is, the dough is really forgiving, so if you mess a couple up, just toss the dough back in the bag.
- Bake: Bake one tray at a time for 9-11 minutes.
- Let Cool: Remove the cookies from the oven and let them cool on the baking sheet for 5-10 minutes, then transfer them to a wire rack to finish cooling.
Decorate
- Melt Chocolate: These are so so good when dipped in chocolate. Let the cookies cool before dipping. To prevent the chocolate from burning, I always microwave chocolate at 50% power for 30-seconds, stir and then repeat until the chocolate is melted and smooth.
- Dip Cookies: Dip the cookies about halfway into the melted chocolate. Tap off excess chocolate on the sides of the bowl, then place the dipped cookies onto a lined baking sheet.
- Add Sprinkles: Add some sprinkles over the melted chocolate if you’d like.
- Let Set: Let the cookies rest until the chocolate has set. Enjoy!
Tips for Success
- Don’t Overfill the Piping Bags: You only want to have about 1 cup of cookie dough in your piping bags at a time. Push about half of the dough down into the bottom of the bag so it fits in the palm of your hand. Pipe out a couple of cookies and push more dough down in the bag.
- Use That Hand Strength! It may be a bit challenging to pipe out your first two or three cookies, but don’t get discouraged. The dough softens as you go and gets easier to work with. You can pipe out the dough with both hands and then help shape the cookies with your fingers if needed. If you’re still having problems with piping, try cleaning out the piping tip with a knife.
- Not Happy With a Swirl? If you don’t like the size or shape of your piped out cookie dough, throw it back into the bowl. You can press it down into the piping bag and try again!
- Only Use Room Temperature Baking Sheets: When you’re baking cookies in batches, sometimes you can get away with re-using a baking pan while it’s still warm. I advise against doing that for these cookies – it can cause the bottoms to brown too quickly.
Variation Ideas
- Peppermint Butter Cookies: To make these babies even more festive for your Christmas cookie tray, use a combination of vanilla and peppermint extract. Then, decorate your cookies with crushed peppermint rather than sprinkles. Santa would be proud!
- White Chocolate Butter Cookies: While these cookies are normally dipped in dark or milk chocolate, they taste wonderful with white chocolate too. You could also drizzle the melted chocolate over the cookies rather than dipping them into it.
- Extra Nutty Butter Cookies: Feel free to swap out the sprinkles with your favorite chopped nuts. Go ahead and toast the nuts for extra flavor if you’d like. I love making my cookies with almond extract and topping them with chopped and toasted almonds. SO yummy.
Storage Instructions
- Store at room temp: Keep these cookies in an airtight container at room temperature once they’ve cooled completely. If you’ve dipped them in chocolate, store them once the chocolate is fully set and place wax or parchment paper between layers if stacking is needed. They will stay fresh for up to a week without the chocolate and for 3-4 days with the chocolate included.
- Can I freeze them? You can absolutely freeze these cookies if you’d like to store them long-term. Place them in a freezer-safe container with wax or parchment paper between layers if the cookies are dipped in chocolate. Whether or not you’ve added the chocolate, they will last in the freezer for up to 3 months. Thaw out your cookies on the counter before serving.

Classic Butter Cookies Recipe
- Prep Time: 45 minutes
- Cook Time: 10 minutes
- Total Time: 55 minutes
- Yield: 32 cookies
- Category: Dessert
- Method: Oven
- Cuisine: American
Description
These soft and buttery swirl cookies are partially dipped in chocolate, then decorated with your favorite holiday sprinkles. Every Christmas celebration could use some of these melt-in-your-mouth Butter Cookies!
Ingredients
- 1 cup (226g) unsalted butter, at room temperature
- 2/3 cup (126g) granulated sugar
- 3 large egg yolks
- 2 ½ cups all-purpose flour
- 1/8 teaspoon salt
- 2 teaspoons vanilla or almond extract
- 2 tablespoons (30ml) milk
- 10 oz Ghirardelli Chocolate Wafers (optional)
- Sprinkles (optional)
Instructions
- Preheat the oven to 350°F. Line a large cookie sheet with a silicone baking mat.
- In a stand mixer, combine the butter with the sugar and beat on medium speed until well combined.
- Next, add the egg yolks and the vanilla or almond extract and beat until well combined.
- Then, add the dry ingredients and beat until the dough starts to form. Add the milk and finish beating until the dough is stiff.
- Fit a large piping bag with an Ateco 825 tip. In a separate large piping bag, add about 1 cup of dough, pressing it down to the bottom of the bag. Drop the dough-filled bag into the other one. Pipe large swirls, about 1 ½ inches wide, placing 2 inches apart on the baking sheet.
- Bake one tray at a time on a room temperature baking sheet for 9-11 minutes.
- Remove from oven and let cool on the baking sheet for 5-10 minutes, then transfer to a wire rack to cool completely.
- To dip in chocolate, wait until the cookies have cooled completely. In a microwave-safe bowl, melt half the chocolate wafers at 50% power in 30 second intervals; stir after each interval and continue until chocolate is melted. Reduce microwave time as needed so the chocolate does not burn.
- Dip the cookies in the chocolate, tap off excess chocolate on the sides of the bowl and then place on a baking sheet lined with parchment paper or a silicone baking mat. Add sprinkles if desired.

Notes
- To Store: Store cooled cookies in an airtight container at room temp. If they’re dipped in chocolate, store once the chocolate is fully set and place wax paper between layers if stacking is needed. Enjoy within 1 week without chocolate and within 3-4 days with chocolate.
- To Freeze: Place cooled cookies in a freezer-safe container with wax paper between layers if dipped in chocolate. Enjoy within 3 months and thaw on the counter before serving.
- The piping tips I used was an Ateco 825, it’s a large open star tip
- Don’t Overfill the Piping Bags: You only want to have about 1 cup of cookie dough in your piping bags at a time. Push about half of the dough down into the bottom of the bag so it fits in the palm of your hand. Pipe out a couple of cookies and push more dough down in the bag.
- Use That Hand Strength! It may be a bit challenging to pipe out your first two or three cookies, but don’t get discouraged. The dough softens as you go and gets easier to work with.
- Reshape the dough with your fingers if needed. If you’re still having problems with piping, try cleaning out the piping tip with a knife.
- Not Happy With a Swirl? Throw it back into the bowl. You can press it down into the piping bag and try again!
Nutrition
- Serving Size: 1 Cookie
- Calories: 109
- Sugar: 4.3 g
- Sodium: 11.3 mg
- Fat: 6.3 g
- Carbohydrates: 11.8 g
- Fiber: 0.3 g
- Protein: 1.4 g
- Cholesterol: 32.6 mg
More Christmas Cookies to Try
Soft and chewy cookies hold a very special place in my heart. Here are some of my favorite recipes for Christmas!


My family loved these cookies. I was unable to pipe through the Wilton 1M tip I had so I rolled to 1/4 inch thick and used a wavy edged cutter to make small rectangular shaped cookies. Dipped in chocolate after. Will make
again next year! Was so quick with perfect texture and flavor.
Hi Susan, thanks for sharing your modifications.
Could not get through the 1M Wilton tip- too hard to squeeze though.
Hi Sheri, were you able to reference the tips I shared to try and adjust the dough consistency? I am sorry this was not successful for you
Your recipe sounds delicious! I was thinking do you have to but it in a piping bag? Or can I make it as a drop cookie? I love lots of your recipes. Thanks for your time.
Jan
Hi Jan, yes it can also be done as a drop cookie.
Love this recipe. They came out great and wasn’t hard at all to make or pipe.
Wonderful Rachel, thank you so much!
Guess I should’ve read the comments first!
First off I will state I put in less dough than the one cup suggested and they were horrible to pipe. After using every muscle in my body I got a few….tiny ones. Baked as stated and they basically melted to little flat circles. Didn’t even look like the picture.
Will NOT be making again
Hi Justyne, I am sorry this recipe did not work for you. The dough is stiff, but it should be workable to pipe through a large tip. What tip size were you using? If the melted into flat circles, then it sounds like perhaps the flour was unmeasured. I understand the frustration when a recipe doesn’t work out, the dough should hold it’s shape though.
Have you tried a cookie press to pipe would this work?
I would actually use my Spritz recipe instead. It’s the same recipe but doesn’t have the added milk.
https://beyondfrosting.com/spritz-cookies/
I find the dough very stiff and difficult to push through even a large star tip. I am afraid to make the dough softer in case it would not hold its shape while baking.
I love the swirls!
In the tips provided, I work in small batch of dough, about 1 cup at a time, the first couple are hard to pipe but the dough softened a bit with the warmth of my hand. I also used quite a large piping tip as noted in the post. The dough is very thick, but if it’s too thin, then the cookies will spread and lose the shape. What piping tip did you try?
Adding my voice to those who just can’t pipe these. I’ve tried the tips in the blog post but I find that my batter is unpipeably stiff when first put into the bag but as it gets warmed up, it just gets really greasy. In neither state will it pipe nicely – either the edges are rough and the dough breaks off, or the edges are too melty and soft and indistinct. I love the flavour and the fact that it uses only yolks so I’ve made it a few times, but the piping always defeats me and I wind up giving up and just making rounds and flattening them. Next time maybe I’ll try the suggestion of adding milk. I guess I’m just not strong enough but I find that I’m more likely to burst the piping bag than to get it coming out of the tip properly, and I use a large star tip.
Hi Cat- Thank you for your feedback. Try reducing the amount of dough in the piping bag too. It is a very stiff dough, but even mine have some breaks on the edges, but I find they bake out a little as the cookie spreads.
I the list of ingredients it states: 2 tablespoons milk”
But it is not listed anywhere in the directions. This is the first making them – I am ooting not to use the milk. 2 tablespoons seems a lot for the recipe, even after all ingredients are mixed together. I may add a bit of milk if it is too stiff.
Hi Donna, step 4 in the directions says “Then, add the dry ingredients and beat until the dough starts to form. Add the milk and finish beating until the dough is stiff”. Maybe you missed that. You will need to add some milk to make the recipe soft enough to pipe.
This recipe is excellent! The cookies are delicious, they hold their shape, and I didn’t have any problems piping them onto my cookie sheet. I made Santa bear cookies with them. They were adorable. I’ll definitely be making these again.
Thank you Nicole, very happy to hear that!
Nicole: did you use the 2 tablespoons of milk?
I wanted to try these but they are way to stiff to have to work so hard 😫
It takes a bite of elbow grease to pipe these. If they were too soft, it wouldn’t hold it’s shape.In my tips for success, I also mention not overfilling the bag, and holding the bag closer to the piping tip to help get the dough out.
I’ve been trying to pipe this dough for about 20 mins now and I still can’t! My hands and forearms are so sore. I’ve put my dough on top of the oven in hopes it’ll soften up. Unfortunately, I don’t think I’ll be making this recipe again. 😕
Hi Louise- I followed up with you via email, but you can always try putting the dough back in the mixer and adding more milk. I also included some helpful tips for piping in the blog post