
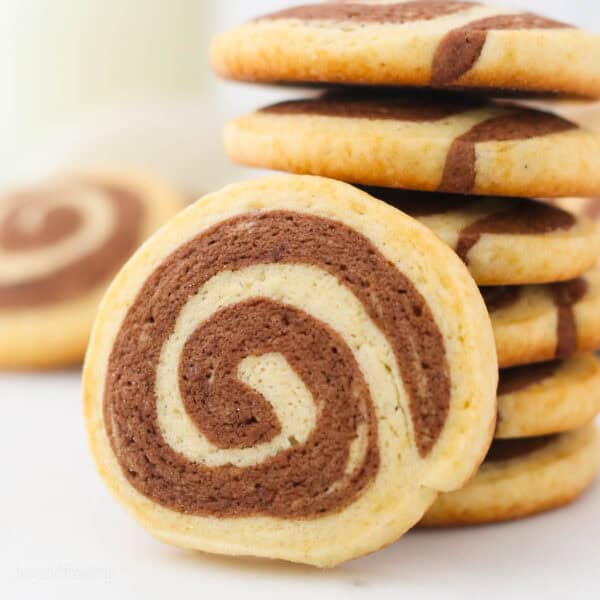
Our family loves these festive, classic pinwheel cookies with soft-baked layers of vanilla and chocolate sugar cookie dough, just like Nana used to make! This is an eye-catching and easy cookie recipe that’s perfect for filling your cookie platters.
These pinwheel cookies make a perfect addition to a Christmas cookie dessert board with more favorites, like chewy hot chocolate cookies, anise cookies, and peanut clusters.

Nana’s Soft-Baked Pinwheel Cookies
Today’s pinwheel cookies are another recipe I’ve “thrifted” from my family collection, and it holds a special place in our house during the holidays. My grandmother’s pinwheels are classic cookies, made from layers of flavorful vanilla and chocolate cookie dough rolled up into gorgeous little spirals. They’re soft-baked, with chewy middles and buttery edges. There are so many variations of pinwheel cookies out there, but no other pinwheels come close to Nana’s! You’re going to love this recipe for soft, crave-worthy pinwheel cookies just as much as we do.
Why You’ll Love This Pinwheel Cookie Recipe
I could go on for ages as to why these are the best cookies you’ll bake this season. But, I’ve narrowed it down to my top three reasons:
- One base, two cookie colors. Both the vanilla and chocolate layers for these pinwheels come from the same cookie dough base. Easy-peasy.
- Unbelievably soft and tender. My Nana’s pinwheel cookies were always soft-baked, melt-in-your-mouth, and irresistibly tender. This updated version delivers just that.
- Classic Christmas cookie vibes. These cookies let their sweet chocolate and vanilla flavors do the talking. No fancy bells or whistles. However, they still leave tons of room for variations if that’s your thing! Don’t forget to check out the section later on with ideas.

Ingredient Notes
Below you’ll find notes on the key ingredients you’ll need to make these chocolate pinwheel cookies from scratch. You’ll find the full ingredient amounts and details in the recipe card.
- Unsalted Butter – Bring the butter to room temperature before you start.
- Sugar – Since the base of these pinwheel cookies is very similar to a sugar cookie, I recommend using regular granulated sugar for the most consistent results.
- Milk – You can use whole milk or 2% milk to bring the dough together.
- Flavoring – Use real vanilla extract or another choice of extract, like almond or peppermint, to flavor the cookies.
- Chocolate – Chocolate chips or chocolate bars, melted to flavor the chocolate cookie dough.
How to Make Pinwheel Cookies
These pinwheel cookies might look fancy, but they’re surprisingly easy to put together. Here an easy step-by-step, just like Nana used to make:
Step 1: Prepare the Dough
This recipe starts with a batch of classic sugar cookie dough. Here’s how to mix up the dough and color it for your pinwheel cookies:
- Prepare the cookie dough. Start by creaming together softened butter with sugar, then add the milk, egg, and vanilla. In another bowl, whisk together the dry ingredients. Slowly add the dry to the wet ingredients, mixing to form the dough.
- Divide the dough. Portion the dough in two (a kitchen scale comes in handy for this) for the vanilla and chocolate layers. Melt chocolate in the microwave, and mix the melted chocolate into one of the dough halves.
Step 2: Roll the Pinwheel Cookie Dough
Next, you’ll flatten, stack, and roll up your colored cookie dough:
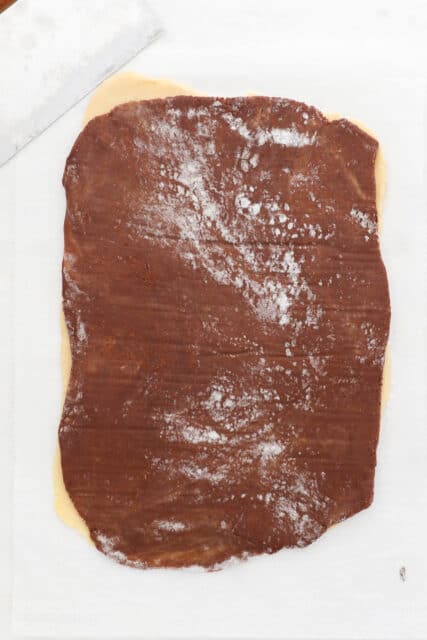
- Assemble. Roll each dough color into two longish rectangles of about the same size and thickness. Layer the chocolate dough rectangle over the vanilla. Use a rolling pin to gently press the two layers together.
- Roll. Roll the dough into a tight log, wrap it in plastic wrap, and place it into the fridge to chill (the freezer can also help speed up the process).
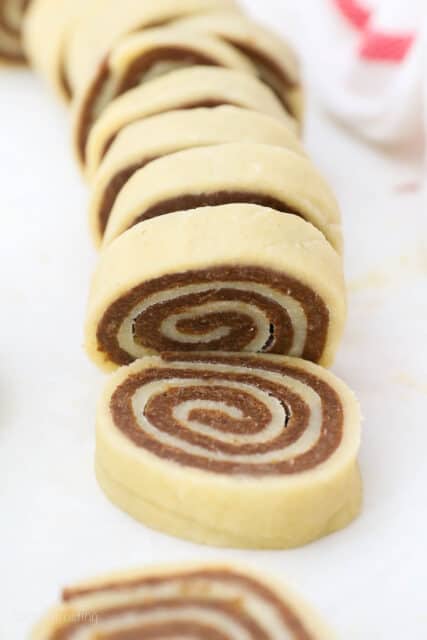
Step 3: Slice and Bake
When the dough is well-chilled, it’s time to cut your cookies into pinwheels and bake them:
- Slice the cookies. Cut the cold dough log into even-sized slices, aiming for about a quarter-inch in thickness. Arrange your chilled dough spirals on a lined baking sheet.
- Bake. Bake at 425°F for 5-7 minutes. The cookies should be lightly golden and still soft in the centers.

Recipe Tips
I adapted my grandmother’s original recipe, and after some trial and error, ended up with these perfect pinwheel cookies! Below are some tips I picked up along the way:
-
- Weigh the dough. Weighing is the best way to ensure that the dough gets evenly portioned between the two colors. When I made this recipe, the full batch of dough weighed in at 17oz. This made it easy to divvy the dough into two parts, 8-8.5 oz each, for the vanilla and chocolate layers. So if you have a kitchen scale, use it!
- This dough is on the stickier side. Just use a bit of flour on your work surface and on your hands when turning out the dough. It will be a lot more workable! I’ve also found that rolling out the dough rectangles on parchment paper makes it much easier to transfer one dough on top of the other.
- Roll the dough as tightly as possible. However, if you do have small cracks or spaces after rolling, don’t worry. These will fill in after baking.
- Bake the cookies cold. The dough should be well chilled before you slice it, and still cold when the cookies go into the oven.
- Know your oven. In my oven, exactly 6 minutes was the sweet spot when baking these pinwheel cookies. However, baking times can vary from oven to oven. So, keep a close eye on the cookies, and bake them on a silicone baking mat if possible (this keeps the bottoms from burning).
Pinwheel Cookie Variations
Whether it’s for Christmas or even Valentine’s Day, there are some easy ways to make these cookies a little more festive to your liking. Try these ideas:
- Add food coloring. Rather than adding chocolate, use gel coloring to dye the dough instead, as I do in my rainbow sugar cookies. You can use any color you want.
- Christmas pinwheel cookies. This original recipe is the inspo behind my Christmas pinwheel cookies, made from red and green dough.
- Roll the dough in sprinkles. Before chilling the dough, roll the outside edge of the logs in sanding sugar or nonpareils for a pop of color.
- Change the flavors. Use orange, almond, or peppermint extract in place of vanilla in this recipe.

Can I Make the Cookie Dough Ahead?
Yes! There’s nothing better than a make-ahead-friendly holiday cookie recipe, is there? Once your cookie dough log is rolled, double-wrap the dough in plastic wrap to store in the fridge for up to 1-2 days.
You can also freeze the dough for up to 1 month. If you plan on freezing the dough, I recommend pre-freezing the log on a cookie sheet to keep the soft dough from warping too much.
How to Store
- To Store. Store these homemade pinwheel cookies airtight at room temperature for up to 5 days.
- Freeze. To freeze the baked pinwheel cookies, let them cool completely, and then store them in an airtight container or freezer bag. These cookies will stay fresh in the freezer for up to 3 months. Thaw the pinwheel cookies at room temperature before serving.
More Easy Cookie Recipes
- Snowball Cookies
- Snickerdoodle Cookies
- Cream Cheese Cookies
- White Chocolate Cranberry Orange Cookies
- Soft Molasses Cookies
Pinwheel Cookies
- Prep Time: 2 hour, 5 minutes
- Cook Time: 6 minutes
- Total Time: 2 hours 11 minutes
- Yield: 25-28 cookies
- Category: Cookies
- Method: Oven
- Cuisine: American
Description
These classic pinwheel cookies are made from soft-baked layers of buttery vanilla and chocolate sugar cookie dough. An eye-catching and easy cookie recipe for the holidays and beyond!
Ingredients
- ½ cup (113g) unsalted butter
- ½ cup (95g) granulated sugar
- 3 tablespoons (44ml) milk
- 1 large egg
- 1 teaspoon (5ml) pure vanilla extract
- 1 ½ cups (210g) all-purpose flour
- 1 ½ teaspoons (5g) baking powder
- 1/8 teaspoon salt
- 2 ounces chocolate (bar or chips), melted
Instructions
- Soften the butter to room temperature or microwave for 15-20 seconds until softened but not melted.
- Combine the butter with the sugar and beat on medium speed until well creamed together.
- Add the milk, egg, and vanilla extract. Mix until it’s well combined.
- In a separate bowl, combine the remaining dry ingredients. Slowly add into the batter and beat on medium-low speed until well combined and dough forms.
- Melt the chocolate in the microwave in 30-second increments, stirring occasionally until melted and smooth.
- Divide the dough in half (about 8.5 oz each) and mix the chocolate into one-half of the dough.
- Turn each dough out onto a lightly floured surface and roll out until is 1/8 inch thick into a rectangle shape. The shapes should be similar in size.
- Place the chocolate dough over the regular dough and gently press the layers together with the rolling pin. Trim excess edges.
- Roll the dough into a log, and tightly wrap it in plastic wrap. Chill the dough for at least 2 hours in the refrigerator or 1 hour in the freezer.
- Slice the dough into ¼-inch thick slices. Bake cold, on a baking sheet lined with parchment paper or a silicone baking mat. Bake at 425°F for 5-7 minutes.

Notes
- The dough will be tacky, turn out onto a lightly floured surface and flour your hands, and gently turn the dough to coat in the flour, which will make it much easier to work with.
- In my oven, 6 minutes was the sweet spot. 7 minutes was too long. I recommend baking on a silicone baking mat to prevent the bottoms from burning, and transfer them immediately to a wire rack to cool.
- Make sure the dough is plenty cold when you slice into it and I also recommend baking these cold.
- If you want to change the flavor, substitute the vanilla extract for another flavor such as almond or peppermint.
Nutrition
- Serving Size: 1 Cookie
- Calories: 61
- Sugar: 5.4g
- Sodium: 16mg
- Fat: 1.1g
- Saturated Fat: .6g
- Carbohydrates: 11.6g
- Fiber: .4g
- Protein: 1.3g
- Cholesterol: 8.1mg


Sorry but these were not good. They had little to no flavor. The dough was so incredibly sticky it was impossible to roll out and we ended up having to just kind of spread the chocolate “dough” over the plain dough. Rolling was very hard to do because of it. I wouldn’t have minded if they were delicious, but they were honestly so bland we ended up just chucking them.
Super easy recipe to follow & they came out amazing! Thank you!
Wonderful Katie, thank you so much!
You list baking powder in the ingredients list and baking soda in the recipe. I used powder.
Thank you for the heads up Stan. Baking powder is correct, I’ll update the recipe card.
We are Russian Mennonites now living in Central America.. This is so interesting! These cookies look very familiar… Like the cookies my mom and grandma would make for Christmas.
I LOVE making pinwheel cookies, especially around Christmas time 😀 I once made plain vanilla pinwheels and tinted half the dough pink, and it was soooooooo pretty. But I think I would enjoy chocolate even more 😉 I also think these would be fabulous with a few drops of peppermint extract!
Oh I love that Erin!
425 degrees gave these burnt bottoms. 375 was still too hot on the next try, so I think 350 will be my goal next time.
I will be making these today thank you ..