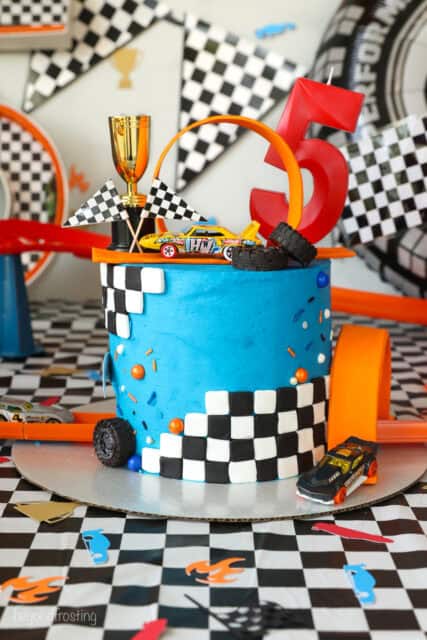
I went all out with this Hot Wheels cake for my son’s 5th birthday! It’s a 6” chocolate layer cake decorated with vanilla buttercream and fondant decoration, complete with a functional tunnel design so cars and drive through the cake. I’ll show you how to make it, step-by-step.
If your little racer loves cars, this Lightning McQueen Cake is another fun birthday cake idea.

My oldest just turned FIVE. How are we here? He was just a tiny baby not too long ago. If you’ve been around here for any amount of time, you know my boys are obsessed with all things cars, trucks, and construction. This Hot Wheels cake is the perfect cake for little racers.
My boys have birthdays just a few weeks apart, and so this year the birthday themes were Monster Jam and Hot Wheels. I must say this has been my favorite year for cakes! In years past, we’ve done construction cakes (with matching party favors) and even a Paw Patrol cake.
Things to Know About This Hot Wheels Themed Birthday Cake
- 100% homemade. This is a 3-layer 6-inch cake made with a variation of my chocolate cake as the base and decorated with vanilla buttercream.
- Thick chocolate layers. This cake recipe yields a thicker cake with a tighter crumb, yet it’s still incredibly moist and spongy. You’ll want the thicker cake layer to accommodate the tunnel in the cake.
- Some skills are required. Bakery cakes can be expensive, and I had so much fun (and a bit of stress) making this Hot Wheels birthday cake from scratch. It takes time and a little bit of skill, but you can apply the frosting, fondant, and decorating techniques to future birthday cakes, too. You’ll notice some flaws in my cake, I am embracing them. You will learn from my mistakes!
- Make it your own. I set out to make a Hot Wheels cake with a tunnel for toy cars running through the bottom cake layer. Ambitious, but it paid off! If you don’t feel like making the tunnel, you can simply skip that step and assemble the layer cake as usual, but I have to say it was such a HUGE hit with his friends.
- Consider how to store and transport. My cake carrier was JUST tall enough to keep the cake stored airtight without the decorations. I transported it in the cak carrier and assembled onsite where we were having the party.
Picking A Track
As you’re planning your cake, pick a simple track, and know what size table you will need to support it. Mine was a continuous loop with a motor running. EVERY kid at the party wanted to send a truck through the cake. As I anticipated that, I decided I would serve cupcakes so they could enjoy the love and labor that went into the cake (don’t worry we served it at home!).

Prepare the Buttercream
First, prepare the buttercream frosting you’ll use to fill and frost your Hot Wheels birthday cake. Refer to the printable recipe card for the full recipe amounts and detailed instructions.
- Make the frosting. Beat cold butter for 5-10 minutes until it’s whipped and super fluffy. It will grow in volumn and turn whitish in color, then gradually add powdered sugar, alternating with vanilla and heavy cream. Whip the frosting well in between each addition.
- Color the buttercream. Give the frosting another good whip so it’s fluffy, then lower the mixing speed and slowly add a few drops of Electric Blue color, and one drop of Royal Blue to the frosting. Mix and add additional color as needed until the frosting is an even color. If needed, see my full tutorial on how to color buttercream for details.
Frosting Tips and Colors
- Make the frosting ahead. The frosting can be made up to 7 days before and kept airtight in the fridge. It does need to come back to room temperature and be rewhipped before decorating the cake.
- Coloring tip: Frosting colors get better the longer they sit. For this reason, I recommend coloring the buttercream the day before you plan to decorate.
- Add a crumb coat. You’ll notice I crumb-coated and filled my cake with white buttercream instead of blue. It was just a personal choice. You can frost it with either color.

How to Make a Hot Wheels Cake With a Tunnel
Before you assemble your layer cake, you’ll need to level the baked cakes using a cake leveler or a serrated knife to trim off the domes so the layers are even and flat for stacking. I go into the steps to assemble a layer cake in detail in my post, How to Make a Layer Cake. I recommend reading through it if you’re new to building layer cakes.
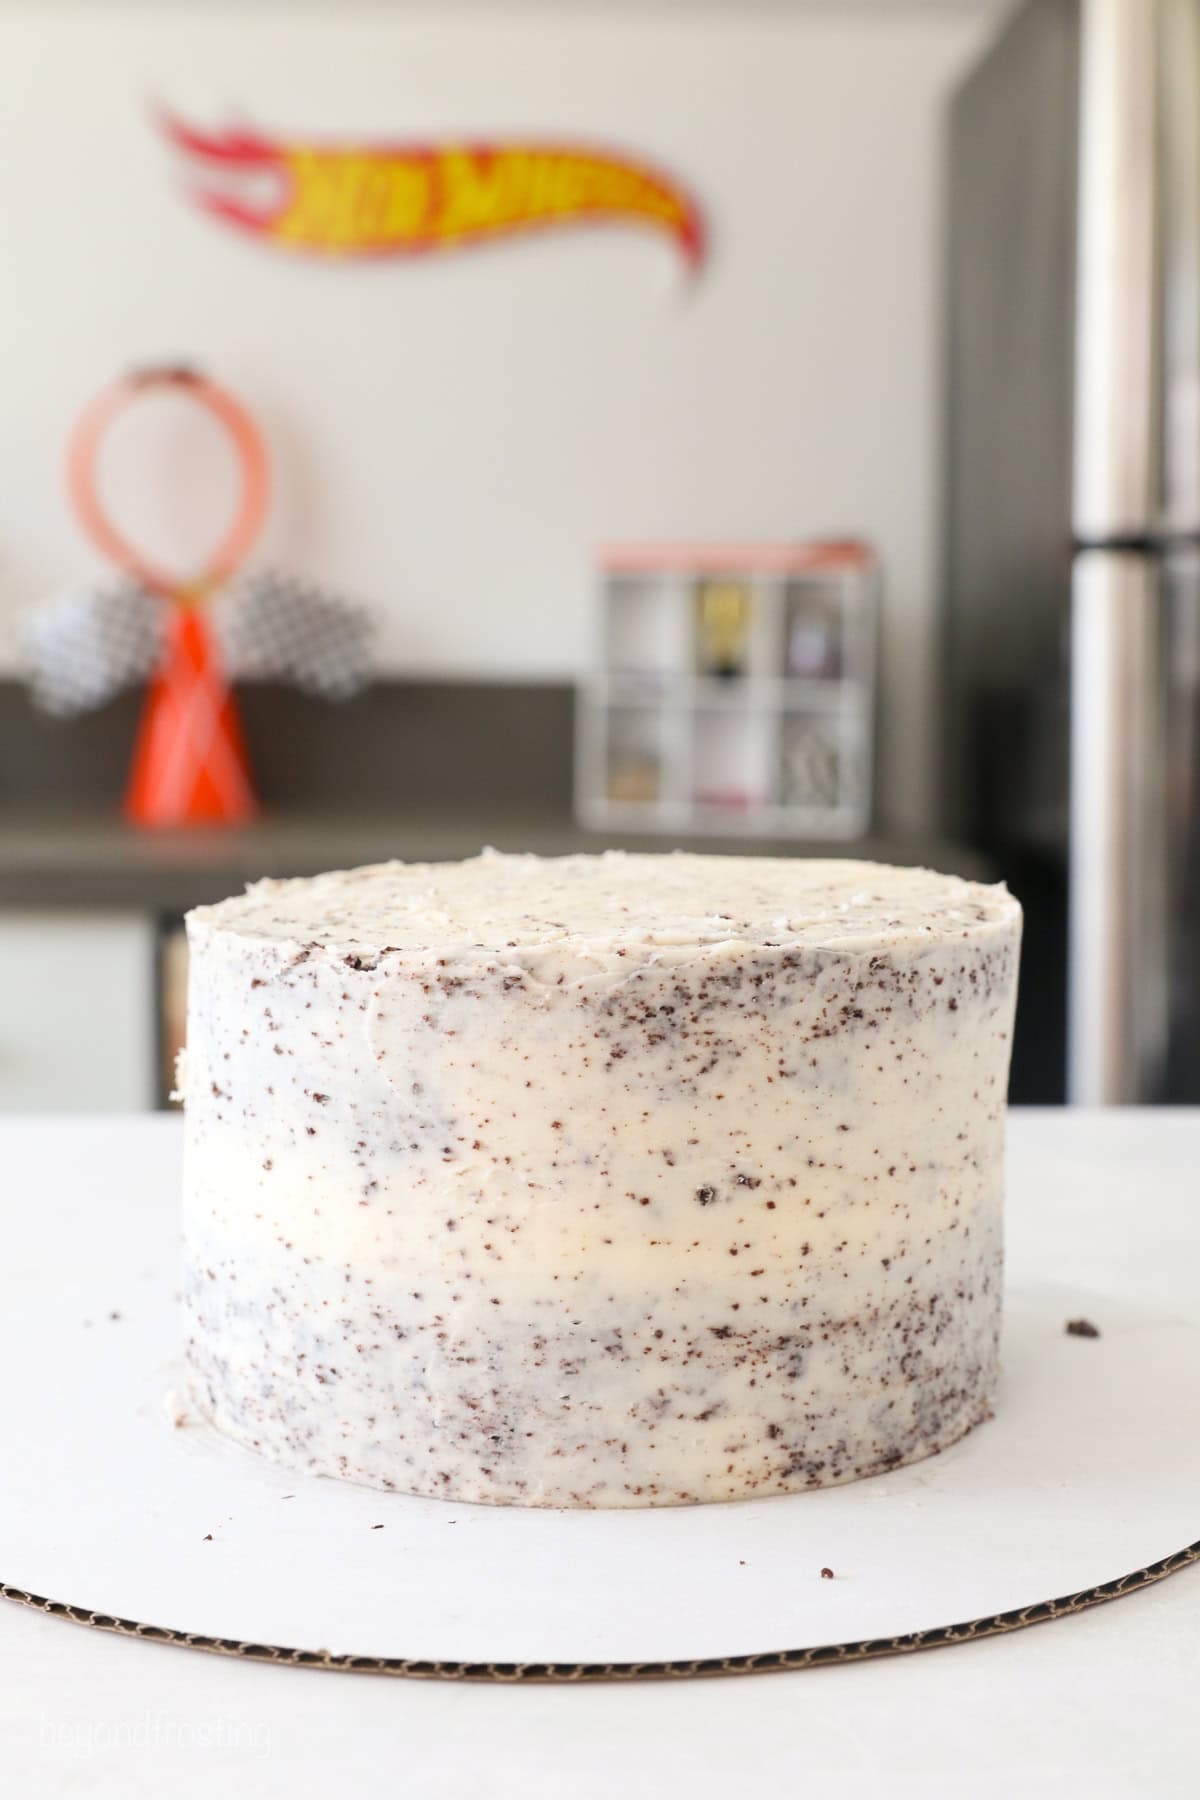
- Start by assembling the top layers. Spread about 1 cup of frosting between the two cake layers, which will become the top of the cake (we’ll get to the bottom layer with the tunnel in a minute). Once you’ve stacked the cakes, lightly frost the outside to create a crumb coat. Then, place the cake into the fridge for 15-30 minutes to chill.
- Prepare the bottom layer. Next, to make the tunnel through the bottom cake layer, lay a piece of track across the cake and cut out the middle, leaving a little extra space on either side. You’ll be left with two cake halves. Crumb coat each half separately. Use about ½-¾ cup of buttercream, frost both halves of the bottom cake layer, including the inside edge. Afterward, line the inside edges with strips of parchment paper. Place those two halves onto a large round cakeboard (I recommend 12 inches) with a smidge of buttercream on the board to hold them in place. Be sure the tunnel is still wide enough with some space on both sides.
Learn From My Mistake
When I made this cake, I originally used strips of fondant to seal the edges of the cake halves where the car would be rolling through. However, after refrigerating and thawing the cake, the fondant became far too soft to put the track through. I ended up using a piece of parchment paper instead. All this to say: Ditch the fondant and just go with the parchment paper! Use an angled spatula to help press the paper into place if needed.


Learn From My Mistake
I opted to dowel my cake. I recommend 2 dowels, one on each side. Measure and precut the dowels before assembling the cake. You’ll want the dowels to go from the top layer all the way through two holes in the cake board, so I placed the dowels on the lower tier and then stacked the other cake on top.
- Secure the cake. Place a 6-inch cake board over the two halves, leaving the tunnel open in the middle. Cut two holes in the cake board, one on each side, then, place the dowels through the holes in the cake board and into the bottom cake layer.
- Add the top layers. Now, take out your assembled and chilled top cake layers. Carefully place them over the dowels. When you’ve stacked the cake, liberally crumb coat the outside with buttercream again, and smooth it out so the sides of the cake are as even and flat as possible. You may need extra buttercream around the bottom of the cake as it is slightly wider than the top. Return the cake to the fridge for 20-30 minutes so that the frosting can set properly.


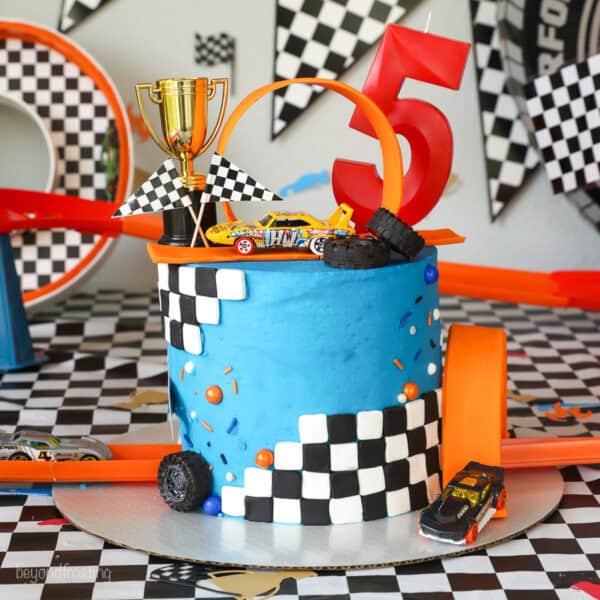
- Frost the cake. Use a large piping bag to pipe the blue buttercream around the outside of the cake, starting and the bottom and working your up to the top. and spread a thin layer on top of the cake. Smooth out the piped frosting using an icing scraper, filling in any gaps and rescraping as you go. After your layer cake is evenly frosted, I recommend placing the middle track through the cake. It can stay there until it’s time to serve.


Fondant Decorations
I used fondant squares to create the black and white checkered flag pattern on the sides of the frosted cake and the orange loop track on top. Grab a package of pre-colored fondant at craft stores like Michaels, Hobby Lobby, or Walmart.
Checkered Flag Pattern
You’ll need less than 4 ounces of fondant for the squares. You can cut your fondant squares up to 48 hours ahead of time. If you do, arrange them in a single layer in an airtight container to store for later. Cutting out the squares is easy:
- Roll out the fondant. Use a fondant roller or rolling pin to roll out each color to an even ⅛” thickness.
- Cut out the squares. Next, use a small square cookie cutter to cut out squares in each color. The cutter I used is ⅝”. Alternatively, you can use a ruler and pizza cutter to measure and cut (I’ve also seen plunger cutters and multi-cutter squares, but I have not personally used them). You’ll need approximately 40 squares of each color, depending on how much decoration you want to do.
It’s best to apply the fondant squares to the cake when the buttercream is fresh. If you’ve already frosted the cake and are applying the squares later, use a toothpick to gently scratch the buttercream before you place the fondant on top. This helps it adhere to the cake. Or you can use piping gel.
I opted to make a few different arrangements of the checkered pattern, taking inspiration from various cakes I’ve seen online. I just love how it turned out and how it’s a bit randomized.


Fondant Number
In addition to the checkered pattern, I cut out a fondant number “5” using a cookie cutter. I laid out the black and white pattern, then very gently smoothed it over with a rolling pin so the squares would stick together. Afterward, I cut out the number, gently removed the cookie cutter, and left the “5” to lie flat overnight until it was dry. Since the fondant will wilt with time, I recommend placing the number on the finished cake right before serving.

Before You Begin…Here’s what I learned.
For me the orange loop was the center of the decoration, so I made several practice ones before doing the final on.
Extra decorations. The fondant loop can be fragile, so I recommend making 2-3 of them. Consider picking up an extra 4-ounce package of fondant. I had issues with cracking while making mine, and the one pictured on the cake is actually cracked on the bottom. I covered it with a car!
Shaping: You’ll need a round object to shape the mold. Make sure to place some parchment under the fondant so it doesn’t stick to your round object.
Allot enough time: It needs several days to dry, take that into consideration as well as how to transport it. It’s very fragile.
Orange Fondant Loop
The fondant loop that I made as a cake topper took several days to dry, so give it plenty of time. The fondant should be thick enough so it (hopefully) won’t crack, but still thin enough so it dries completely.
- Roll out and cut the fondant. I recommend planning your loop using a piece of actual Hot Wheels track. This way, it’s roughly the same width and you can trim the excess off the sides. Roll out the orange fondant to ⅛” thick, and using the track as a guide, trim the edges with a pizza cutter or knife. Make the strip longer than you think you need at first, as you can always trim it back.
- Shape the loop. To make the loop, use a wide cup or cylinder covered with a piece of parchment paper. Loop the fondant around the cylinder with the parchment paper in between, and place it on a sheet pan lined with parchment paper. Trim the ends as needed. Finally, place the fondant loop in a cool, dry place for several days to dry.
- Decorate. To place it on the cake, consider using a large spatula or cake lifter. I transported it in a separate container and placed it after my track was attached and assembled.

Other Cake Decorations
Along with the elements covered above, I finished decorating my Hot Wheels cake and cupcakes with the following:
- Hot Wheels sprinkles
- Checker candles (or these ones)
- Mini trophies (I also used these for Party Favors)
- Checkered Flags (mine are from Hobby Lobby, but you’ll find lots of options on Amazon)
- Hot Wheels Cars
- Edible Chocolate Tires- see below for more!
Hot Wheels Cupcakes
Since I had no intentions of slicing this cake at the party, I served our attendees cupcakes. It’s so much easier than a slice of cake! Meanwhile, the kids enjoyed sending the car around the track and were amazed at the tunnel. They all wanted a cupcake with a chocolate tire!
I made these Hot Wheels cupcakes from my favorite chocolate cupcakes and the same vanilla buttercream I used for the cake (I saw the idea on Pinterest from Chloe’s Cupcakes).
To decorate, I split the batch of buttercream into thirds and dyed it orange and blue, and left the third uncolored/white. I piped the frosting with a large French star tip following the same method as my rainbow cupcakes. Afterward, I topped each cupcake with a chocolate tire (see below). For the flames coming out of the chocolate tires, I used leftover orange buttercream and a size 21 tip.

Chocolate Tires
I topped my cake and cupcakes with edible tires. You can make these with black fondant or melted chocolate. Since I was serving them to the kids, I opted for chocolate tires. I used these tire molds from Amazon. I found the two medium-sized tires, although they’re different patterns, worked best.
- Prepare the chocolate. To make the chocolate tires, I used my candy melting pot, Ghirardelli melting wafers, and black oil-based gel color to dye the chocolate darker. You can buy black melting wafers, but I find that they don’t taste as good. However, if you’re using the tires only as a decoration, that’s a more cost-effective option or simply use fondant.
- Fill the molds. You’ll need to pour one tire at a time, so a candy melting pot is helpful in keeping the chocolate at a consistent temperature. Otherwise, use a double boiler or a microwave, but make sure not to overheat the chocolate (see how to melt chocolate). Once the molds were filled, I refrigerated them until they were set and repeated it for as many as I needed.
- Add a metallic shimmer. Afterward, I painted the center hub caps using edible silver shimmer. I think it gives them a nice touch! To make homemade edible shimmer, combine edible glitter with a couple of drops of vodka (don’t worry, it evaporates), clear vanilla, or lemon extract. Then, use a paint brush to brush the shimmer over the center of the tires.

Make Ahead and Storage
- Make the cake layers in advance. Get a head start and bake the chocolate cake layers up to 2 days in advance. To store, wrap the cooled cakes in plastic wrap. Keep them at room temperature, or you can freeze the cake layers for up to 1 month. Thaw the cakes before you assemble and frost them.
- Store the leftover cake. You can keep the finished cake covered airtight at room temperature for a day or two, unless you live somewhere warm and humid, in which case, store it in the fridge. Remove any plastic decorations before storing the cake. The fondant will wilt and weep with time, so I recommend enjoying leftovers sooner rather than later.
Hot Wheels Party Decor
I DIY’d so many things for this party but also purchased a few things I found online.
- Fillable number– similar to the Monster Jam #2 I made, I did the Hot Wheels version (see it here) and attached orange tracks on the inside. It’s SO stinking cute, they were the perfect size. The white fillable number is from Hobby Lobby. See the full video tutorial here.
- DIY Centerpieces– Made with Dollar tree cones and track, plus some LED lights. We also placed Dollar Tree hot wheels tracks and cars on the tables. See the full tutorial here.
- Hot Wheels Sign– Mine is from Hobby Lobby but Amazon has this metal sign as well.
- Checkered Banner– Hobby Lobby
- Tableware– Can be found at either Hobby Lobby or Target: Table cloth, Napkinst, Plates
- Birthday Road Sign– also from Target, I love this one so much! It also comes with a smaller checkered banner so you get 2 for 1
- Table Confetti– since I discovered this, it’s one of my favorite things to add to the party and backdrop. I made it myself but took inspiration from this one.
More Birthday Cake Ideas
Hot Wheels Cake
- Prep Time: 120 minutes
- Cook Time: 28 minutes
- Total Time: 2 hours 28 minutes
- Yield: 12 servings
- Category: Cake
- Method: Oven
- Cuisine: American
Description
This Hot Wheels birthday cake is a 6-inch chocolate layer cake decorated with buttercream and fondant, complete with a tunnel design running through the cake! Follow along to make it step-by-step.
Ingredients
For the Cake
- 2 cups (380g) Granulated sugar
- 2/3 cup (157 ml) Vegetable oil
- 4 Large eggs, at room temperature
- 1 tablespoon (15 ml) Pure vanilla extract
- 2/3 cup (160g) Sour cream, at room temperature
- 2 2/3 cups (320g) All-purpose flour, sifted
- 2/3 cup (54 g) Cocoa powder, sifted (Hershey’s Special Dark)
- 3 teaspoons (12 g) Baking powder
- ¾ teaspoon Baking soda
- 1 ¼ teaspoon (6.25 g) Salt
- 1 ½ cups (354 ml) Hot brewed coffee
For the Buttercream
- 2 cups (453g) unsalted butter, cold
- 7–8 cups (910-1041g) powdered sugar
- 1 tablespoon (15ml) pure vanilla extract
- 2–3 tablespoons (30-44ml) heavy whipping cream (or milk)
- 1/8 teaspoon salt
- Gel colors
For the Decorations
- 4oz White and black fondant
Instructions
For the Cake
- Preheat the oven to 350°F. Prepare three 6-inch round baking pans, line the bottom with parchment paper, and grease the sides.
- In a large mixing bowl, combine the sugar, vegetable oil, eggs, and vanilla extract. Beat on medium speed until well incorporated. Next, mix in the sour cream and beat until well combined.
- In a separate bowl, sift together the dry ingredients. To the batter, alternate adding half the dry ingredients followed by half of the coffee, and mix just until the flour starts to incorporate. Repeat with remaining ingredients. Use a spatula to scrape down the sides of the bowl and stir the batter from the bottom to the top to ensure it’s well mixed.
- Divide the batter evenly between the three pans, it’s around 2 cups per layer. Bake at 350°F for 28-35 minutes. Test the cake for doneness by inserting a toothpick into the center of the cake. If the toothpick comes out clean, the cake is done. Remove from the oven and allow to cool completely.
For the Buttercream
- Cut butter into pieces. Using the paddle attachment, whip the butter for 5-7 minutes, scraping down the bowl occasionally. Beat until the butter looks light in color.
- Alternate adding 2 cups of powdered sugar at a time with the liquid ingredients: vanilla extract & heavy cream. Add the salt. Ensure the powdered sugar is well combined, then whip for 1-2 minutes before adding the next cups of powdered sugar.
- Once all the powdered sugar has been added, increase speed to medium-high and beat for another 3 minutes or so until it’s light and fluffy. Then turn down the mixing speed. Add a few large drops of electric blue along with one drop of royal blue and mix at a low speed, scraping down the bowl as needed. Add additional color until you reach the desired effect.
- Fondant: Prepare the black and white fondant squares by rolling out each color to a thin but even thickness, but not less than 1/8” thick. Use a square cookie cutter (mine was 5/8” wide) and cut the squares out (estimate about 30 squares of each color). Set aside, or place in a single layer in a flat, airtight container to be used later. These are best placed on the cake while the buttercream is fresh (and best if you’re not refrigerating the cake), otherwise you can attach them but taking a toothpick to gently scratch the buttercream before applying.
To Assemble
- Use a cake leveler to cut the domes off the top of the cake so all 3 layers are even and flat.
If you want to dowel the cake, stack them on top of one another and cut the dowel about 1/8 of an inch above the top layer of cake. Also, place 2 dowel holes in a 6-inch cake board, one on each side. Set the dowel side. - Assemble the top 2 layers first. Using 1 cup of frosting between the layers, spread it evenly with an offset spatula, and then add a light crumb coat around the outside. Fill a large piping bag, cut off about 1 inch up from the bottom. Pipe a thin layer of frosting along the outside edge of the cake, filling in any additional gaps between the layers, and a thin layer of buttercream on top of the cake. Then, use an offset spatula or icing scraper to wipe away the excess frosting, leaving just enough to coat the outside of the cake. Do not mix the crumb-coating frosting back into the bowl if it has cake debris in it. Refrigerate the cake for 15-30 minutes until the outside layer is chilled.
- For the bottom layer, lay a piece of track between the two, cutting out the middle of the cake. Leave yourself a little extra space on each side. Crumb coat each half, all the way around the cake, including the inside edge. Place a thin strip of parchment paper along the inside edge of the cake. Then, using about ½- ¾ cup of buttercream, frost the top of each layer, place a cake board on top, and place the dowels through the cake board and bottom layer of the cake.
- Next, place the top 2 layers (assembled and chilled) over the dowels. Once the cake is stacked, apply another liberal crumb coat to the entire cake, making the sides as even and flat as possible. Chill for 20-30 minutes until the buttercream is set.
- Using the remaining buttercream, fill a couple of large piping bags, cut off about 1 inch up from the bottom. Pipe a layer of frosting along the outside edge of the cake, working your way from top to bottom. Add a thin layer of buttercream on top of the cake.
- Next, use an icing scraper to smooth out the frosting. First, run it under very hot water and dry thoroughly. Lightly press the scraper up against the side of the cake at a 90-degree angle, rotate the cake in a circle, applying even pressure on the scraper. Stop halfway through and clean off the scraper, run under hot water, and dry before starting again. Repeat these steps until the buttercream is smooth. Any gaps can be filled in with the additional frosting and rescraping. It may take several rounds of scraping. Finally, add a thin layer of buttercream on top of the cake and spread evenly. If possible, I recommend placing the middle piece of track through the cake and just leaving it there until you’re ready to serve.


Love the idea of the hot wheels track cake 😍😍😍 !! So amazing . She’s sooo sweet too. Very helpful tips and creative idea. 1000000000/10 highly recommend 😍!
Thank you so much, Bria!! I really appreciate your kind words and happy to hear you love the cake.
I’ve made this one and the monster jam ( Mile High the name I gave it )
They both came out amazingly.
Instructions given were spot on and very easy to follow.
Birthday pleasure for sure!
Thank you so much Tabatha!! I loved to see the picture you sent me too. I am honored you chose to make to make these!
Very cute cake‼️‼️
Thank you!