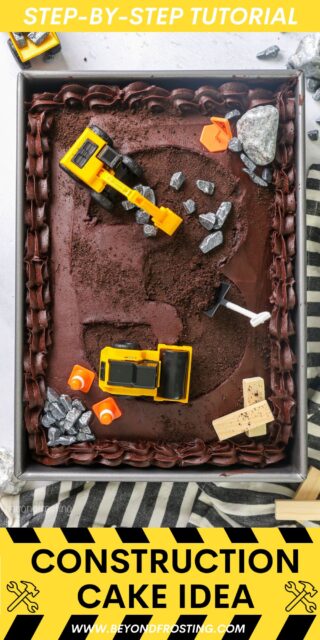
Get out your hard hats and dig into this impressive construction birthday cake! All it takes is a few toys, chocolate frosting, and a little creativity. Make your chocolate cake from scratch, or adapt this tutorial to a store-bought sheet cake!

Easy Construction Site Cake Idea
As a mom of two boys obsessed with all things trucks and digging, I’ve done two construction-themed parties already, and I know there will be more in my future! Last summer, I transformed a plain Costco cake into this super easy construction cake. It was such a hit, I’m sharing how to do it with homemade cake!
This construction site cake is easy to make with moist homemade chocolate cake topped with fudgy chocolate frosting. I include my easy technique to make it look like trucks have been digging away at the frosting!
Why You Should Make It
- No special tools. Anyone with a pan and a knife can make this cake. While I did use a piping tip for a boarder, this is optional!
- The easiest cake to decorate. Decorating a construction birthday cake is so much fun! Top this cake with adorable construction toys, wooden blocks, chocolate rocks, and Oreo crumb “dirt”. There are so many ways to make it your own, and you probably things on hand already.
- Make it from scratch (or not). This recipe is based on my favorite easy chocolate cake. It’s super moist, fudgy, and totally worth making from scratch! If you’re not into homemade cake, or if you’re feeding a large crowd, this tutorial easily translates to a store-bought sheet cake (like the kind you’ll find at Costco). I include all the details in my video below!
- Extra dimension. Excavating a “hole” in the shape of a number gives the cake dimension, plus the trucks look like they’re working. I include printable stencils for numbers 1 to 6. Or, customize this cake with any numbers or letters of your choosing.

Ingredients and Substitutions
Below are some quick notes on the important ingredients. Scroll down to the recipe card for a printable ingredients list for the cake and frosting.
- Sour Cream – Sour cream is a key ingredient for super-moist chocolate cake. Like the eggs, you want your sour cream at room temperature so that it blends well with the other ingredients. If you don’t have sour cream, Greek yogurt is a good substitute.
- Cocoa Powder – I use Hershey’s Special Dark cocoa powder, but a natural unsweetened cocoa powder will work in this cake recipe. Check out my post on the different types of cocoa powder.
- Brewed Coffee – Freshly brewed coffee or espresso helps bloom the cocoa powder and enhances the flavors in chocolate cakes. You won’t actually taste the coffee, but it makes a big difference! Warm milk is your next best alternative.
- Frosting – I use my favorite chocolate frosting for this construction cake. It’s easy to make with butter, cocoa powder, and powdered sugar. You can use the same cocoa powder that you use to make the cake.
- Decorations – You’ll need Oreos to crush up for “dirt”, plus chocolate rocks, and any construction-themed decorations you’d like, such as toy trucks, cars, wooden blocks, and mini shovel spoons. Links for all of these are included below.

How to Frost and Carve the Number
With your cake, frosting, and Oreo crumbs set to go, you’re ready to decorate this construction cake! Before frosting and decorating, print out your desired number cut-out from the templates provided.
- Frost the cake. Now, frost the top of the cake with your prepared frosting, and pop the whole cake into the fridge to chill for a few minutes, it makes it easier to cut out the number.
- Create a cut-out. Print out the number and place your cutout over the middle of the cake. Using a sharp knife, trace around the number. You can find the templates for the numbers here.


- Remove the frosting. Once you have the number outlined in the frosting, carefully remove the top layer of frosting from inside the outline to create an indent (see photos).


- Fill the cut-out. Next, spread a thin, fresh layer of frosting inside the indented number, and spoon Oreo crumbs over top. It may seem silly to remove a layer of frosting only to add it back in, but this helps to seal the cake and gives the Oreo crumbs something to stick to. Use the back of a spoon to press the crumbs into the frosting.


- Add a border. Use any leftover frosting to pipe a border around the outside edge of the cake. The best tip options for this are a 1M piping tip, open star tip, or French star tip. If you need more guidance, check out my tutorials on how to use a piping bag and how to use piping tips.
- (Optional) If you’d prefer to skip the number indent, cut out the number to make a stencil instead. Skip the step of chilling to frosting, place the stencil over the cake and simply fill the cut-out with Oreo crumbs (see photo, below right).


Helpful Recipe Tips
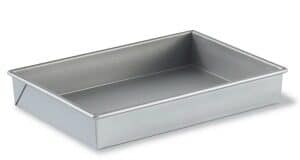
- To remove the cake from the pan, make sure to grease and flour the pan entirely, or line the bottom with parchment paper
- Chill the cake. Chilling the cake in the fridge before cutting out and removing the top layer of frosting makes the frosting easier to remove.
- Don’t sweat the small stuff. Use a sharp knife to cut out the number or letter. If some of the cake comes away with the top layer of frosting, don’t worry. Once the number is filled in, no one will be able to tell!
- Remove non-edible decorations before serving. Many of the decorations on this cake aren’t edible, so keep this in mind and use your discretion when serving this cake to small children.
- Don’t scale the printouts. The numbered printouts are set for a 9×13-inch cake. All you need to do is hit print! They work best when used vertically.
- Colored frosting. If you’d like to decorate this cake with colored frosting, whip up a batch of my easy vanilla frosting and see my tips on how to color buttercream.
- Keep the cake covered until you’re ready to serve it. Especially if you’re serving this cake outdoors, make sure that it’s out of direct sunlight. If it’s warm or humid, I recommend keeping it in a cooler until you’re ready to serve it. See the next section for more storage details.
- Looking for another flavor? Try using my vanilla cake, funfetti or yellow cake as the base instead. These are not quite as thick as the cake featured in this recipe, but it will still work just fine.

Construction Cake Topper Ideas
Now, it’s time to get creative! Have fun decking out your construction site cake with chocolate rocks, props, and any leftover Oreo dirt. Below are some easy ways to decorate. Shop all of these ideas, and more Construction party ides on my Amazon page!
- Toy trucks. I love this CAT activity set or this CAT toy truck set that comes complete with adorable little excavators.
- Shovels. I use these mini shovel spoons for my Halloween dirt cups and they’re just as perfect for decorating this construction cake! Plus you can pass them out with the sliced cake.
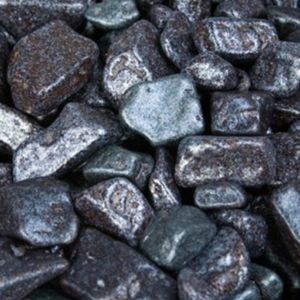
- Boulders. These chocolate boulder rocks are a fun topper idea. M&Ms or chocolate chips are also great options.
- Construction signs. If your little one loves construction, you probably have a few things laying around you can stick on top like plastic road signs.
Candy Topping Ideas
I’ve see so many different options for edible toppings! Here’s a few you can try
- M&Ms or Reese’s Pieces
- Vanilla Wafer Cookies
- Kit Kits
- Malted Milk Balls
- Graham Crackers
- Mini Reese’s Peanut Butter Cups

How to Store A Finished Cake
- To Store. Store the frosted construction cake covered airtight at room temperature for up to 3 days. Unless you live somewhere especially warm, in which case I’d recommend refrigerating the cake instead. Serve at room temperature. If preparing in advance, you may want to wait to add the decorations until prior to serving.
- Freeze. This chocolate cake can be frozen frosted or unfrosted. In either case, leave it in the pan and wrap it tightly with a double layer of plastic wrap for best results. Freeze the cake for up to 1 month and defrost it at room temperature before decorating and serving.
More Cake Decorating Tutorials
Print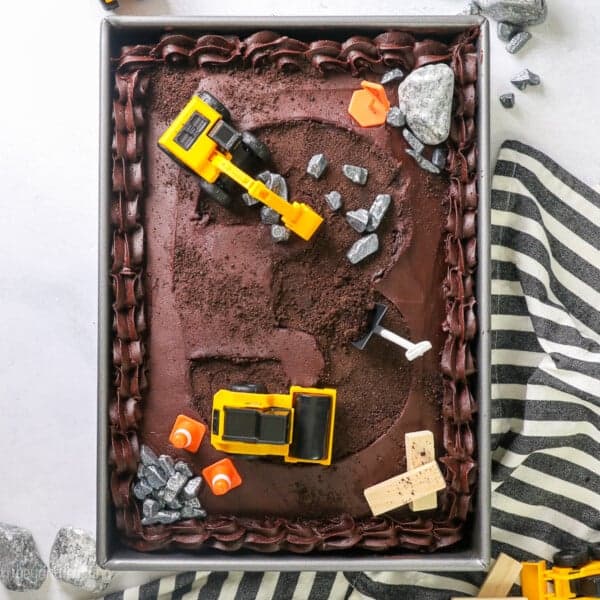
Construction Cake
- Prep Time: 45 minutes
- Cook Time: 30 minutes
- Total Time: 1 hour 15 minutes
- Yield: 15 slices
- Category: Cakes
- Method: Oven
- Cuisine: American
Description
You don’t have to be a professional baker to make this fun and chocolatey construction birthday cake! All it takes is chocolate frosting, some toys, and a little creativity.
Ingredients
For the Cake
- 2 cups (380g) Granulated sugar
- 2/3 cup (157 ml) Vegetable oil
- 4 Large eggs, at room temperature
- 1 tablespoon (15 ml) Pure vanilla extract
- 2/3 cup (160g) Sour cream, at room temperature
- 2 2/3 cups (320g) All-purpose flour, sifted
- 2/3 cup (54 g) Cocoa powder, sifted (Hershey’s Special Dark)
- 3 teaspoons (12 g) Baking powder
- ¾ teaspoon Baking soda
- 1 ¼ teaspoon (6.25 g) Salt
- 1 ½ cups (354 ml) Hot brewed coffee
For the Frosting
- 1 ½ cups (339g) Unsalted butter, cold
- 1 cup (80g) Cocoa powder, sifted (Hershey’s Special Dark)
- 1 tablespoon (15 ml) Pure vanilla extract
- 6 cups (780g) Powdered sugar
- 5 tablespoons (75ml) Heavy whipped cream
Decorations
- 10–15 Oreos
- Chocolate Rocks
Instructions
For the Cake
- Preheat the oven to 350°F. Spray the pan with cooking spray.
- In a large mixing bowl, combine the sugar, vegetable oil, eggs, and vanilla extract. Beat on medium speed until the eggs and oil are well incorporated and the batter is lighter in color. Next mix in the sour cream and beat until well combined.
- In a separate bowl, sift together the dry ingredients. Add half the dry ingredients to the wet ingredients, followed by half of the coffee, and mix until the flour is just incorporated at a low speed. Then add the remaining dry ingredients and coffee. Beat until all of the ingredients are well combined. Use a spatula to scrape down the sides of the bowl and stir the batter from the bottom to the top to ensure it’s well mixed.
- Pour the batter into a 9×13-inch pan and bake at 350°F for 26-28 minutes. Test the cake for doneness by inserting a toothpick into the center of the cake. If the toothpick comes out clean, your cake is done. Remove from the oven and allow to cool completely.
For the Frosting
- Cut butter into pieces, 1 tablespoon size. Using the paddle attachment, whip butter for 5-7 minutes, scraping down the bowl occasionally. Beat until the butter looks light in color and has more volume.
- Sift the cocoa powder into a mixing bowl. Turn the mixer on slow speed and beat until cocoa powder is incorporated. Add 2 cups powdered sugar and the vanilla extract and mix on low speed until incorporated. Beat for an additional 2 minutes.
- Continue adding additional powdered sugar, 2 cups at a time, alternating with the heavy whipping cream, and beat on low speed until the sugar is incorporated. Increase speed to medium-high and beat for 2 minutes before adding more powdered sugar.
- After all the powdered sugar has been added, increase the speed to medium-high and beat for another 2 minutes to whip additional air into the frosting.
Decorating
- Remove the cream filling from the Oreos and pulse the cookies in a food processor until it’s a fine crumb.
- Frost the top of the cake in one even layer, and smooth it out as best as possible. Chill for at least 15 minutes until the top of the frosting has crusted over.
- Place the number cutout in the center of the cake, vertically and then use a sharp pairing knife to cut around the number. Next, remove the top layer of frosting by making small cuts in the actual number to remove small pieces at a time. Discard the frosting.
- Next, fill a small piping bag with frosting, squeeze a little bit back into the cake, and spread it out with a knife. Alternatively, you could skip this step and just fill in the number with crumbs, but this helps lock in the moisture of the cake and gives something for the crumbs to stick to. Spoon Oreo crumbs over top of the fresh layer of frosting and use the back of the spoon to press into place.
- Use the remaining frosting to pipe a shell border. For this, you can use a 1M piping tip, an open star tip, or a French star tip.
- Decorate with trucks and props, chocolate rocks and sprinkle leftover Oreo crumbs around for dirt.

Notes
Recipe Tips
- You only need to remove the top layer of frosting, but if some of the cake comes with it that’s okay.
- Chilling the cake before removing the top layer of frosting makes it easier to remove.
- Use a sharp pairing knife to cut out the letter.
- There are lots of ways to decorate this cake, I’ve linked the options below.Note that most of the decorations are not edible, so use your best judgment based on the age range and make sure to remove non-edible parts before serving.
- Number Cut-outs: I included numbers 1 through 6, which you can easily print out. Do not scale the printout at all, it’s set for a 9×13-inch cake. Simply print the page with your desired number, find the template here.
- To remove the cake from the pan, make sure to grease and flour the pan entirely, or line the bottom with parchment paper
Storing, Freezing and Making ahead
- Storing: Once frosted, this cake can be stored in an airtight container on the countertop for up to 3 days. If you live in a hot and humid environment, then you’ll need to refrigerate it. However, this can sometimes dry out the cake. Be sure to use an airtight container and serve at room temperature for the best results.
- If hosting an outdoor party, be sure the cake is not sitting in direct sunlight, and if it’s hot or humid, consider storing it in a cooler before serving.
- If preparing in advance, add decorations prior to serving.
- Freezing: You can freeze the cake frosted or unfrosted. I recommend leaving it in the pan, and tightly wrapping the pan with two layers of plastic wrap. Freeze for 1 month. Thaw to room temperature before serving.
Decorations
- Chocolate rocks are my go-to. You can find smaller packages of these at Hobby Lobby, and one tube of them is enough to decorate with. Otherwise use leftovers for goodie bags.
- Toy trucks. I love this CAT activity set or this CAT toy truck set. These go on sale frequently for half off.
- Shovels. I use these mini shovel spoons, they’re just as perfect for decorating this construction cake! Plus you can pass them out with the sliced cake.
- Boulders. These chocolate boulder rocks are a fun topper idea. M&Ms or chocolate chips are also great options.
- Candy. Use unwrapped candy bars, like chocolate wafer bars or Kit Kats, to stack up as “beams” or logs.
- Construction signs. If your little one loves construction, you probably have a few things laying around you can stick on top like plastic road signs.
- Candy. Use unwrapped candy bars, like chocolate wafer bars or Kit Kats, to stack up as “beams” or logs.
- Construction signs. If your little one loves construction, you probably have a few things laying around you can stick on top like plastic road signs.
Nutrition
- Serving Size: 1 Slice
- Calories: 700
- Sugar: 74.2 g
- Sodium: 292.6 mg
- Fat: 34.1 g
- Carbohydrates: 99.2 g
- Fiber: 3.5 g
- Protein: 6.8 g
- Cholesterol: 107.6 mg


First time decorating a cake like this! I used box cake mix, and I made the icing as described. I followed the steps exactly for cutting out the number three, and it worked perfectly. I thought for sure I would mess it up and that I was in over my head, but this was perfect.
Oh that’s so wonderful Annie! Thank you so much for sharing!