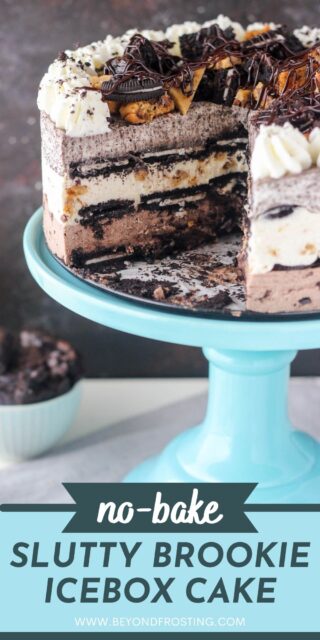
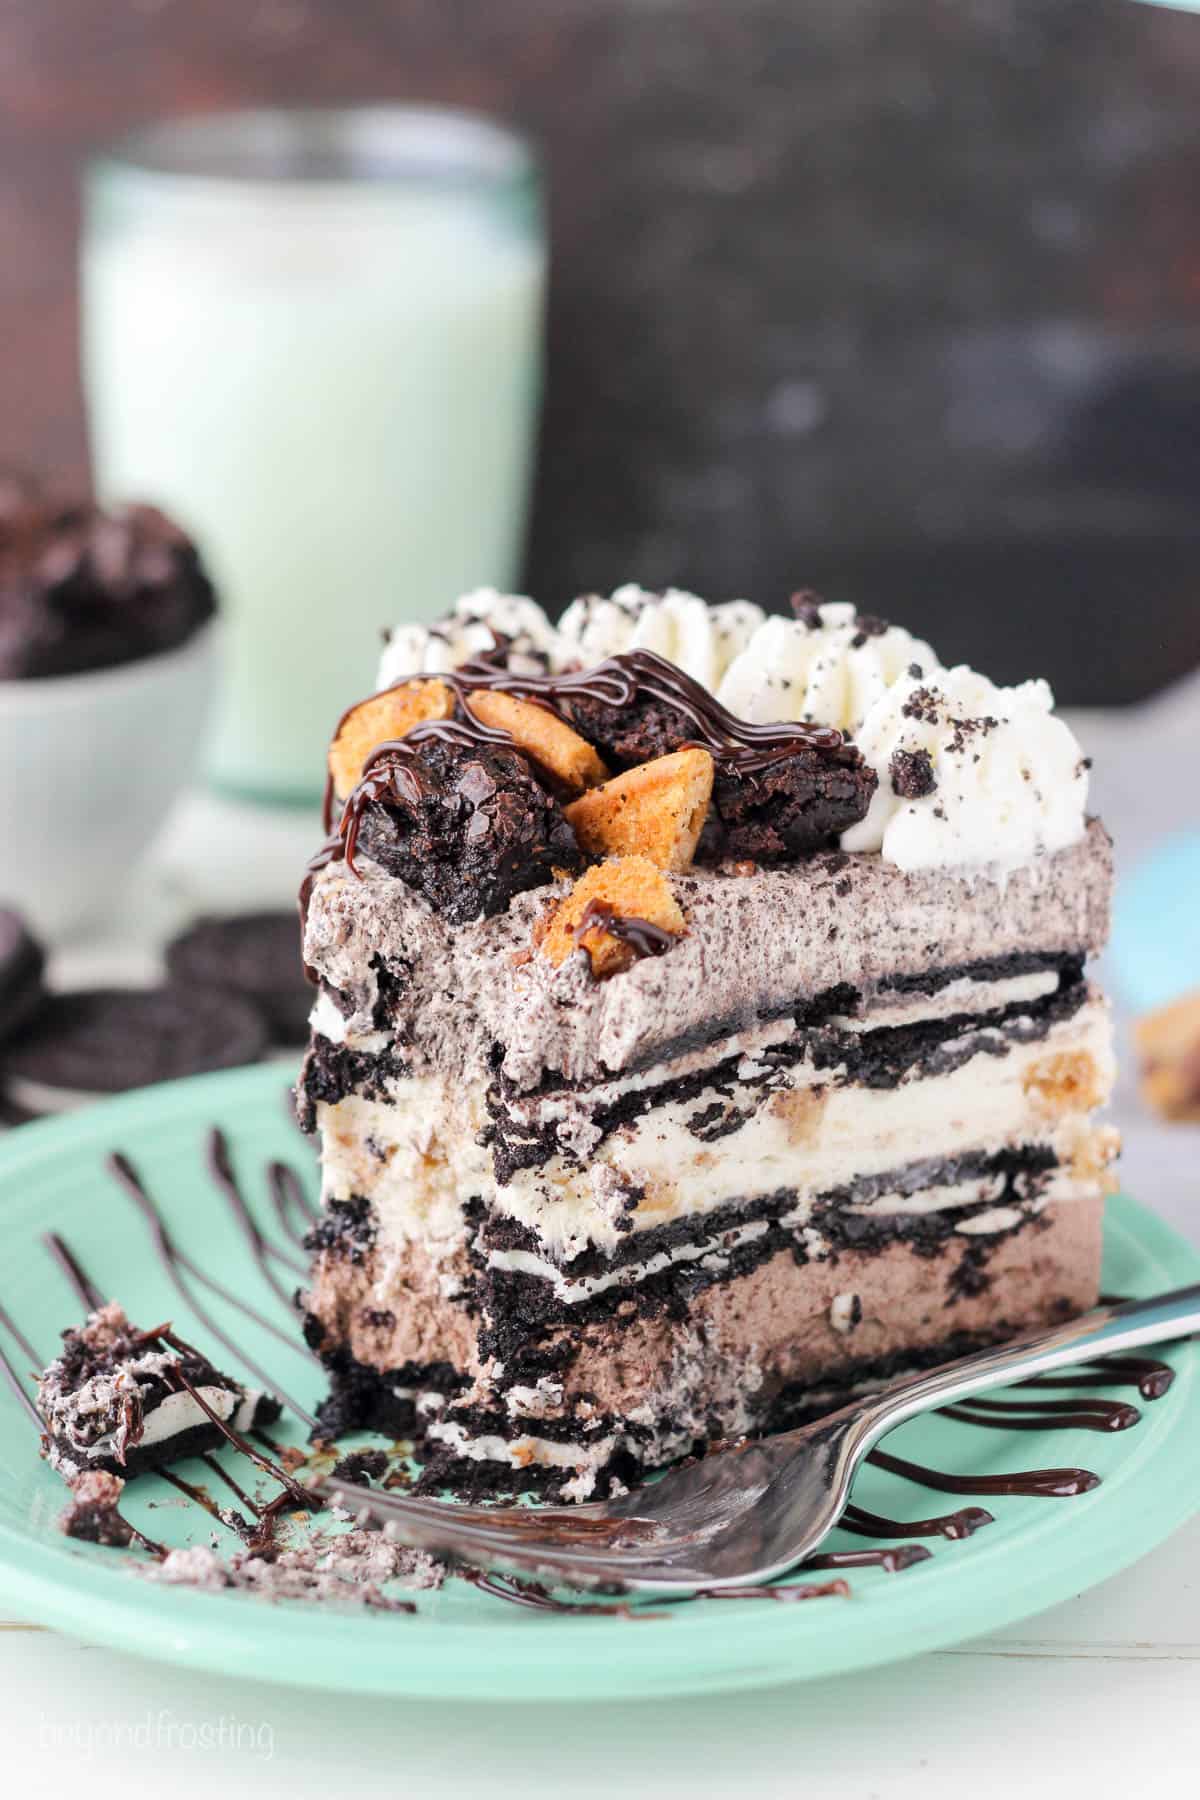
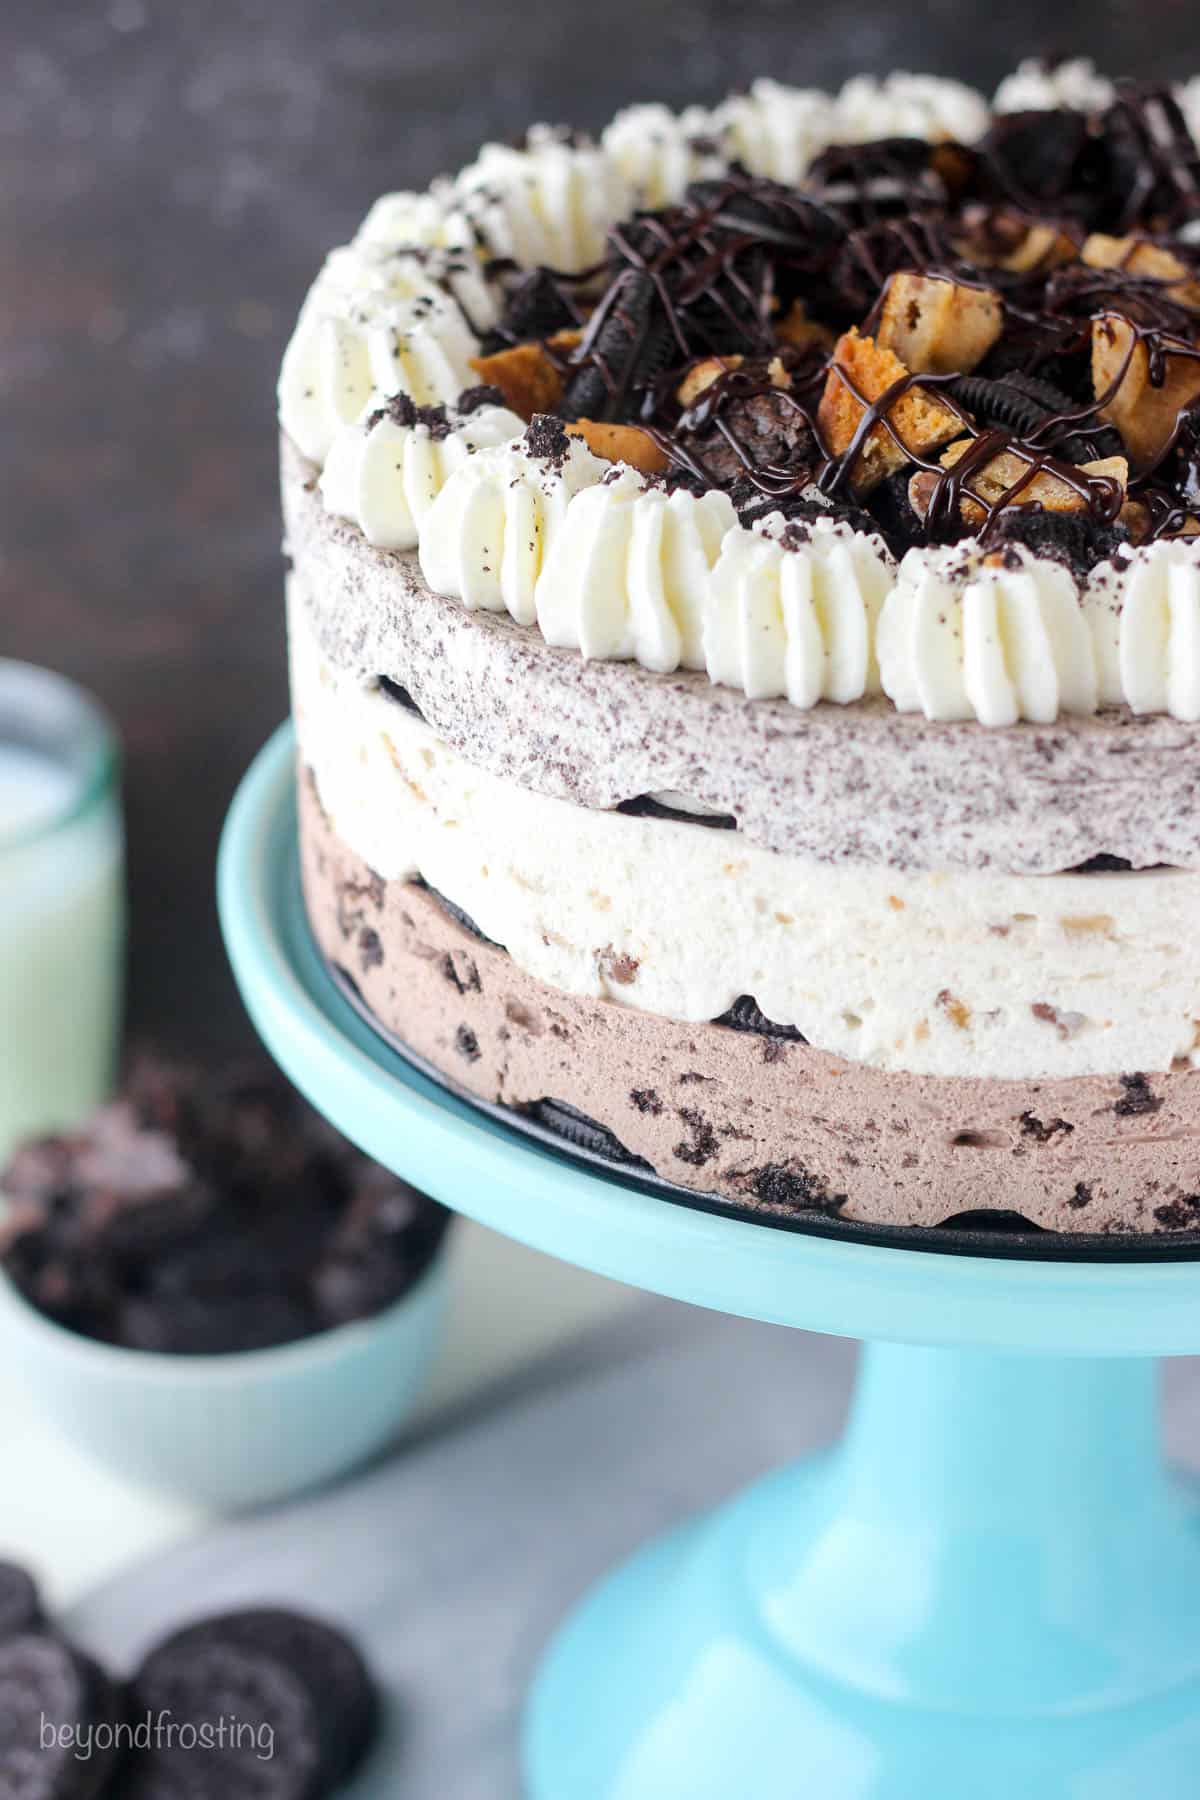
With 3 glorious layers of homemade mousse featuring brownies, chocolate chip cookies, and Oreos, this Slutty Brookie Icebox Cake is a chocolate lover’s dream. It’s rich, it’s decadent, and though it does require some prep, it’s surprisingly easy to make! After one bite, there’s no way you’ll want to share.

A Chocolate Lover’s Dream Dessert
This dessert trumps all other previous favorite no-bake recipes and it’s going to be real hard to top this one. Real hard. Each time I’ve made this, it just gets better and better. It also inspired my No-Bake Chocolate Nutter Butter Mousse Pie.
This Slutty Brookie No-Bake Icebox Cake has 3 glorious layers of mousse, and it’s mostly no-bake. (Completely no-bake if you choose to use storebought brownies!)
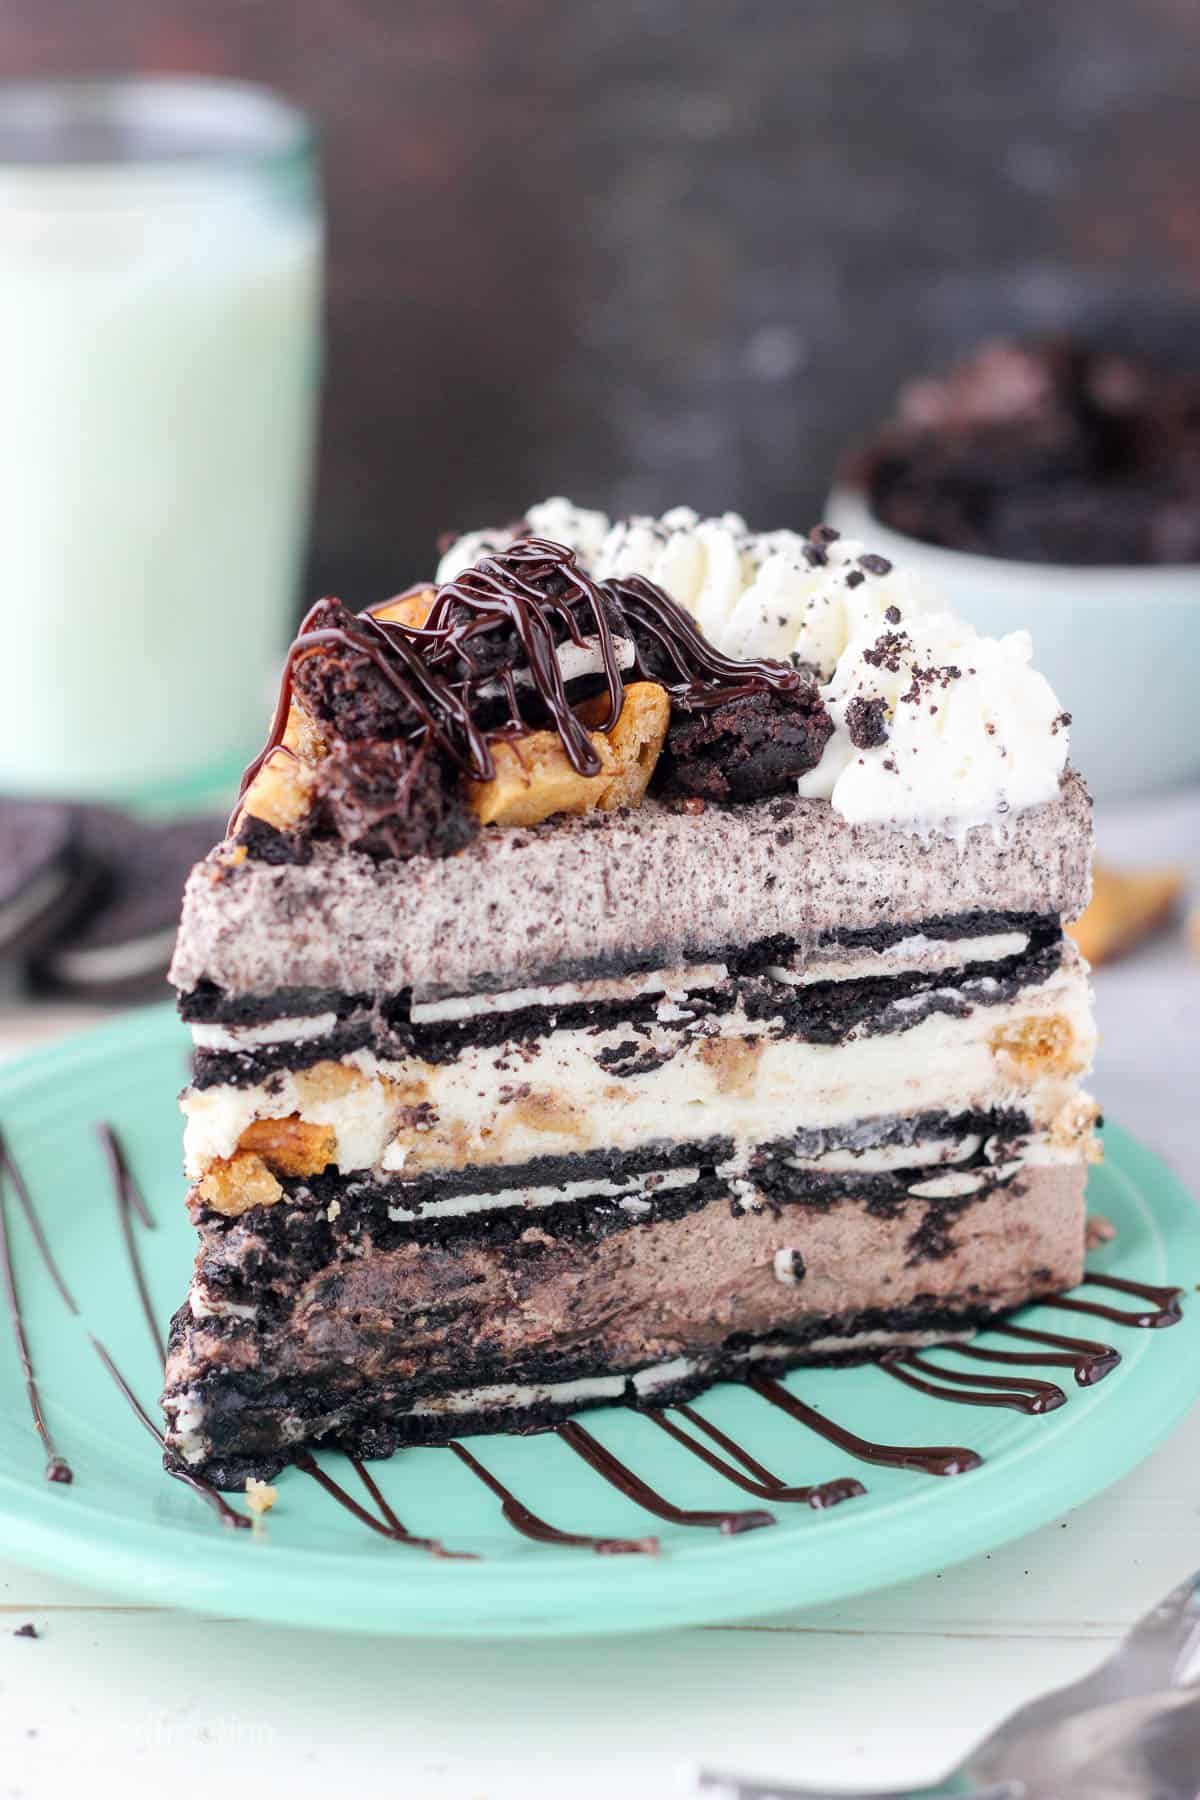
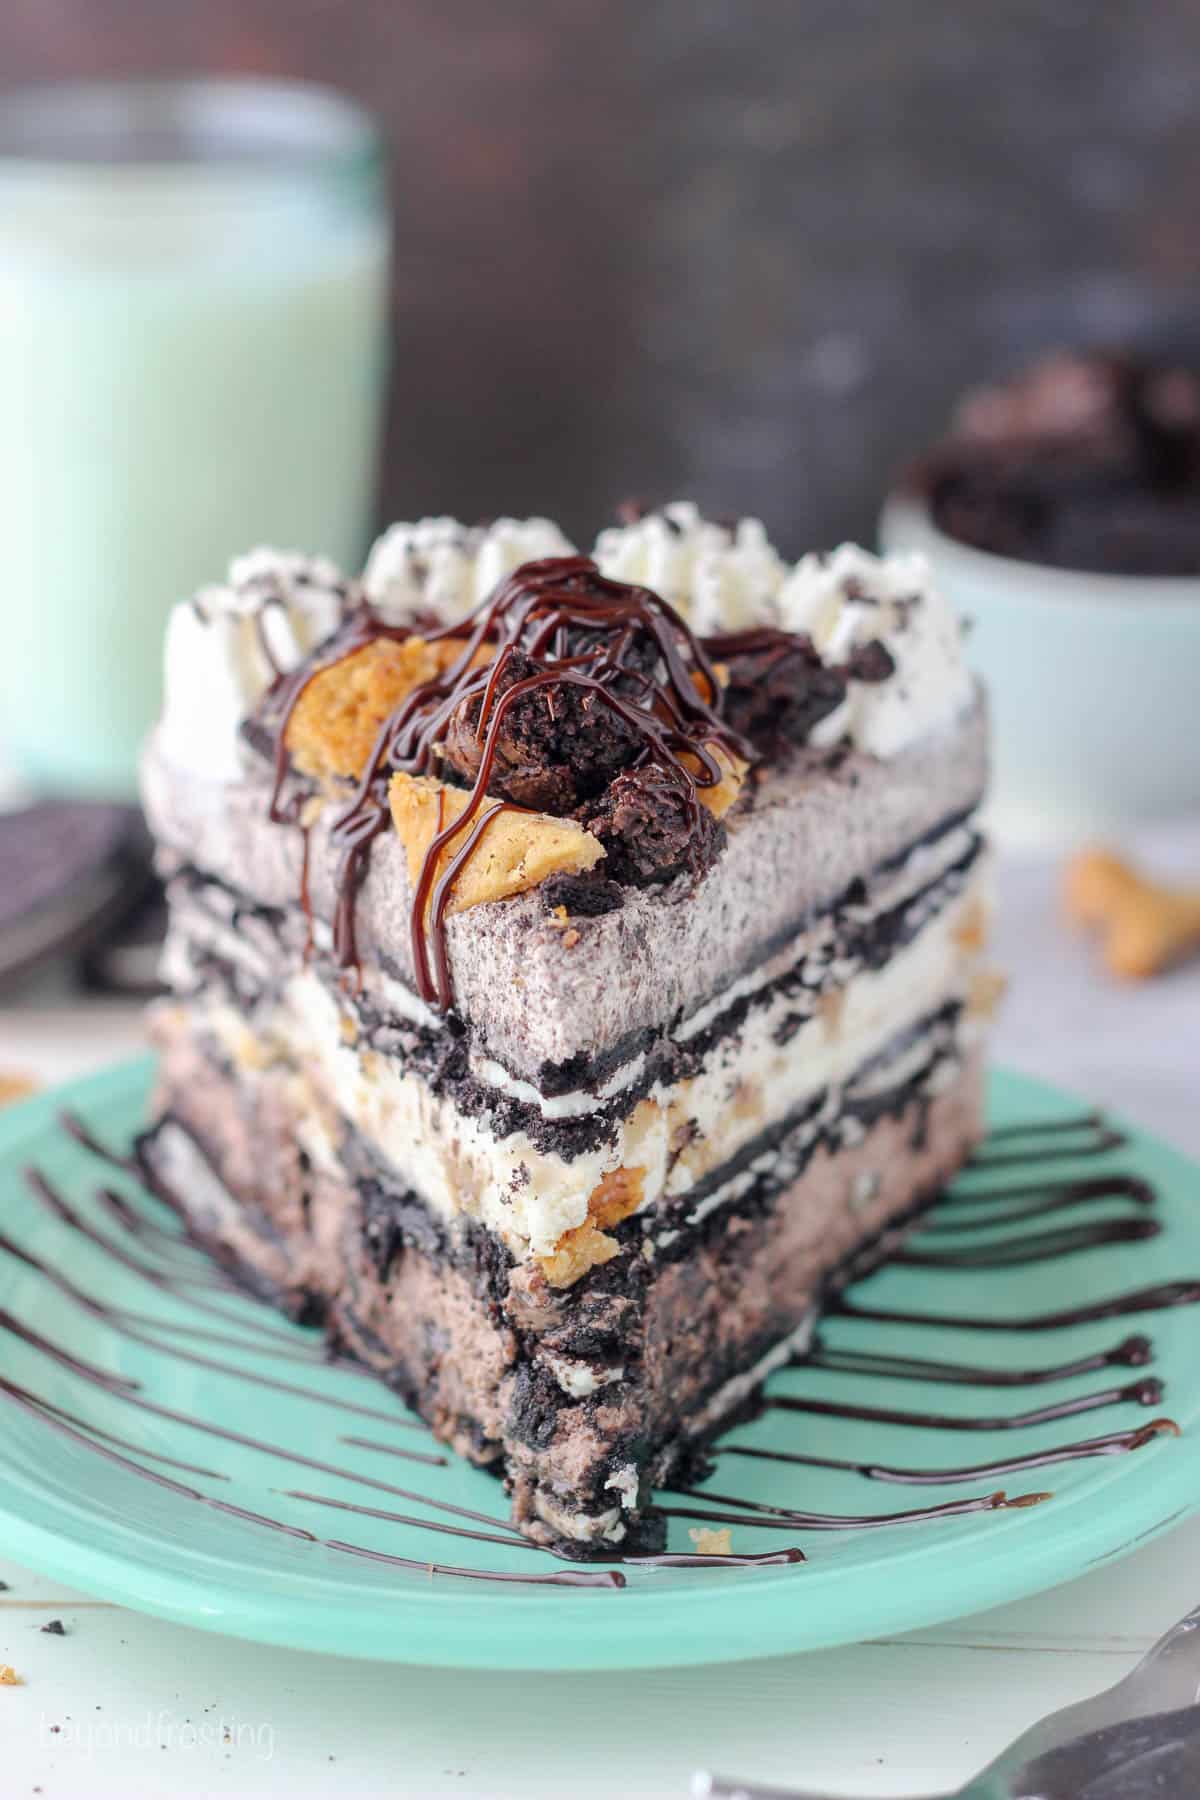
The bottom layer is a brownie batter mousse made with a whipped brownie batter cream and chunks of fudgy brownies. The second layer is a chocolate chip cookie mousse with you guessed it, chunks of chocolate chip cookies. The top layer is an Oreo mousse. Each layer is equally as easy as the other to make.
And then you have the toppings! This wouldn’t be a “slutty” brookie cake if it weren’t for layers of cookies, brownies and Oreos piled on top with a generous hot fudge glaze.
What Is A “Slutty Brookie”?
A brookie is the combination of a brownie and a cookie. The addition of the Oreos is what makes it “slutty”. I don’t care so much for that word, but slutty brownies have been around for years now so we’ll go with it.
This cake isn’t for the faint of heart. It takes a little bit of work, but the rewards, on man, it’s worth it. Yes, you have to clean your mixing bowl 3 different times. Yes, it takes about an hour to prepare. Yes, it will be one of the BEST desserts you’ve ever had.
Key Ingredients
The ingredient list for this icebox cake recipe is surprisingly short, as many ingredients repeat in multiple layers of the dessert.
- Oreos – Used in the Oreo mousse and also soaked and milk and layered.
- Soft chocolate chip cookies – Like Pepperidge Farm or a similar brand.
- Fudgy brownies – You can grab some at the store or prepare an 8-inch pan yourself.
- Gelatin – Helps create the mousse texture in each later and gives some form to the layers.
- Heavy whipping cream – Creates the creamy mousse texture.
- Brownie mix – A box of brownie mix is the base of the brownie mousse layer.
How to Make a Slutty Brookie Icebox Cake
Don’t be alarmed by the length of the how-to directions – while there is some prep work required, no part of this icebox cake recipe is difficult!
Make the Brownie Layer
- Prepare the gelatin. Freeze the mixing bowl and whisk. Sprinkle gelatin over cold water until it turns into a solid. Melt in the microwave for 3 to 5 seconds, until it turns into a liquid.
- Prepare the whipped cream. Use an electric mixer to beat the heavy whipping cream in the chilled bowl until bubbly. Slowly add in the dry brownie mix. Mix in the gelatin and continue beating until peaks start to form.
- Add the brownies. Chop the brownies into small pieces and fold them into the mousse. Spoon into a piping bag and refrigerate while you prepare the other layers.
Make the Chocolate Chip Cookie Layer
- Prepare the gelatin. Prepare the gelatin according to the same instructions as the previous layer.
- Make the mousse. Whip the heavy whipping cream until bubbly. Add in the powdered sugar, flour, brown sugar, and vanilla extract. Add in the gelatin and beat until soft peaks start to form.
- Add the cookies. Chop the cookies into tiny pieces and gently fold into the mousse. Spoon into a piping bag and refrigerate.
Make the Oreo Mousse Layer
- Prepare the gelatin. The same as other layers!
- Make the mousse. Beat the heavy whipping cream until bubbly. Add the powdered sugar and vanilla extract, beating until soft peaks form. Add in the gelatin, beating until stiff peaks form.
- Reserve some for later. Separate 1 1/4 cups of the prepared whipped cream and refrigerate for decorating later.
- Add the Oreos. Chop/smash the Oreos into small pieces and crumbs. Fold into the prepared whipped cream.
Assemble
- Make the bottom later. Dunk 19 Oreos into a bowl of milk. Place them in the bottom of the pan, starting on the outside into the middle so they are tightly fit.
- Layer the mousse and cookies. Use the brownie mousse to fill the holes between Oreos then pipe the mousse in an even layer. Use a spatula to smooth it out. Add a second layer of Oreos dunked in milk. Repeat with the chocolate chip cookie mousse, more cookies dunked in milk, and then the Oreo mousse. Smooth out the top layer with a spatula.
- Refrigerate. Refrigerate for 3 to 6 hours until all layers are firm. Remove the sides of the pan.
- Decorate and serve. For easy slicing, I like to freeze for 30 minutes. Decorate with the remaining whipped cream and top with any remaining brownie, chocolate chip cookies, or Oreos. Drizzle with hot fudge sauce. Enjoy!
Tips for Success
As I mentioned, this slutty brookie icebox cake isn’t for the faint of heart and will always be a bit time-consuming to make but there are a few things you can do to make it easier.
- Freeze your beaters and bowl. One thing you can do to get a nice and stiff whipped cream is to freeze your bowl for a few minutes while the gelatin is setting.
- Prepare everything in advance and then assemble at one time. I made this a couple of times and I found that to be the best method. I put the mousse in bowls and threw them in the refrigerator while I prepared the rest of the layers.
- Make the brownies in advance. I preferred to make a small batch of fudgy brownies the night before, so they were nice and cooled when I was ready to make this dessert. You can definitely buy brownies, but if you prefer to make them, buy a small mix that is meant for an 8-inch pan or use your favorite brownie recipe. You’ll need a little less than half of an 8-inch pan.
- For the chocolate chip cookies, you’ll want something soft. I opted to use Pepperidge Farm. You’ll need about 8 cookies for this dessert.
- Buy family-size Oreo boxes. You’ll need 2 family-size boxes of Oreos to build the layers. Dipping the Oreos in milk helps keep them nice and soft!
Do I Have to Cook the Flour?
The ingredients list calls for both a brownie mix and raw flour. In recent years, the CDC has advised against consuming raw flour. If you’d prefer to cook the brownie mix and flour in the oven, follow the below directions.
Preheat the oven to 350°F. Bake the flour (and brownie mix) on a baking sheet lined with parchment paper for approximately 10 minutes, or until the temperature of the flour reaches 160°F. Stir halfway through and allow it to cool completely. Sift the flour through a fine-mesh sieve to break up any clumps.
Decorating Tips & Tools
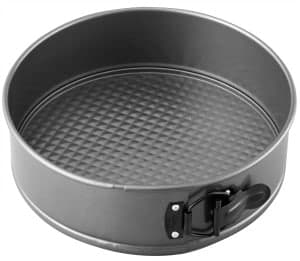
For all these layers, you’ll need a standard 9-inch by 3-inch springform pan. Be prepared to fill this right up to the tippy top. I used a few additional tools to make this dessert a little extra pretty.
First, I used a cake collar (affiliate link) so I could easily remove this from the edges of the springform pan. A good alternative would be parchment paper, but it does buckle a little bit once it gets wet. You can also line the sides of the pan with plastic wrap and hang it over the top edges.
Second, I used a large piping bag to pipe each layer of mousse. I piped from the outside edge to the middle, pressing the filling into the sides of the pan. Then I used my offset spatula to smooth the mousse into a nice and even layer. These steps aren’t necessary, but I feel like you want your cake to look just as pretty!
Finally, when you prepare the last layer of mousse (the Oreo one), you’ll divide out 1 ¼ cups of the prepared whipped cream which will be used for the topping to pipe that pretty edge. I use my favorite Ateco 846 tip. Right before serving, to finish it off, cut up some extra brownies, cookies, and Oreos and sprinkle them in the middle of the cake, then drizzle it with hot fudge. Be sure to use two hands, because this is one heavy cake!
Proper Storage
This decadent cake must stay refrigerated until served. The mousse layers will soften very quickly and it will make cutting slices of the cake quite difficult and messy.
As I mentioned, I like to pop the cake in the freezer for a few minutes before slicing, just to make life easier. I also recommend cleaning the knife between each cut.
Since this is a tall layer cake and each layer is so rich and decadent, I definitely recommend serving thinner-than-normal slices!
Can I Freeze This?
Yes! This is the best news because it means you can either make the cake in advance (aka when you have lots of free time!) or freeze individual servings of any leftovers. I do recommend freezing it before adding the whipped cream border and toppings. Thaw overnight in the fridge and enjoy!
More Brookie Recipes:
Print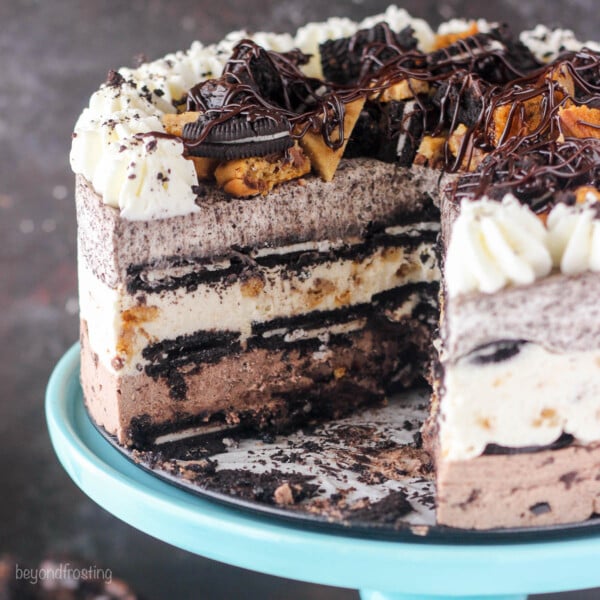
Slutty Brookie Icebox Cake
- Prep Time: 1 hour
- Chill Time: 4 hours
- Total Time: 5 hours
- Yield: 10 slices
- Category: No-Bake
- Method: Refrigerator
- Cuisine: American
Description
With 3 glorious layers of homemade mousse featuring brownies, chocolate chip cookies, and Oreos, this Slutty Brookie Icebox Cake is a chocolate lover’s dream. It’s rich, it’s decadent, and though it does require some prep, it’s surprisingly easy to make! After one bite, there’s no way you’ll want to share.
Ingredients
Assorted ingredients
- 2 family sized package (20 oz) Oreos
- 6–8 Soft baked chocolate chip cookies, Pepperidge Farm or others, chopped
- 4–5 Fudgy Brownies or 1 8-inch square pan, prepared and cooled
- Hot fudge for garnish
- 1 cup milk
For the brownie mousse:
- 1 tablespoon cold water
- 1 teaspoon gelatin
- 1 ½ cups heavy whipping cream
- ¾ cup brownie mix
- 1 cup chopped brownies
For the chocolate chip cookie mousse
- 1 tablespoon cold water
- 1 teaspoon gelatin
- 1 ½ cups heavy whipping cream
- ½ cup powdered sugar
- 2 tablespoons all-purpose flour
- 3 tablespoons light brown sugar
- 2 teaspoons vanilla extract
- 4 soft-baked chocolate chip cookies
For the Oreo mousse:
- 1 tablespoon cold water
- 1 teaspoon gelatin
- 1 ¾ cups heavy whipping cream
- ½ cup powdered sugar
- 1 teaspoon vanilla extract
- 10 Oreos, crushed
Instructions
For the brownie layer
- Place the mixing bowl and whisk attachment in the freezer for 5 to 10 minutes to chill while you are preparing the next steps.
- Place 1 tablespoon of cold water in a small bowl. Sprinkle the gelatin over the cold water, trying to spread the powder evenly. Allow the gelatin to turn to a solid (about 2-3 minutes).
- Next, melt the solid gelatin in the microwave for 3-5 seconds until it turns back to a liquid. Watch it closely!
- Prepare the whipping cream. Pour the heavy whipping cream into the chilled bowl and use an electric mixer to beat the heavy cream on medium-high speed until the cream gets bubbly. Slowly add the dry brownie mix and continue beating on high speed until peaks start to form.
- Slowly pour the liquid gelatin into the mixing bowl and continue mixing until stiff peaks form.
- Chop 1 cup of the prepared brownies into small pieces, about the size of a dime or smaller and gently fold them into the brownie batter mousse. Spoon the mousse into a bowl or large (18-inch) piping bag and place in the refrigerator while you prepare the other layers.
For the chocolate chip cookie layer:
- Wash and dry your mixing bowl. Place the mixing bowl and whisk attachment in the freezer for 5 to 10 minutes to chill while you are preparing the next steps.
- Place 1 tablespoon of cold water in a small bowl. Sprinkle the gelatin over the cold water, trying to spread the powder evenly. Allow the gelatin to turn to a solid (about 2-3 minutes).
- Next, melt the solid gelatin in the microwave for 3-5 seconds until it turns back to a liquid. Watch it closely!
- Prepare the whipping cream. Pour the heavy whipping cream into the chilled bowl and use an electric mixer to beat the heavy cream on medium-high speed until the cream gets bubbly. Slowly add the powdered sugar, flour, brown sugar, and vanilla extract and continue beating on high speed until soft peaks start to form.
- Slowly pour the liquid gelatin into the mixing bowl and continue mixing until stiff peaks form.
- Chop 4 soft-baked chocolate chip cookies into tiny pieces, the size of a dime or smaller. Gently fold them into the chocolate chip cookie mousse. Spoon the mousse into a bowl or large (18-inch) piping bag and place in the refrigerator while you prepare the other layers.
For the Oreo mousse:
- Wash and dry your mixing bowl. Place the mixing bowl and whisk attachment in the freezer for 5 to 10 minutes to chill while you are preparing the next steps.
- Place 1 tablespoon of cold water in a small bowl. Sprinkle the gelatin over the cold water, trying to spread the powder evenly. Allow the gelatin to turn to a solid (about 2-3 minutes).
- Next, melt the solid gelatin in the microwave for 3-5 seconds until it turns back to a liquid. Watch it closely!
- Prepare the whipping cream. Pour the heavy whipping cream into the chilled bowl and use an electric mixer to beat the heavy cream on medium-high speed until the cream gets bubbly. Slowly add the powdered sugar and vanilla extract and continue beating on high speed until soft peaks start to form.
- Slowly pour the liquid gelatin into the mixing bowl and continue mixing until stiff peaks form.
- Separate out 1 ¼ cups of the prepared whipped cream to pipe the border and refrigerate for later.
- In a large Ziploc bag, roughly chop and smash 10 Oreo cookies into small pieces/crumbs. Fold the smashed cookies into the remaining prepared whipped cream.
To assemble:
- The bottom layer will have 19 Oreos. Quickly dunk each Oreo in a bowl of milk. Starting with the outside edge, place the cookies just inside the edge of the pan and work your way into the middle so they are tightly fit.
- Starting with the brownie mousse (fill your piping bag if you haven’t already), cut off the tip of the bag about 3/4 inches from the bottom. First, fill the holes between the Oreos. Then starting on the outside edge, pipe the mousse in an even layer working your way towards the middle. Any excess mousse, distribute evenly. Then use your offset spatula to smooth out the mouse, creating a nice even layer.
- To create the second layer, you’ll need 18 Oreos. Repeat the above steps to dip the Oreos in the milk and assemble them in a circle from the outside edge into the middle.
- Repeat the same steps with the chocolate chip cookie mouse, first filling in the gaps between the Oreos and then piping from the outside edge into the middle, smoothing out the layer with your spatula.
- For the third layer, you’ll need 18 Oreos. Repeat the above steps to dip the Oreos in the milk and assemble them in a circle from the outside edge into the middle.
- Repeat the same steps with the Oreo mouse, first filling in the gaps between the Oreos and then piping from the outside edge into the middle, smoothing out the layer with your spatula.
- Refrigerate the pie for 3 to 6 hours until all layers are firm. When ready, remove the sides of the pan and prepare the toppings before serving. To create even slices, I recommend freezing this for 30 minutes prior to slicing. This is only optional and not required.
- Take you’re remaining prepared whipped cream and pipe the borders of the pie with whipped cream using a large open star tip.
- Prior to serving, top the cake with remaining brownies, chocolate chip cookies, and Oreos, chopped up to about the size of a quarter. Drizzle with hot fudge sauce.

Notes
- Prepare a batch of brownie the night before or use store-bought brownies
- Read through the instructions before starting and prepare all of your ingredients
- Prepare each layer of mousse before assembling
Cooking the raw flour: This step is optional. Preheat the oven to 350°F. Bake the flour on a baking sheet lined with parchment paper for approximately 10 minutes, or until the temperature of the flour reaches 160°F. Stir the flour halfway through and allow it to cool completely. Sift the flour through a fine-mesh sieve. The flour can get a little clumpy when baked, and we don’t want that to happen in the cookie dough. So don’t skip this step!


Wow. That’s the best name for a recipe I’ve ever heard
Hi, I’m excited to make this in a few days! How long will this cake last in the fridge & how long in the freezer?
Hi Wendy, this should keep for 3 days in the fridge and 1 month in the freezer.
Hi, I’m so sorry last question! My husbands birthday is Thursday & party is Saturday! What is your timeline reccomdation for making this! Is making ahead and freezing taste as good?
Thanks so much!! ❤️
If you made it Monday or Tuesday, you could freeze until Friday. Leave it in the fridge overnight. Add the topping before serving for best results. If you made it Thursday or Friday you would not need to freeze
Hi, is the texture light and fluffy or more Dense? Thanks so much!
Hi grace, it’s more fluffy, like a mousse texture
I made this for my husband’s birthday and it was a hit! My first mouse cake and I found it fun and easy to make. The cake collar was super helpful and making each mouse layer and putting it straight into the 18in pipping bag to assemble later were really helpful tips. I can’t wait to try more of your yummy recipes!
Thank you so much Sheena! I loved seeing your pictures, you truly did an amazing job!
I’m currently making this recipe and can already tell that it will be delicious!! For cookie mousse, am I missing when to add powdered sugar? It is left out of that section, so I didnt include it in the layer. It still tastes good. Anyway. It is too late for me to fix the layer, but thought I’d comment for your other readers!
Hi Kim, thank you for your feedback! Sometimes it’s difficult to catch these airs after you’ve read it so many times. I will update it! I hope you liked it!
This cake is amazing and was consumed by my guests in like 5 minutes. So much wow factor and deliciousness. A few quick notes – 1. there’s 1/2c powdered sugar listed in the cookie mousse section that doesn’t seem to get used. I just added the flour + brown sugar + vanilla to the mousse like the instructions said. 2. On step 12 it says to fold the cookies into the “brownie” mousse, versus the cookie mousse. 3. In the layer assembly the bottom layer asks for 19 oreos, and the top two layers ask for 18 each – but 19 seemed to fit best for all 3 Oreo layers. 4.) My 9×2.75″ springform worked well with a collar of parchment paper – the cake was definitely over the top of the springform ring so the paper collar was totally necessary. ❤️ Thanks for a beautiful recipe.
I’m making this today for my birthday….and when you are assembling ? How are u doing so ? Each layer in a spring form then put on top of Each other ? Or on a platter itself ? I guess I’m a little confused about the assembly.
Such an amazing cake with so many delicious ingredients! And a real showstopper!
Thank you Kaitlin!
I definitely won’t want to share this cake! This looks incredible!
Oooh I love love love the new site! It is so beautiful and fresh! And showcases all your gorgeous desserts wonderfully. Especially this one – it’s all my chocolate covered dreams come true. Pinned! x
The blog looks great and so does this cake! Holy cow those layers all look equally delicious! My husband’s birthday is this month and I know he would just die if I made it for him. 🙂
Oh my, this is one decadent cake! It will be perfect for all the chocolate lovers in my family. And I love all of your no bake desserts, too.
first, I absolutely LOVE the new look! It is so pretty. and this cake, I mean it is so over the top in the best way possible.