
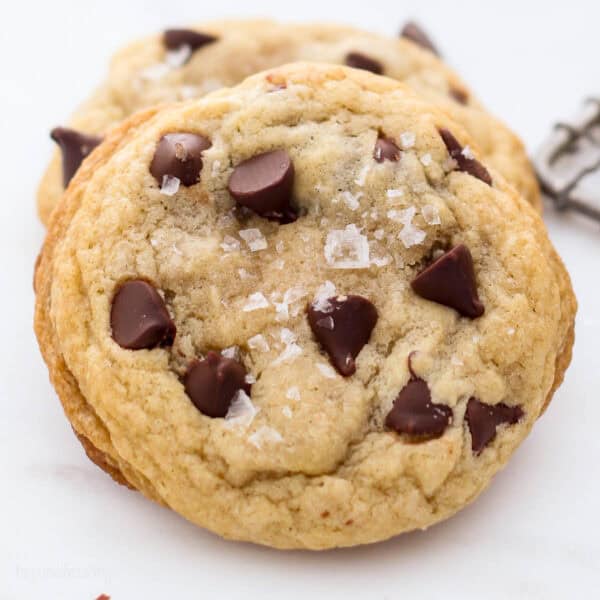
I’m sharing the secret to the ultimate fat and chewy chocolate chip cookies. This easy recipe makes perfectly thick cookies, finished with a sprinkle of sea salt. They’re the best chocolate chip cookies you’ll ever have!
If you love chocolate chip cookies, these chewy oatmeal chocolate chip cookies are a must-try, too!

I think every family has that chocolate chip cookie recipe. You know the one. Whether it’s your mom’s Tollhouse recipe or a family secret that’s passed through the hands of thirteen grandmothers, those chocolate chip cookies are sacred.
After years of making these chewy chocolate chip cookies, I think they just might be my generational cookie. These are chewy, irresistibly homemade chocolate chip cookies: soft-baked in the center, rich and buttery, and a little crisp at the edges. They stay soft forever, but they never last that long in our house.
Every bite balances the flavors of caramelized brown sugar perfectly with sweet vanilla extract and ooey-gooey chocolate chips. I top them with sea salt, and it’s perfection!
What Makes These Cookies So Darn Good?
Let’s face it, there are thousands of delicious chocolate chip cookie recipes out there. If there’s one thing I’ve realized, it’s that there’s a difference between a good chocolate chip cookie and a cookie that you can’t get enough of. Here’s what makes this recipe the best:
- Fat and chewy. These homemade chocolate chip cookies are thick in the middle with buttery, crispy edges. I make them with extra brown sugar, which helps the cookies stay soft and moist (and not cakey).
- Simple ingredients. The ingredients you’ll need are readily available, and likely in your cabinet already.
- Quick to make. This chocolate chip cookie dough comes together in 10 minutes. Plus, there’s no refrigeration time required. It’s perfect for last-minute cookie cravings!
- Finished with sea salt. A sprinkle of flakey sea salt is my favorite garnish on top of a warm and melty, gooey chocolate chip cookie. If you’ve never tried it, it will change your life!
- Small or large batch. If you have a craving for late-night cookies but don’t want to have too many leftovers, you can make a small batch which is just 10 cookies.

Key Ingredients
You’ll need your usual baking staples like flour, eggs, and leavening to make these perfect chocolate chip cookies. Then, there are a few key ingredients that I go over below. Be sure to scroll to the recipe card for the full amounts and recipe details.
- Melted Butter – This recipe starts with melted butter. I recommend unsalted butter, though salted will work (reduce the salt in the recipe by 1/4 teaspoon in this case).
- Sugar – I use a combination of brown sugar as well as white granulated sugar for added chewiness.
- Vanilla – You can never go wrong with high-quality, pure vanilla extract. The flavor is so much better than artificial vanilla.
- Chocolate Chips – You can’t make the best chocolate chip cookies without chocolate chips! For best results, I recommend using good quality semi-sweet or unsweetened dark chocolate chips, like the ones from Ghirardelli or Guittard. However, it’s really up to preference. You can use milk or dark chocolate chips, chocolate chunks, or chopped chocolate bars.
- Flaky Sea Salt – Top your chocolate chip cookies with a generous sprinkle of flaked sea salt for the perfect sweet-salty combination with a bit of crunch. Highly recommend!

How to Make Chewy Chocolate Chip Cookies
Get those ovens preheated to 350ºF, we’re about to make the best cookies you’ll ever taste!
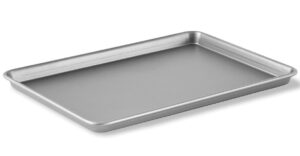
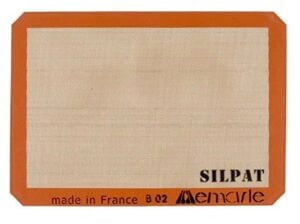
- Prep your pan. I recommend lining your baking sheet with parchment paper or using a silicone baking sheet if you have one.
- Combine the wet ingredients. First, melt the butter and then give it a few minutes to cool. Then, cream together the butter with both sugars, followed by an egg and vanilla extract.


- Add the dry ingredients. Next, combine the dry ingredients, and then add these to the bowl with the wet ingredients. Mix slowly and as the dough thickens, fold in the chocolate chips.


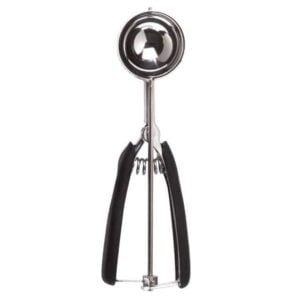
- Portion. Use a large cookie scoop to portion the dough onto your baking sheet, leaving a couple of inches between each cookie. Add a pinch of sea salt to the tops of the cookies right before you pop them into the oven.
- Bake. Bake your cookies at 350ºF for 9-11 minutes, keeping an eye as they bake. Take the cookies out when the edges are set and they’re still a little underbaked in the centers. Once out of the oven, leave the cookies to rest on the baking sheet for 10 minutes or so before moving them to a rack to cool.

The Secret to Chewy Chocolate Chip Cookies
When developing this recipe, I made eight different variations before finding the perfect one. It was a labor of love (and many, many cookies), but totally worth it to crack the code for the ultimate chewy cookies that stay chewy long after they’re baked.
With all that testing came extra wisdom. Three key things contribute tribute to a soft and chewy cookie:
- The right ingredients. White sugar has less moisture than brown sugar. For this reason, using only white sugar would lead to a drier cookie. Chewier cookies call for more brown sugar and less granulated sugar.
- Properly measure the flour. I always recommend using a kitchen scale to measure the ingredients (this is my favorite, affordable one), but if you don’t have one available, use the spoon and level method I show in this handy tutorial.
- Proper mixing. It’s crucial that you only mix the dough ingredients until they’re just combined and smooth, and don’t overmix. Overmixing the batter activates gluten, which can lead to a tough, dense texture. (This goes for all cookie recipes, not just this one!)
- Underbaking. Lastly, the final secret to chewy cookies is to take them out of the oven at the right time, when they’re slightly underbaked and just beginning to turn golden. They’ll finish setting up while they cool. Overbaking will lead to dry, crumbly cookies.

Tips for Baking Perfect Cookies
Now that you’re armed with the secret to the perfect soft and chewy chocolate chip cookie, here are some additional cookie-baking tips:
- For photo-ready cookies, gently press a few chocolate chips into the tops of the cookies right when they come out of the oven. This way you’ll have nice, visible chocolate chips (and even more chocolate). If you’d like, add another pinch of sea salt after baking, too.
- If your cookies have spread a bit while baking, use a spatula or a knife to gently press the edges of the cookie back toward the center. This makes them a little thicker and rounder, but you have to do this when they’re hot from the oven before the cookie fully sets.
- Bake the cookies in the middle rack of the oven. This is where the temperature is the most consistent. Also, take care not to overcrowd the baking sheet, and bake one tray at a time. If the baking sheet or oven is overcrowded, the cookies won’t bake evenly.
- Not all ovens bake the same, so keep a close eye on your chocolate chip cookies so that they don’t overbake or burn. An oven thermometer is a handy kitchen gadget that you can use to monitor the temperature inside your oven, in case it runs hot.
- To prevent the bottoms of your cookies from burning, use a silicone baking mat, or line the pan with parchment paper. Dark metal baking sheets also tend to make the bottoms of the cookies darker.
Common Questions
This is likely because your cookies are overbaked. Try taking your cookies out of the oven sooner, and double-check your oven temperature to make sure that it isn’t running too hot (see my tip about ovens above).
The best way to prevent the bottoms of your cookies from burning is to use a light metal baking sheet, lined with parchment paper or a Silpat baking mat.
No, I don’t recommend refrigerating the dough for this recipe. However, the cookie dough can be frozen if you’re making it ahead. See below for make-ahead, storing, and freezing tips.
Optional Add-Ins and Variations
One more thing to love about this chewy chocolate chip cookie recipe is how easy it is to customize with your favorite cookie add-ins. Try these ideas:
- Crushed Nuts – Chopped pecans or walnuts, like these chocolate chip walnut cookies.
- Candy – Make soft and chewy M&M cookies, or add in your favorite chopped chocolate or candy pieces.
- Oats – For a fun variation, try my salted caramel oatmeal chocolate chip cookie recipe.
- Browned Butter – Try my variation of browned butter chocolate chip cookies.
- Dried Fruit – Dried cranberries, chopped dried strawberries, or currants.
- Double Chocolate – For the chocoholics out there, give this recipe for double chocolate chip cookies a try.
- Gluten-Free – This recipe was such a hit, I had to make a gluten-free version!

Can I Make The Dough In Advance?
Yes, you can prepare the dough in advance, with one caveat: I recommend that you freeze the cookie dough rather than refrigerate it. When testing this recipe, I found that regardless of how much time the dough spent in the fridge, it changed the texture and made the outsides of the cookies rough after they were baked (see below).
To make the chocolate chip cookie dough ahead of time, pre-scoop the cookie dough and freeze the portioned balls in an airtight container. They can stay frozen for 2-3 months. Whenever you’re ready to bake, allow the cookie dough scoops to thaw at room temperature for about an hour before placing them into the oven.
To see the differences between the cookies that were refrigerated versus the ones that were frozen and then thawed before baking, check out the graphic below.
How to Store Chocolate Chip Cookies
- Store at room temp: Wait until your chocolate chip cookies have cooled completely before you store them. Store the cookies in an airtight container at room temperature for up to 3-4 days. Adding a slice of white bread to the container can help to keep these chewy cookies extra soft.
- Can I Freeze These Cookies? Yes! The baked and cooled chocolate chip cookies can be frozen for up to 3 months. You can freeze them in a resealable Ziploc bag or airtight container. If you can’t wait to thaw your cookies before you serve them, defrost the frozen cookies in the microwave for a few seconds.
Chewy Chocolate Chip Cookies Recipe
- Prep Time: 10 minutes
- Cook Time: 10 minutes
- Total Time: 20 minutes
- Yield: 10-12 large cookies
- Category: Cookie
- Method: Baked
- Cuisine: American
Description
Want bakery-style chewy chocolate chip cookies? These are thick, rich, ultra-chocolatey, and soft-baked with perfectly gooey centers.
Ingredients
- ½ cup (113g) unsalted butter, melted
- ½ cup (55g) light brown sugar, packed
- ¼ cup (48g) granulated sugar
- 1 large egg
- 2 teaspoons (10ml) pure vanilla extract
- 1 1/2 cups (180g) all-purpose flour
- ½ teaspoon salt
- ¼ teaspoon baking soda
- ¾ cup (135g) chocolate chips
- Flaky sea salt
Instructions
- Preheat the oven to 350° F. Line a baking sheet with parchment paper or use a silicone baking sheet.
- Melt the butter in a microwave-safe bowl for 30-45 seconds. Allow to cool for a few minutes. Combine the melted butter with the brown and granulated sugar. Beat on medium speed until well combined, 2-3 minutes.
- Next, add the egg and vanilla extract and continue beating until well incorporated.
- In a separate bowl, combine the flour, salt and baking soda. Stir to combine and slowly add the dry ingredients into the dough, mixing on low speed until dough starts to form. As the dough thickens, add the chocolate chips. Beat until incorporated.
- Using large cookie scoop, scoop the dough onto a baking sheet, placing 2 inches apart. Sprinkle with flaky sea salt.
- Bake for 9-11 minutes. The center of the cookies should be slightly under-baked but not too gooey. Allow to cool on the baking sheet for 10 minutes before transferring to a wire rack to cool.
Notes
- Chocolate chips: Any type of chocolate chips can be used
- Butter: I’ve made this recipe with both salted and unsalted butter. Either will work. If using salted butter, reduce the added salt to 1/4 teaspoon.
- Gluten-free flour: these can be made with a measure for measure all-purpose gluten-free flour (that includes xanthan gum).
- Pro tip! Right when you pull these from the oven, place a few chocolate chips on top of the cookie for extra chocolate goodness.
- Storing and Freezing baked cookies: These are best stored in an airtight container once completely cooled. You can also freeze these baked cookies in an airtight container. Microwave the frozen cookies for approximately 15-20 seconds.
- Storing cookie dough: If needed, it’s best to freeze the dough directly after preparing, I would recommend freezing single scoops of dough, thawing to room temperature for approximately 1 hour and 15 minutes and then bake.
Nutrition
- Serving Size: 1 Cookie
- Calories: 293
- Sugar: 25.4g
- Sodium: 159.6mg
- Fat: 14.6g
- Saturated Fat: 8.9g
- Carbohydrates: 38.7g
- Fiber: 1.6g
- Protein: 3.6g
- Cholesterol: 43mg


Do I skip popping it into the fridge
these so not have to be refrigerated
Delicious and easy! My new favorite chocolate chip cookie recipe!
Oh I love that so much, thank you Theresa!
Juliianne these are the best chocolate cookies i have ever baked. I bake all th time over the lasr 50 years lol and just love your recipes. I check my email every day. Thank you
Oh Joanne, that is so amazing, thank you so much!