
These easy Valentine’s Day sugar cookies are guaranteed to steal hearts this holiday! Learn how to make soft-baked, classic cutout sugar cookies decorated with your choice of colorful buttercream frosting or icing.

The Best Valentine’s Day Sugar Cookies
These Valentine’s Day cookies are thick, buttery cutout sugar cookies decorated with brightly colored frosting. Soft, sweet, chewy frosted sugar cookies are the perfect Valentine’s Day dessert alongside classics like red velvet cupcakes and chocolate-covered strawberries.
I’ll show to how to decorate your Valentine’s Day sugar cookies using frosting or icing, but feel free to get creative! Any way you decorate these, you’re going to be head over heels.
Why You’ll Love These Valentine’s Day Cookies
- The best sugar cookie dough. My cutout sugar cookie recipe is my all-time favorite for a reason! The dough comes together quickly with a short chilling time, and the cookies always turn out perfectly rich, buttery, and soft-baked. Ideal for decorating!
- Easy decorating techniques. Decorate these soft cutout cookies with frosting or sugar cookie icing, or (better yet) both! I share two easy ways to decorate Valentine’s cookies that are sure to stand out on a cookie plate or Valentine’s Day dessert board.
- Perfect for gifting. Homemade cookies are an easy Valentine’s Day gift! Share the love and gift these Valentine’s Day sugar cookies to your special someone(s) this holiday. Once the icing sets, these cookies keep for days.

Ingredient Notes
You only need a handful of basic baking ingredients to make these easy Valentine’s Day sugar cookies! Below are some quick notes. Scroll down to the recipe card for a printable ingredients list.
- Butter – I recommend unsalted butter so that you can adjust the amount of salt in the dough to taste.
- Baking Soda and Milk – Dissolving baking soda in whole milk (or 2%) helps to kickstart the leavening action in sugar cookie dough.
- Buttercream Frosting – I share my best vanilla buttercream recipe that’s perfect for frosting and piping, along with some easy Valentine’s Day cookie decorating ideas.
- Icing – If you’d prefer to decorate these cookies with icing instead, I’ve also included my favorite sugar cookie icing recipe. Learn how to make beautifully marbled icing designs like you see in the photos!
- Gel Food Coloring – You’ll need food-grade gel coloring to dye the frosting or icing vibrant on-theme colors. I’ve shared my recommendations below.

How to Make Valentine’s Day Sugar Cookies
First things first, we’ll make a batch of perfect cutout sugar cookies. You’ll find printable step-by-step instructions in the recipe card below the post. For now, here’s a short overview:
- Combine the wet ingredients. Start by creaming together the butter and sugar. In a separate bowl, dissolve the baking soda in milk, and beat this into the butter along with the vanilla and egg.
- Add the dry ingredients. Next, slowly mix in the dry ingredients, a little at a time to form the cookie dough.
- Chill the dough. Divide the dough into 3 equal-sized balls. Wrap each ball in plastic wrap, and chill the dough in the fridge for 30 minutes. You can speed things up using the freezer if needed.
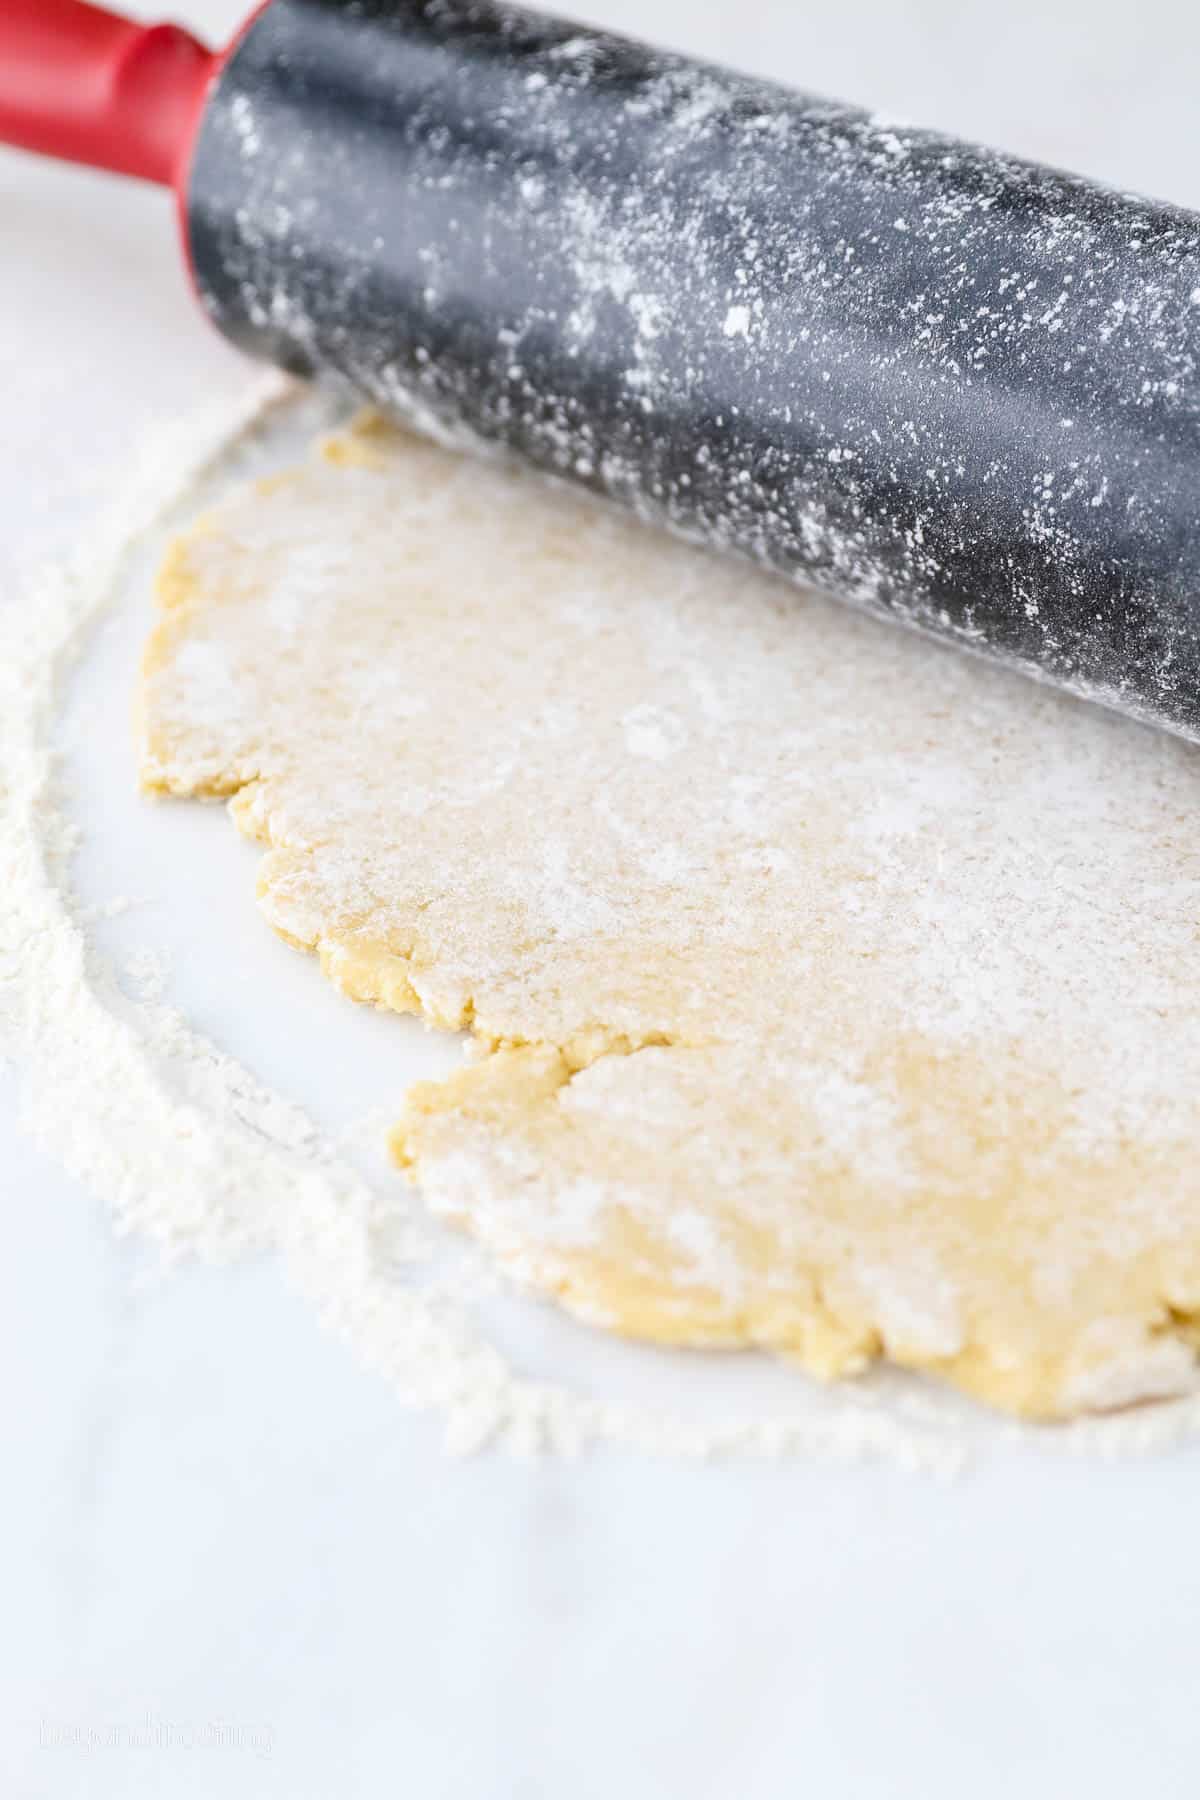
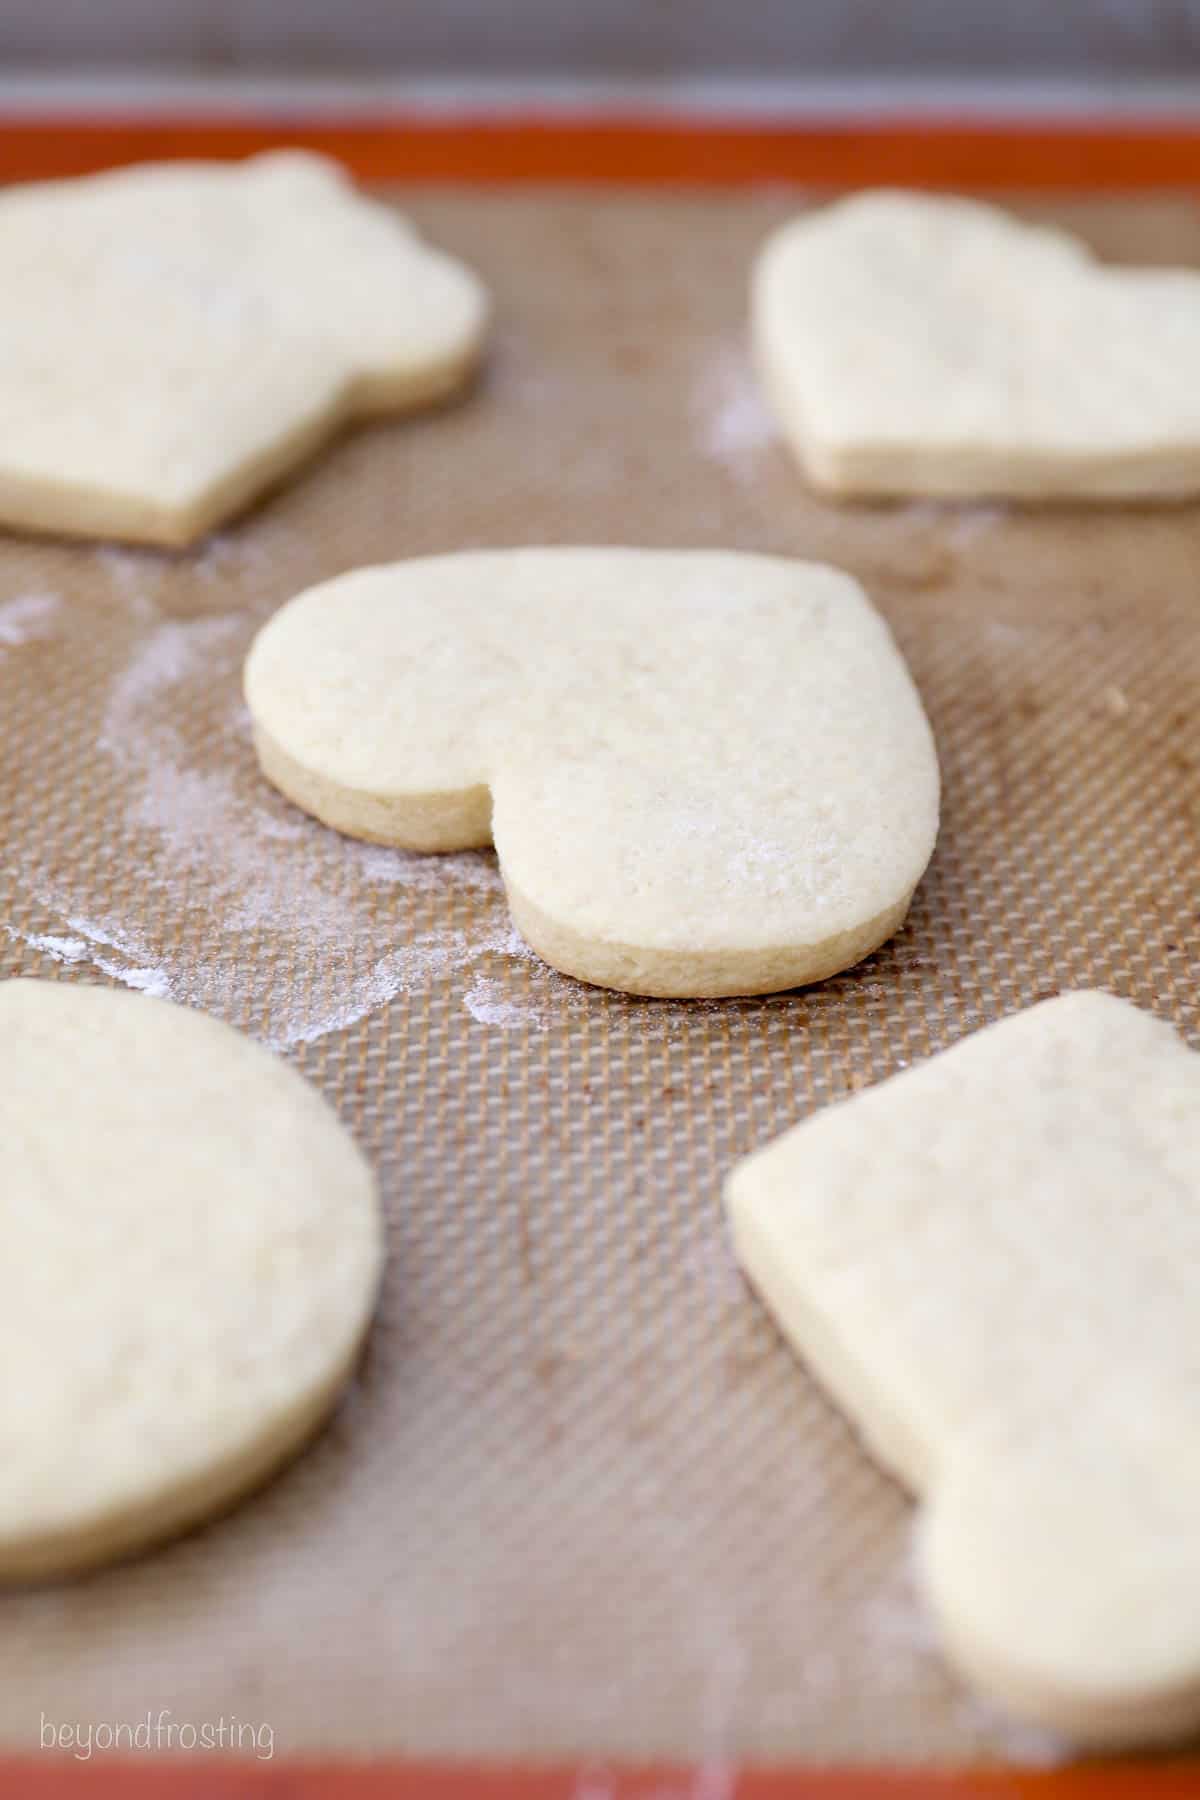
- Cut out the cookies. First, roll out your cookie dough to ¼” thick. Then, use your choice of Valentine’s Day-themed cookie cutters to cut out heart-shaped cookies. Place the cutout cookie dough onto a lined baking sheet.
- Bake. Once all your sugar cookies are arranged on the baking sheet, bake at 350ºF for 8-12 minutes. Afterward, cool the cookies for a few minutes, then move them to a wire rack. Your sugar cookies will need to cool completely before you decorate them.
Recipe Tips
This sugar cookie recipe is pretty much foolproof, but a few last-minute tips can’t hurt.
- Work in batches. I recommend dividing the cookie dough into 2-3 flattened discs, no larger than a softball, before chilling. This lets you roll out the dough in smaller batches so that the dough doesn’t become too soft.
- Roll to the right thickness. For a thick, soft sugar cookie, roll the dough to at least ¼” thick. Thicker cookies hold their shape and the edges are less likely to burn.
- Bake one tray at a time. Line the cookie sheet with a silicone baking mat or parchment paper, and bake your sugar cookies one tray at a time on the middle rack of the oven.
- Leave the cookies underbaked. Bake the cookies until they’re lightly golden at the bottom and edges. They will finish baking as they cool on the cookie sheet. Underbaking is the secret to soft and chewy Valentine’s Day sugar cookies!

Decorating Valentine’s Day Cookies (2 Ways!)
There are many ways to decorate these Valentine’s Day sugar cookies using simple, easy techniques. For this post, I share two ways of decorating using classic vanilla frosting and easy sugar cookie icing (scroll to the recipe card for printable versions of both recipes).
Buttercream Frosting
Below, I’ll walk you through how to achieve beautiful Valentine’s Day cookies using two different styles of decorating, starting with classic buttercream. Buttercream frosting is thick and stable, perfect if you’d like to decorate these Valentine’s cookies with piping tips. Here’s how to do it:
- Make the frosting. First, you’ll whip up a batch of stable buttercream frosting. You can use vanilla frosting or another type, like Swiss meringue buttercream. Make sure to beat the frosting thoroughly so that it’s light, airy, and pipeable.
- Color the frosting. Dye the frosting according to your chosen color palette (I recommend 2-3 colors, plus plain/white). If needed, refer to my in-depth guide on how to color buttercream.
- Fill the piping bags. If you have a set of couplers, you can easily change out your piping tips between colors. See my tutorial on how to use a piping bag for details.
- Choose your piping tips. I use an open star tip (#18), a round tip (#12), and open round tips (#3 and #5) to create the designs pictured here.
- Decorate! Alternate piping tips and frosting colors to frost these Valentine’s Day cookies with your desired designs. If you need a detailed tutorial on how to frost cookies, check out my posts on how to use piping tips and how to decorate sugar cookies with loads of tips and tricks.
What Food Coloring Should I Use?
The best food coloring for frosting and icing is gel food dyes, like the ones from AmeriColor or Wilton’s Color Right Color System. Gel colors are thicker and more concentrated than traditional liquid food coloring (like the kind you’ll find in grocery stores). You’ll find gel colors at craft stores, cake supply stores, or online.

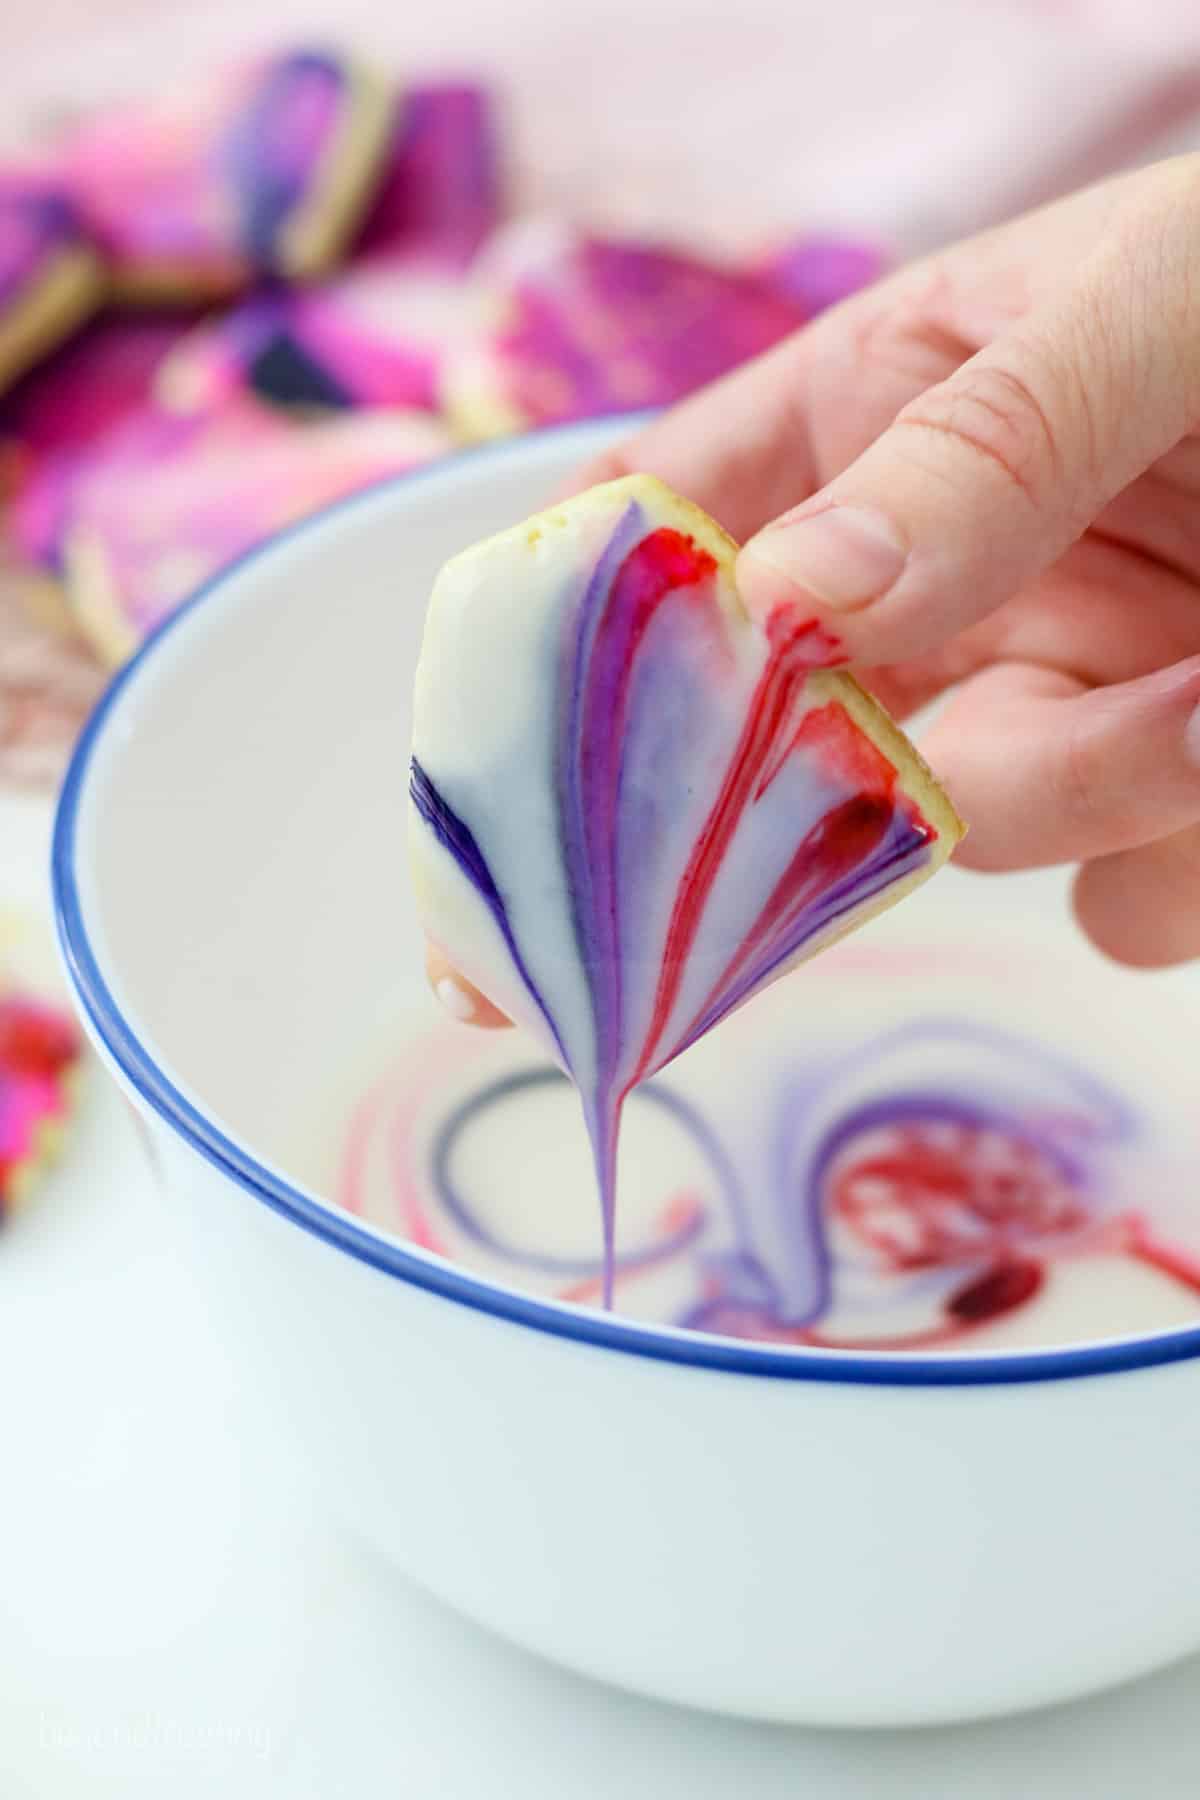
Marbled Icing
The best part about this marbled icing technique is that even if you’re new to decorating cookies, it’s SO easy and your Valentine’s Day sugar cookies look totally bakery-worthy. It’s love at first dip!
- Make the icing. Use my recipe for sugar cookie icing or whip together your favorite cookie icing. Store-bought icing is another option.
- Color the icing. Set aside about a ¼ cup of icing and add the rest to a shallow bowl. Add a drop of gel color to the bowl and use a toothpick to gently swirl the color through the white icing.
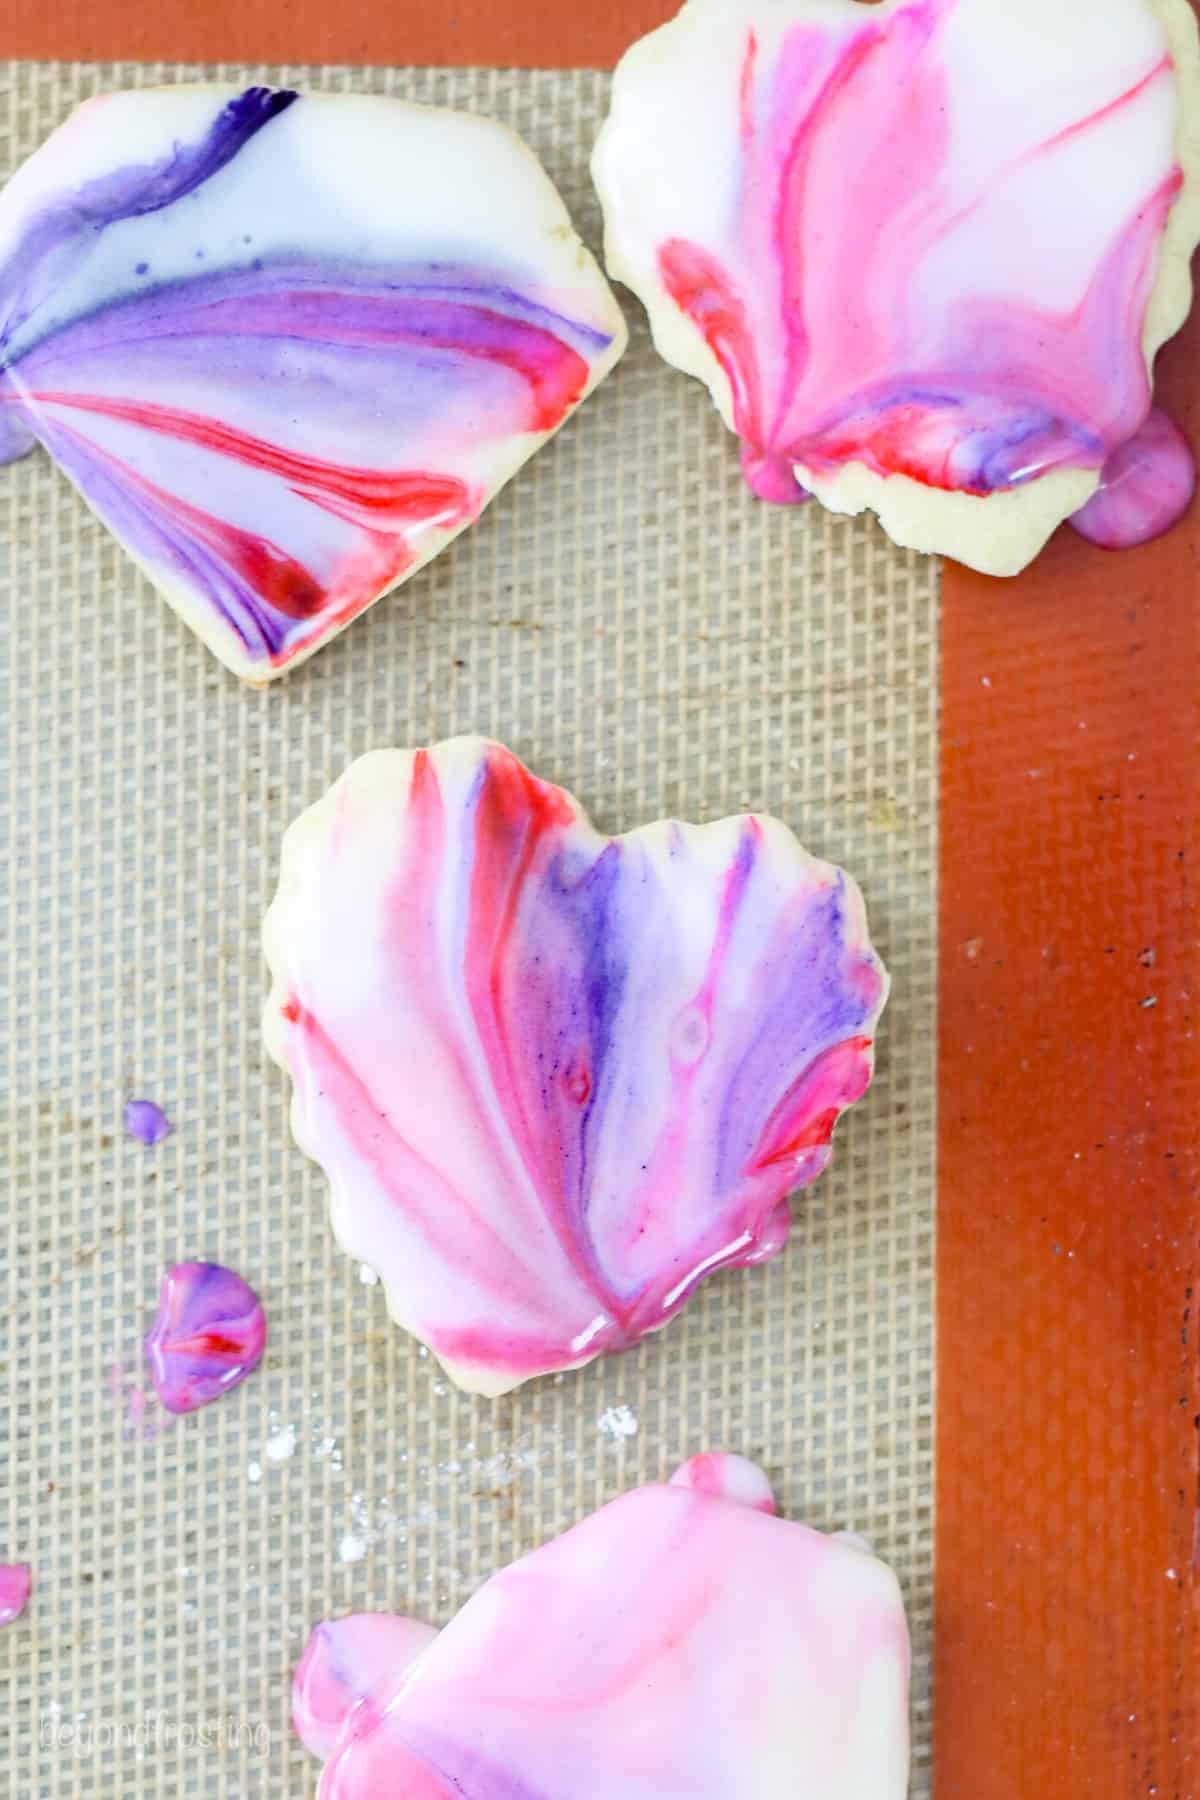
- Dip the cookies. One at a time, carefully dip the tops of your heart cookies into the swirled icing. Lift the cookie out again, and voila! The icing will drip, creating a marbled, tye-dyed look. Let any excess icing drip off before placing the marbled cookie onto a lined cookie sheet to dry.
- Let the icing harden. It can take anywhere from a couple of hours to overnight for your icing to harden, depending on the thickness. You’ll notice that the color becomes slightly less vibrant as it dries down, but it’ll still look gorgeous!
Add Shimmer
Last but not least, I love using shimmer (pearl dust) powder to add a romantic shimmer effect to these Valentine’s Day sugar cookies. There are a couple of different ways that you can achieve this look:
- Sprinkle. Sprinkle the dry shimmer powder directly onto the frosted cookies. Use your hands (wear gloves!) or you can use a dry paintbrush dipped in shimmer dust, and shake it over the cookies.
- Paintbrush. Let the frosted cookies set for a while. When the icing is set but not fully dry, mix shimmer powder with a clear extract (almond, vanilla, lemon, or clear vodka also works here). Dip a paintbrush into your shimmer mixture and dab it gently over the cookies. You can also wait until the icing is completely dry, and paint the shimmer over the dried icing.

Tips for Icing Valentine’s Sugar Cookies
You’re going to love how your frosted Valentine’s Day sugar cookies turn out! In case you’re just getting the hang of icing cookies, here are some final tips:
- Protect your workspace. Gel colors tend to stain easily (fingers, clothes, countertops) if you don’t wash them off right away. For this reason, cover your work surface with parchment paper and, if you have them, wear food-safe gloves when handling the food dye.
- Dry the cookies on a cookie sheet. Cover a baking sheet with parchment paper or a silicone baking mat to place your finished cookies on to dry.
- Reserve some of the uncolored icing. Set aside about ¼ cup of white icing before swirling color into the rest. After a few rounds of dipping cookies, the icing starts to become more uniform in color. This way, you can use your reserved icing to add some white back into your swirl.
- Add gel colors in small amounts. A little goes a long way when it comes to gel food dyes. Use very small amounts and gently swirl with a toothpick.
- Let the excess icing drip off. When dipping your cookies, allow some of the icing to drip back into your bowl before you flip the cookie over. Otherwise, the icing runs all over the sides of the cookie.
- Make unique patterns. Change the direction of the marbling by carefully tilting your cookie as you pull it up and out of the icing.
- Add sprinkles. Don’t forget to have some of your favorite Valentine’s Day-themed sprinkles on hand for a final touch!

Can I Make These Cookies Ahead of Time?
Yes! If you don’t have hours to dedicate to this recipe all at once, prepare your undecorated Valentine’s Day sugar cookies a day ahead. Prepare the cookie dough and refrigerate it overnight, or you can bake the cookies the day before and store them airtight on the counter.
Freeze the cookie dough. Alternatively, freeze the cookie dough if you’d prefer to make it well in advance. Store the sugar cookie dough tightly wrapped in plastic wrap and defrost it in the fridge before rolling, cutting, and baking. See the next section for details on how to store your finished Valentine’s cookies.
How to Store Frosted Sugar Cookies
- To store. These Valentine’s Day sugar cookies can be stored airtight on the countertop for up to 2-3 days. Store the cookies in a single layer.
- Freeze. I recommend freezing these cookies before they’re decorated whenever possible. Pre-freeze the cookies on a baking sheet and then store them in a container for up to 2 months. To freeze frosted cookies, flash freeze in a single layer on a cookie sheet until the buttercream is frozen. Transfer to an airtight container, and place a piece of parchment paper between layers. Thaw in a single layer for a couple of hours.
- Do not freeze the iced sugar cookies. The icing discolor and white spots tend to appear on the icing when frozen.
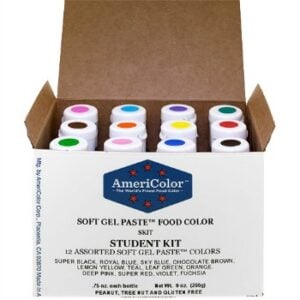
Soft gel-paste colors are concentrated water-based food coloring that makes bright and vibrant colors. Use to color royal icing, buttercream, rolled fondant, macarons, cookie dough, bread dough, cake batter and more.

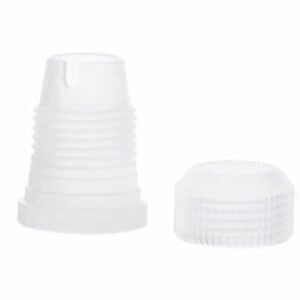
Small 12-inch piping bags are perfect for decorating with buttercream, whipped cream or for filling molds.


The size 18 piping tip is a small closed star piping tip is used to pipe basic flower and star shapes.
More Valentine’s Day Recipes
- Valentine’s Day Ombre Heart Cake
- Easy Chocolate Covered Strawberries
- Valentine’s Day Oreos
- Chocolate Strawberry Cupcakes
- Conversation Heart Sugar Cookies

Valentine’s Day Sugar Cookies
- Prep Time: 60 minutes
- Cook Time: 9 minutes
- Total Time: 1 hour 9 minutes
- Yield: 18-24 large cookies
- Category: Cookies
- Method: Baked
- Cuisine: American
Description
These Valentine’s Day sugar cookies are soft-baked and guaranteed to steal hearts this holiday! Learn how to make easy cutout sugar cookies decorated with your choice of buttercream frosting or icing.
Ingredients
For the cookies
- 1/2 cup (113g) unsalted butter
- 1/2 cup (95g) granulated sugar
- 1/2 tsp baking soda
- 2 tablespoons (30m) milk
- 1/2 teaspoon vanilla extract
- 1 large egg, beaten
- Pinch of salt
- 2 1/2 cups (300 g) all-purpose flour
For the buttercream
- 1 1/2 cups (339g) unsalted butter, cold.
- 5 cups (650) powdered sugar
- 1 tablespoon (15ml) pure vanilla extract (clear is best if you’re coloring the frosting)
- 2 tablespoons (30ml) heavy whipping cream
For the marble icing
- 2 cups (260g) powdered sugar, sifted
- 2–3 tablespoons (30-45ml) milk
- 1 tablespoon (15ml) corn syrup
- Gel icing colors
Instructions
For the cookies:
- Beat the butter and sugar on medium-high speed until the sugar is dissolved and creamy.
- In a small glass dish, dissolve the baking soda in the milk. Add the baking soda/milk, vanilla and egg to the butter. Beat until all ingredients are well incorporated.
- Slowly add the salt and the flour 1 cup at a time and mix until a stiff dough forms.
- Form 3 softball-sized balls of dough. Flatten and wrap tightly in plastic wrap then chill in the freezer for at least 15 minutes or in the refrigerator for at least 30 minutes or up to 3 days.
- Pre-heat oven to 350°F.
- Remove the dough from the fridge, roll the dough out on a well-floured surface about ¼” thick. Use a cookie cutter to cut the shapes and transfer to a lined baking sheet. Use parchment paper or a baking mat. Bake at 350° for 8-12 minutes. Allow to cool for 5 minutes before transferring to a wire rack to cool completely.
For the buttercream:
- Cut the butter into pieces. Using the paddle attachment, whip butter for 5-7 minutes, scraping down the bowl occasionally. Beat until butter is whipped and fluffy.
- Add 3 cups of powdered sugar and the vanilla extract and mix on low speed until incorporated into butter, increase speed to high and beat for about 60 seconds.
- Next, add an additional 2 cups of powdered sugar and heavy cream and beat on low speed until sugar is incorporated. Increase speed to medium-high and beat for 2-3 minutes until whipped and fluffy.
- Dye frosting with desired gel colors and divide into your piping bags. Decorate cookies.
For the marbled icing:
- Combine the ingredients in a bowl and whisk until well combined. If needed, add additional milk to thin out the frosting. If too thin, add an additional 1/4 cup of powdered sugar. Then
- Set aside 1/4 cup of the white icing. Add a small drop of your gel colors to the icing and gently swirl with a toothpick.
- Gently dip each cookie into the icing and then tilt the cookie to the side to allow excess icing the drip off. Place on a silicone baking mat or parchment paper and allow to dry completely.

Notes
- These are mini cookies, this recipe made approximately 36 cookies. Otherwise, it will make 18-24 regular-sized cookies depending on the cookie cutter. The cookie recipe can easily be doubled for larger batches.
Storing and Freezing
- Storing frosted cookies: These are best kept in an airtight container, and they will stay fresh for several days at room temperature. While this buttercream does have a little “crust”, I don’t recommend stacking more than 1 cookie on top of another, as it will crush the frosting. You can also place a layer of parchment in between. You can opt to refrigerate these, but they are best served at room temperature.
- How to freeze cookies
- To freeze baked cookies, prepare and cool completely. Place in a freeze-safe air-tight container for up to one month.
- To freeze decorated cookies, place them on a cookie sheet in the freezer for 15-30 minutes until the frosting is hard. Transfer to a freezer-safe airtight container and freeze. Thaw on a cookie sheet in a single layer to prevent damaging the frosting. Do not freeze cookies with the icing (the icing colors do not hold up in the freezer).


Can’t wait to try it!
Ok, I NEVER leave reviews… but this is the ONLY sugar cookie recipe anyone will ever need. I used buttercream and dipped icing for decorating but even ‘naked’ they were lovely with a cup of tea. Next time I will reserve enough for a dozen or so plain cookies & add lemon or lime zest, or sprinkle with a cinnamon sugar blend. Seriously THIS is my go to cookie!!!!
Wow Beth, that is so kind of you! Thank you so much for taking the time to share your feedback!
Hello…with your buttercream icing do it crust when decorate the sugar cookies…
Hi Rachel- it crusts over yes, but not enough to physically stack the cookies without damage
I happened to find this right when you posted it yesterday. I was looking for a cool decorating idea for cookies for my birthday (tomorrow). I am so excited to try it! I bought a few other decorating supplies to add in just to try them, like star-shaped sprinkles, sparkly sugar, and metallic spray color – we’ll see how it goes. I’ll take pictures to share!
Omg that’s awesome!! Definitely report back- I’d love to see photos!
Do you think these could be frozen after decorating? I want to use them for a birthday party as take-home treats for the kids but I am not sure if I will have time the day or two before the party?
Hi Staci- the ones decorated with buttercream frosting can definitely be frozen once frosted- but don’t stack them! Freeze them in single layers, and let them thaw to room temperature, then you can pack them up as favors.
What about the ones with the marbled royal icing? Thanks!
Unfortunately I have not tested freezing that variety yet.
Will make & ice the cookies for granddaughters for our Valentine box craft day this weekend – looking forward to trying them, thank you.
Find all the pop-up ads sooooo annoying – cover parts of the recipes – yuck. Must repeatedly X to close ads – annoying!
Sometimes just leave your site without exploring all you have to offer – sad.
Hi Sharon. I am sorry you’re experiencing this. It would be helpful to know what type of device you’re on? Other than 1 pop up for my email list, there shouldn’t be any other pop up ads, maybe one that is sticky along the bottom of the screen but that’s about it.