Learn how to make a lattice pie crust following this easy step-by-step! I’ll show you how to weave strips of flaky, buttery pie crust into a classic lattice crust brushed with egg wash and sprinkled with sugar for a sparkly finish.
If you want to learn more about mastering pie crust techniques, check out this tutorial for How to Blind Bake Pie Crust.

The Perfect Lattice Pie Crust
There are countless ways to design a pie crust, but a classic lattice crust is by far my favorite. There’s something so timeless and wonderfully rustic about a golden-baked, buttery lattice pie crust.
If you’ve never made a lattice crust before, though, it can be intimidating! But, never fear. I’ve put all of my best tips and tricks into one easy tutorial. This simple method for weaving a pie crust always gives that “wow” factor. You’ll be a pro in no time.
Why You’ll Love a Lattice Crust
- Impressive. There’s something old-fashioned yet impressive about a perfectly woven pie crust. You’ll be in awe of the final result!
- Easy. This method takes a bit of practice, but making a lattice crust is quite easy once you get the hang of it. Plus my pie crust is so stable, it lends itself to this type of design!
- Versatile. Use this lattice pie crust to bring a bit of flair to all of your favorite pie recipes.

What You’ll Need
Below are some quick notes on what’s involved in making this easy lattice pie crust. Don’t forget to scroll to the recipe card at the bottom of the post for the full list and details.
- Pie Dough – You’ll need one double recipe of my easy pie crust or gluten-free pie crust. Special ingredients for my pie crust include an egg and vinegar.
- Filling – Pie filling of your choice, such as apple pie filling or blueberry pie.
- Egg – You’ll combine an egg with water for an egg wash.
- Sugar – Granulated sugar for sprinkling on top. You can also use a coarser sugar, like turbinado sugar, or I like to use the Wilton sanding sugar for a sparkly finish.
How to Make a Lattice Pie Crust (Step-By-Step)
This lattice pie crust goes wonderfully with my apple blueberry pie and apple pie recipes. And you can fill your pie with any filling you’d like! Here, I’ll walk you through how to make a perfect lattice crust, step-by-step:
Prepare the Pie Dough
First, you’ll need to prepare your pie dough, including the bottom crust and lattice strips:
- Make the dough. Prepare a double crust, dividing the dough in two. Shape each portion into a flat disc, wrap the dough in plastic wrap, and chill it for 60 minutes in the fridge.


- Prepare the pie. Turn the dough out on a floured countertop and roll out the first disc, pressing it into the bottom of a deep dish pie plate. Add your pie filling of choice, and place the crust back into the fridge. Don’t trim off any extra edges.
- Cut the lattice strips. Roll out your second portion of dough into a circle about 12″ wide at least 1/8″ thick. Next, cut the dough into 12 even-sized strips that are 1-inch wide. You can do this using a sharp knife and a ruler, a pizza cutter, or a pastry wheel if you have one.


How to Weave a Lattice Pie Crust
Now that your dough strips and crust are ready to go, it’s time to weave a beautiful lattice crust!
- Position the dough strips. Starting with 6 dough strips, place them vertically across the filled pie. Use the shorter strips at the edges and the longer strips in the center. Space the strips as evenly as possible.
- Peel back the dough strips. Next, peel back every other strip (3 in total), all the way to the edge of the pie. Lay one of the shorter dough strips horizontally over top. Unfold the peeled-back strips so that they’re laying over this first horizontal strip.


- Begin weaving the strips. Peel back the other 3 vertical strips. Place the next horizontal strip on top before folding back the peeled-back strips. You should start to see the lattice pattern coming through!
- Repeat. Repeat with the remaining strips, weaving the dough over and under until all of the dough strips are used.


- Trim the edges. Once your lattice is complete, press the ends of the strips against the edges of the bottom crust to seal. Trim away any excess dough with a sharp knife. Finally, crimp the edges of the pie with a fork.


- Chill and then bake. Place your finished pie into the fridge to chill for 30 minutes. Before baking, brush the crust with an egg wash and give it a sprinkle with coarse sugar. All that’s left to do is bake! Follow the directions for the recipe you’re using.

Tips for Success
It’s OK if your crust doesn’t come out perfectly. Latticing a crust takes practice! Your pie will still turn out great, and most pies suit a rustic look. Here are some final tips for the best results:
- Keep the pie dough cold. Cold dough is way easier to work with. If you notice that your pie dough is too warm while you’re rolling it out, place it onto a baking sheet, cover it, and refrigerate it for 10-20 minutes.
- Avoid a broken pie crust. The secret ingredient in my pie crust is an egg, which binds the ingredients together perfectly to prevent it from crumbling or breaking apart.
- Place the strips correctly. Make sure that the dough strips are evenly spaced. Lay the longest pieces over the middle sections and the shorter strips closer to the edge.
- Chill the crust. Make sure to chill your pie crust. This helps the crust hold its shape and creates nice flakey layers of dough.
- Use a pastry wheel. A standard lattice pie crust cutter, or pastry wheel, makes creating the crust pattern super simple. For a “ribbon” look, use a fluted pastry wheel cutter. This makes for a very pretty presentation.
- Seal the edges of the crust. If needed, brush the edge of the crust lightly with water before pressing the ends of the dough strips down. This helps the dough adhere.
- Avoid overly browned crust. To prevent the edges of the dough from browning too much in the oven, use a pie shield or gently wrap the edges with foil.
- Get creative! Once you’ve mastered this basic method for latticing a pie crust, play around with different strip thicknesses and placements. You can also use up extra dough by adding cut-out shapes to the top.
What’s an Alternative to a Lattice Crust?
One alternative to a lattice crust is a full top crust, or a buttery crumble (see my apple crumble pie). These are definitely easier options if you’re in a hurry! Another alternative is a honeycomb pie crust, created by cutting out sections of the top crust using a knife or cookie cutter. You can use different cutters to achieve different designs. The dough cut-outs can be used to decorate the top of the pie, too.

Make Ahead and Storage
- Fridge. The pie dough can be prepared up to 3 days in advance and stay wrapped in the fridge until you’re ready to use it. Fruit pies will keep covered in the fridge for up to 4 days, or at room temperature for 24 hours.
- Freeze. Freeze the pie dough double-wrapped in plastic wrap for up to 2 months. You can also freeze most baked fruit pies for up to 3 months. Refer to the specific storage instructions for whichever recipe you’re using.
More Homemade Pie Recipes
Print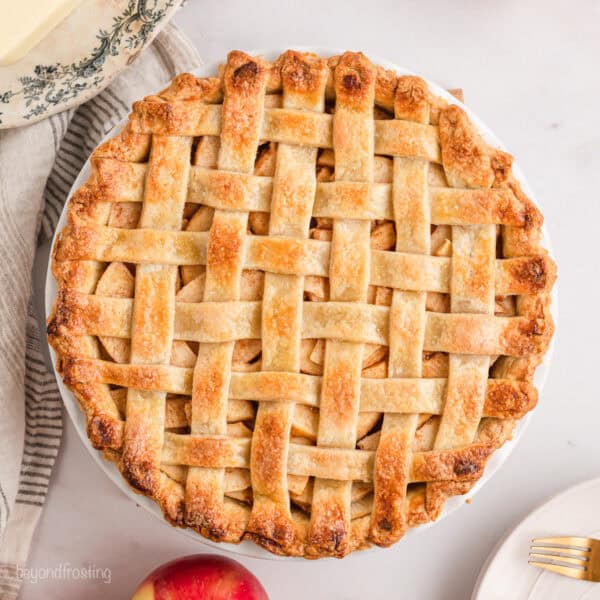
How to Make a Lattice Pie Crust
- Prep Time: 90 minutes
- Total Time: 1 hour 30 minutes
- Yield: One 9″ double crusted deep dish pie
- Category: Pies
- Method: Oven
- Cuisine: American
Description
Learn how to make a lattice pie crust! Weave strips of flaky, buttery pie crust into a classic lattice crust that bakes up golden and perfect in the oven.
Ingredients
- 1 Double recipe of my Easy Pie Crust
- Pie filling of your choice
- 1 large egg
- 1 tablespoon water
- 3 tablespoons granulated sugar
- Flour for dusting work surface
Instructions
- Make a double recipe of my easy pie crust and split the pie dough into 2 even portions. Flatten each portion into a disc, wrap, and refrigerate for at least 60 minutes.
- On a lightly floured surface, roll out one disc of dough into an 11” circle. Place this into the bottom of a deep dish 9” pie plate, and fill with the pie filling of your choice. Do not trim any excess crust. Return to the refrigerator.
- Remove the second disc of dough and on a lightly floured surface roll it into a 12” circle at least 1/8-inch thick. Using a pizza cutter, pastry wheel, or sharp knife cut the circle into 12 even width strips about 1” wide.
- Place 6 of the strips, evenly spaced, vertically (from top to bottom) across the filled pie. Use the longer strips for the center of the pie and the shorter strips for the edges.
- Starting at one end of the pie, peel back every other strip until it is almost to the edge of the pie. Lay one of the shorter strips horizontally across the top edge of the pie. Then carefully pull the peeled back strips back down to the bottom of the pie.
- Next, peel back the other 3 vertical strips that did not get peeled back last time. Place down the second horizontal strip and replace the peeled-back dough strips.
- Repeat this process of alternating the vertical strips and placing them over the horizontal strips until all dough strips have been used. Once all strips have been placed, press the ends down into the edge of the pie plate to seal them to the bottom crust. Use a sharp knife to cut any excess dough from the edge of the pan and tightly crimp the edge using your hands or a fork. Chill in the refrigerator for at least 30 minutes.
- Brush the crust all over with egg wash and evenly sprinkle with sugar. Bake pie according to the pie filling recipe you are using, and until the crust is golden brown.