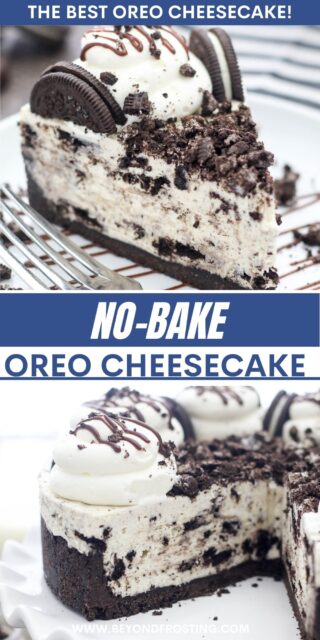
This no-bake Oreo cheesecake is ultra-creamy and packed with softened Oreo cookies inside a buttery Oreo crust. It’s truly the ultimate dessert for Oreo lovers! The light, silky no-bake cheesecake filling tastes just like Oreo creme. And the best part is, you don’t even have to turn on the oven.
If you love Oreo desserts, give my Oreo mousse pie a try, too!

The Best Oreo Cheesecake Recipe Ever, No Oven Needed
I rarely play favorites when it comes to desserts (how do you pick one or two out of thousands??), but my no-bake Oreo cheesecake recipe is without a doubt high on my list. This no-bake dessert is unreal. It’s my light, airy, velvety no-bake cheesecake filling, set inside the most perfect Oreo crust.
The filling tastes just like cool and creamy Oreo creme, filled with even MORE Oreos. It’s easy to prepare, make-ahead-friendly, and it freezes like a dream. Honestly, the hardest part is waiting to slice it.
Make it any time of year for birthdays, holidays, or make it ahead for potlucks. It’s especially great in the summer. Who wants to turn on the oven when it’s warm outside, anyway?
Baked vs. No-Bake Cheesecake
The main difference between a no-bake cheesecake and a baked cheesecake is that the latter contains eggs and calls for baking in order to set. A no-bake cheesecake doesn’t have eggs in the recipe and sets up by chilling in the fridge.

Ingredient Notes
Along with your usual pantry suspects, there are a few key ingredients that make up the perfect Oreo cheesecake. I go over them below, with the full details available in the recipe card at the bottom of this post.
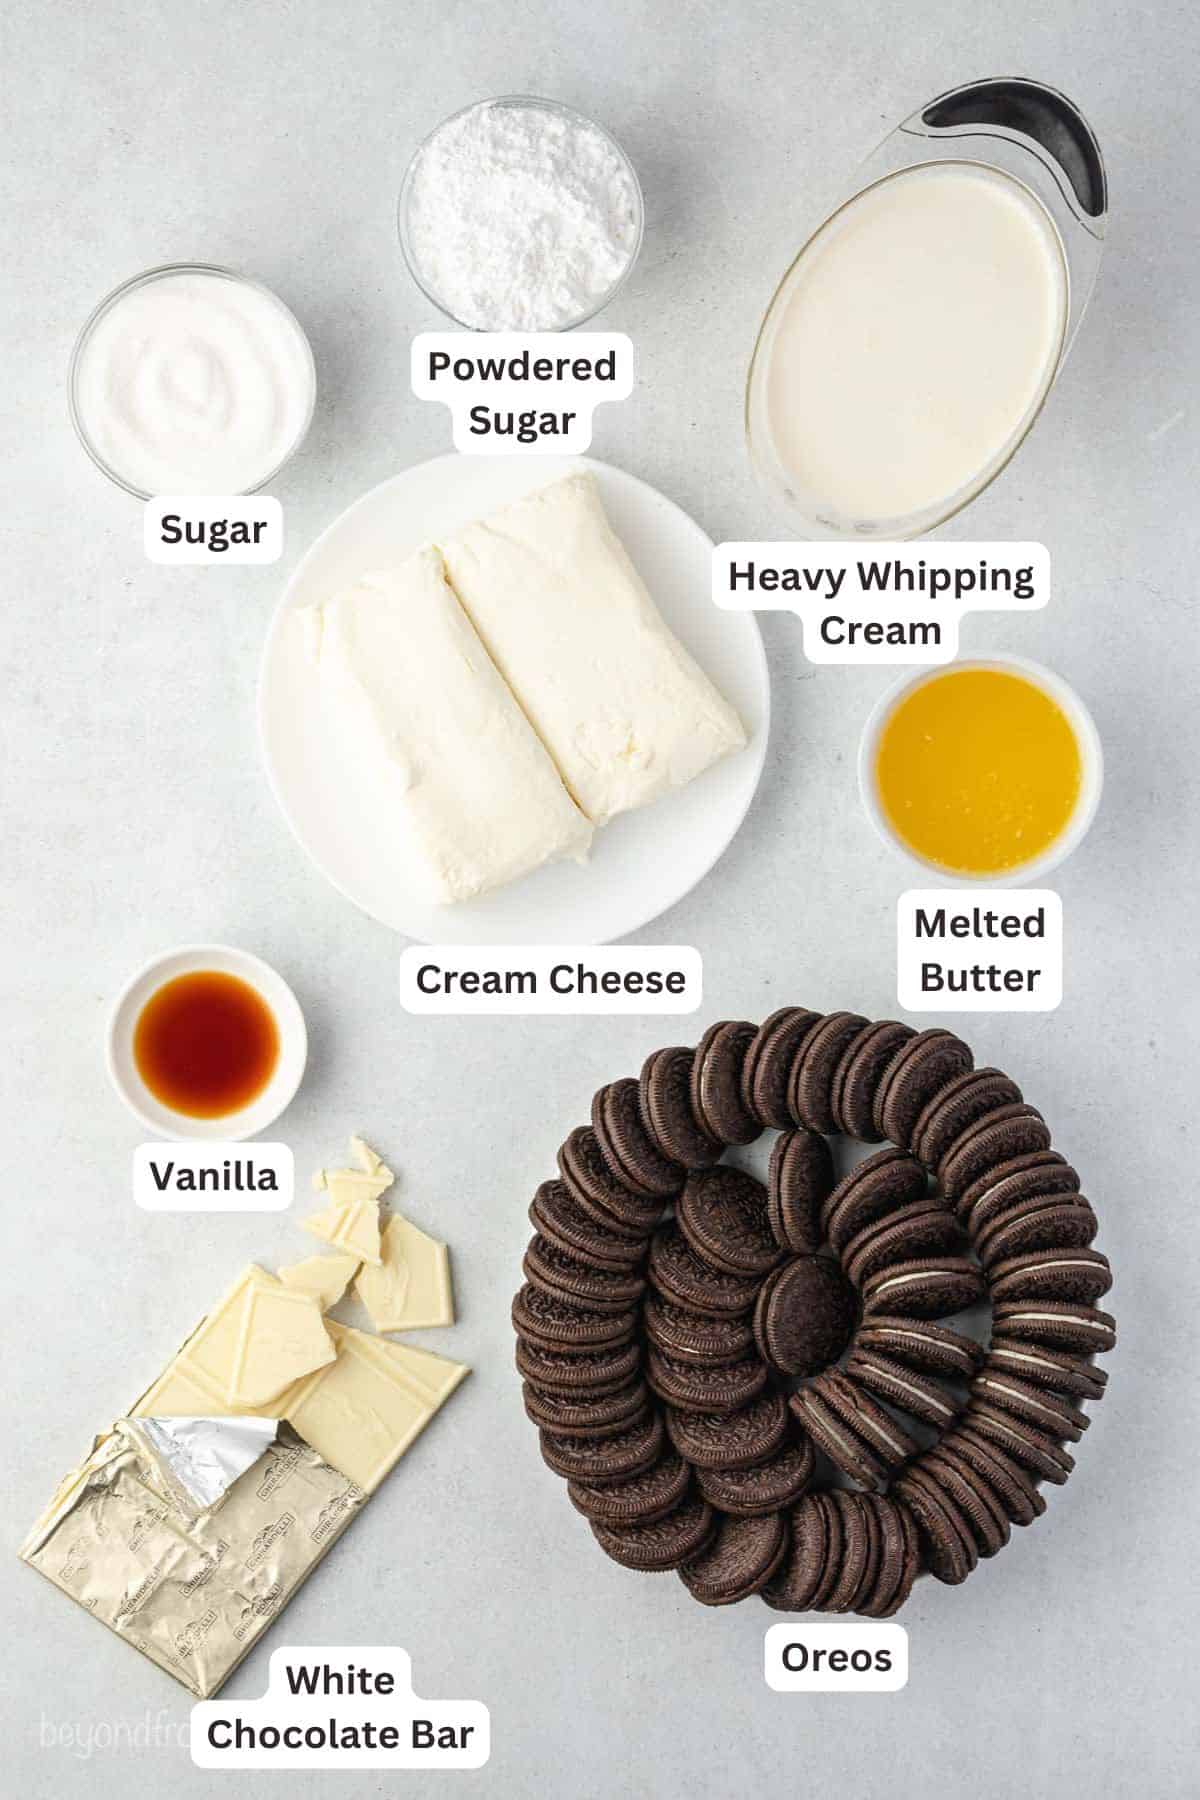
- Oreos – There are Oreos throughout this cake: in the crust, in the filling, and scattered over top. You’ll need at least two packages of Oreo cookies.
- White Chocolate – White chocolate gives the cheesecake a rich and velvety texture without overpowering the flavor. I recommend using a white chocolate bar (like Ghirardelli or Baker’s Chocolate), and not chocolate chips, as bars melt much more smoothly.
- Heavy Whipping Cream – Homemade whipped cream is worth the extra step for a super light and fluffy filling. However, if you’re looking for a time saver, you can swap it out with Cool Whip instead.
- Cream Cheese – Whenever you’re making cheesecakes of any kind, full-fat cream cheese is always best. Reduced or low-fat cream cheese often has a thinner texture as it contains more water, which softens the consistency of the filling too much. Taking your cream cheese out of the fridge ahead of time will allow it to soften, and it will be so much easier to mix.
Why Use White Chocolate In a No-Bake Cheesecake?
Including white chocolate in the filling is actually my favorite way to make no-bake cheesecakes. White chocolate lends an air of luxury to the cheesecake filling that’s subtle and so delicious. If you’ve never used melted chocolate in your no-bake cheesecakes before, I urge you to try it! I use dark chocolate in my no-bake chocolate Oreo cheesecake, too.
Including chocolate also makes the filling thicker, to the point where friends and family can’t even believe that it’s a no-bake recipe. You can leave it out, and the cake will still set fine without it. The taste and texture just won’t be quite the same.
Preparing the Perfect Oreo Crust
Before we begin with the cheesecake itself, properly prepping your pan is key to preventing the crust from sticking. Here are some quick tips for a successful Oreo cookie crust.
How to Prepare the Pan
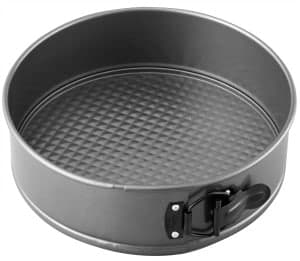
- Use a springform pan. There’s quite a bit of filling in this cheesecake, so I recommend a 9-inch springform pan. If you don’t have one, then a deep dish pie plate will work, or you can use a 9-inch square pan.
- Line the pan with parchment paper. Most springform pans have a textured base. For the best results, line the bottom with parchment paper. Let it hang out over the edge of the pan.
- Lightly grease the edges with cooking spray. Gently wipe the greased sides with a paper towel. This will also help the crust to release more easily from the edges of the pan.
- Press the crumbs tightly into the pan. Use the bottom of a glass or measuring cup to press and flatten the crumbs, so that the crust is less likely to crumble.
With your pan prepped and ready, the Oreo crust comes together quickly with just two ingredients: crushed Oreos and melted butter. No need to remove the filling from the Oreos, either! It actually helps hold the crust together. If you need more guidance on preparing your Oreo pie crust, see my tutorial on how to make a no-bake crust for details.
- Grind the cookies. Use a food processor to pulverize the Oreos into a fine crumb.
- Add butter. Next, pour melted butter over the cookie crumbs and mix to combine.
- Add to the pan. Dump the crumbs into your prepared baking pan, and press the crust firmly into the bottom and up the sides. Afterward, pop the crust into the fridge while you get started on your cheesecake filling.


How to Make No-Bake Oreo Cheesecake
I seriously cannot wait for you to dig into this dessert. I recommend making the whipped cream before the filling so that you can set it aside and use the same bowl to prepare the filling.
Making the Cheesecake Filling
Once your crust is ready, here’s how to make the creamy Oreo cheesecake filling from scratch:
- Melt the chocolate. First, break up the chocolate and melt the white chocolate in the microwave. I recommend adjusting to 50% power to prevent burning. Stir every 30 seconds. Don’t have a microwave? Visit my handy tutorial for how to melt chocolate for more options.


- Prepare the whipped cream. Get the bowl of your stand mixer nice and cold, and then beat the heavy whipping cream until soft peaks begin to form. Next, add the powdered sugar a little at a time while continuing to beat the frosting into stiff peaks. Set aside.
- Beat the cream cheese until smooth. This is the best way to prevent lumps in the filling. Add the sugar and vanilla, beat again, and add the melted chocolate until combined.


- Fold in the whipped cream, followed by crushed Oreos. You’ll want to mix everything until it’s smooth.


- Fill and chill the cheesecake. Fill the prepared crust, and then refrigerate the cheesecake until it’s set. I recommend 4 hours at the very minimum, but 6-8 hours or overnight is even better.


Adding the Whipped Cream Topping
After your Oreo cheesecake is chilled and before you’re ready to serve it, whip up another batch of whipped cream. Here’s how to decorate the cheesecake:
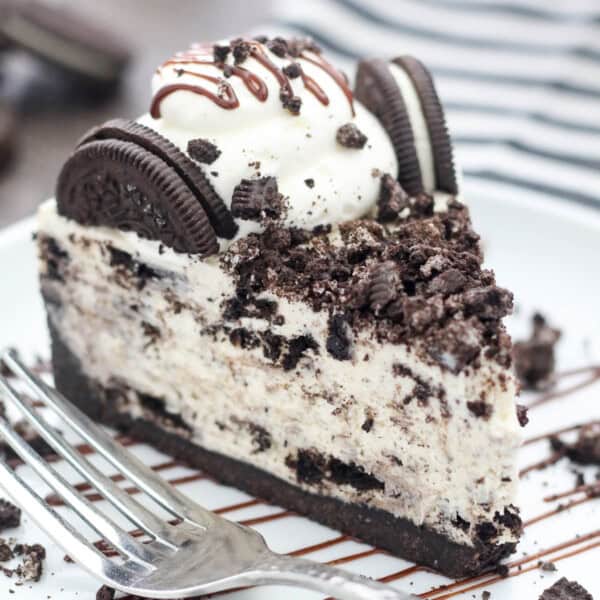
- Decorate. Pipe the whipped cream around the borders of the cake.
- Garnish. Sprinkle over more crushed Oreos and give that baby a drizzle of hot fudge. See below for more cheesecake topping ideas!

Recipe FAQs
As mentioned above, the longer you can let your cheesecake chill and set, the better. If you don’t give your cheesecake at least 4-6 hours to chill completely, it will be soft and mousse-y, not firm and cheesecake-like.
I know this may sound tempting as a way to speed up the process, but resist the urge. Freezing a no-bake cheesecake before it’s had enough time to set will change the texture, and it just won’t come out the same.
Yes! Let the cheesecake set up in the fridge, and then wrap the pan tightly and keep it frozen for up to 1 month. Thaw your no-bake cheesecake in the fridge before serving.

Does No-Bake Cheesecake Need to Be Refrigerated?
You might be able to skip the oven with this recipe, but refrigerating is a must for no-bake cheesecake. Once it’s chilled for a few hours, wrap the pan tightly in plastic wrap and keep it in the fridge. Take the Oreo cheesecake out just before serving, but return it to the fridge as soon as possible.
If it’s left out too long, your Oreo cheesecake filling will become soft and mousse-like, and the crust will crumble more easily.
This is an ideal dessert to make ahead of time (up to 2 days in advance), and it can also be frozen.
More No-Bake Desserts
No-Bake Oreo Cheesecake
- Prep Time: 30 minutes
- Cook Time: 4 hours
- Total Time: 4 hours 30 minutes
- Yield: 8-10 slices
- Category: Cheesecake
- Method: No-Bake
- Cuisine: American
Description
You’ll love this classic no-bake Oreo cheesecake! The light and silky cheesecake filling tastes just like Oreo creme, stuffed with even more Oreos inside a classic Oreo cookie crust.
Ingredients
For the crust:
- 1 package (14.3 oz) Oreos
- ½ cup (113G) unsalted butter, melted
For the cheesecake filling:
- 4 ounces white chocolate bar (Ghirardelli or Lindt)
- 1 ¼ cups (354ml) heavy whipping cream
- ½ cup (65g) powdered sugar
- 16 ounces (452g) full-fat cream cheese, at room temperature
- ½ cup (95g) granulated sugar
- 2 teaspoons (10ml) pure vanilla extract
- 20 Oreos, crushed
For the topping:
- 1 cup (236ml) heavy whipping cream
- ½ cup (65g) powdered sugar
- Additional Oreos for garnish
- Hot fudge sauce for garnish (optional)
Instructions
For the crust:
- Prepare a 9-inch springform pan by lightly greasing the edges of the pan with cooking spray and then wiping gently with a paper towel. Line the bottom of the pan with parchment paper.
- Grind the cookies into a fine crumb using a food processor or blender. Pour the melted butter over the cookie crumbs and stir until the crumbs are well coated.
- Pour the crumbs into your springform pan and press firmly into the bottom and up on the sides to create a thick crust. Refrigerate the crust while you are preparing the filling.
For the filling:
- In a microwave-safe bowl, microwave the white chocolate at 50% power in 30-second increments, stirring each time until the chocolate is melted. Stir until completely smooth. Set aside
- Prepare the whipped cream. Place the mixing bowl and whisk attachment in the freezer for 5 to 10 minutes to chill. Pour the heavy whipping cream into the chilled bowl and use an electric mixer to beat the heavy cream on medium-high speed until soft peaks start to form. Slowly add the powdered sugar and continue beating on high speed until stiff peaks form. Set aside.
- Beat the cream cheese until it’s completely smooth, scraping down the sides of the bowl as needed. Next, add the granulated sugar and vanilla and beat until well combined. Add the melted chocolate, beating until it’s completely mixed into the cream cheese. Then, fold in the whipped cream until it’s completely smooth. Then stir in the crushed Oreos.
- Pour the filling into the prepared crust, spreading evenly. Chill in the refrigerator for 3-4 hours minimum.
For the topping:
- Before serving, make a second batch of whipped cream as instructed above. Pipe the borders using a large open round tip. Garnish with more crushed Oreos and hot fudge sauce.

Notes
- Storing and freezing: Keep refrigerated up to 5 days, this can be prepared up to 2 days in advance. Add the topping the day of serving. Let the cheesecake set up in the fridge, and then wrap the pan tightly and keep it frozen for up to 1 month. Thaw your no-bake cheesecake in the fridge before serving.
- White chocolate: It’s recommended to use a chocolate bar instead of chocolate chips, but in a pinch, white chocolate chips will work. For chocolate bars, I recommend using Ghirardelli, Lindt or something similar.
- Oreos: You’ll need one full package for the crust and an additional package for the filling and garnish. Do not use double-stuffed or thin Oreos, and these would require adjustments to the recipe accordingly.
Nutrition
- Serving Size: 1 slice
- Calories: 522
- Sugar: 34.5g
- Sodium: 194.9mg
- Fat: 39.9g
- Saturated Fat: 23.3g
- Carbohydrates: 38.2g
- Fiber: 0
- Protein: 4.6g
- Cholesterol: 103.2mg


I love it so much its so tasty 5 stars
Thank you so much! I’m so glad to hear you enjoyed it.
Looking forward to making soon, looks incredible and I can make it gluten free just by using gluten free Oreos! Thank you for including more gluten free doable recipes in your blog. I would love if recipe bloggers could mention when readers made the recipe gluten free successfully
– perhaps in the recipe notes?
Thank you for your wonderful recipes.
Hi there, I don’t see why that would not work, but you MAY want to reduce the butter in the crust by 1 tablespoon as add more as needed. I have never tried the GF Oreos, but when swapping out the cookie or the cracker, sometimes adjustments are needed to reduce the butter so it’s not overly wet or oily.
hello I am about to make this. I have crushed the package for crust. where does it say ho many to crush and forld into the filling. How many ores are needed for th top to garnish? i have bee reading th comments and no has asked these questions. How many to crush and add to filling? How many to garnish the top?
The crust uses 1 full package of Oreos as indicated in the ingredients list. A second package is needed for the filling and to garnish. Under the ingredients for the filling, it lists 20 Oreos, crushed, which are folded into the cheesecake batter. That leaves plenty leftover to garnish the top however you’d like, there’s no set amount. To crush the Oreos, I usually put them in a bag and use a rolling pin to smash them, but you’re welcome to do another method.
This is a really good recipe I would like to know if I could make mixture and put it into muffin pans
Hi Angela, you can but you’ll have a to use muffin liners or silicone liners and then you won’t really be able to pull the liners off the cheesecake
this was so good!
Can you use a 9×13 pan instead of the 9 inch ???
It would be better in a 9inch square pan. You would need to double the recipe for 9×13
Hi! I made this recipe last year and absolutely loved it!! I was wondering if I could switch it up with Biscoff cookies instead of Oreos? Will that work also? Thank you so much!
Yes that work work great! If you follow the crust recipe for this Biscoff Pie and then just replace the cookies in the filling.
Absolutely delicious. I got the crust amount confused but it still came out delicious. Taste like a professional baker made it. I see the crust requires a 14 oz bag and the filling requires 20 broken oreos. So I really need 2 bags of oreos. I used crushed oreos for the topping for simplicity. So decadent and easy to make. Ill perfect this dessert next time. Ive already stocked up on white chocolate. Dollar General has 24 oz vanilla chocolate bars for $ 3.95. Bought 3 packs today.This is my new holiday dessert. Thank you so much for sharing.
Thank you Darlene! I am so glad you enjoyed the recipe!
Thank you for this recipe. I love Oreos. I have to make this for a funeral, so I was wondering if I can double it and put it in a 9 x 13 or should I just make 2-9” pies?
Thank you again.
Hi Jannette. Either of those option would work. The 9×13 inch would allow you to slice these into bars which might be easier to grab and eat.
How many ounces of Cool Whip in place of homemade whipped cream for the filling portion? Can I use Cool Whip for the topping? Do I need to eliminate the powdered sugar for the filling and topping in this case? I don’t have any freezer space to chill a bowl. Best I can do is chill the heavy whipping cream in the fridge. I also wouldn’t mind a short cut like this one.
Hi Amy- I would do one 8-oz container of Cool Whip. Yes you can use Cool Whip as a topping but it generally does not pipe as well. If you are using Cool Whip, then yes, you would not need the powdered sugar for the filling and topping. If you can’t chill your bowl, that’s fine. It is just a helpful tip, or you can chill it in the fridge if you have more space there.
Love the consistency of the whipped, perfect for decorating without having to stabilize! I put my beater attachment in the freezer for a few minutes and swished a few ice cubes around in the mixing bowl then dried it.. perfect shortcut to a cold mixer😃
The very best cheesecake I’ve ever had! Super easy to make. This recipe was the first I’ve tried with white chocolate, and I think that’s what made it so special. Made it last weekend and making another one tomorrow. SO DELICIOUS. I won’t use another recipe!
I love that so much Christina! I do think the white chocolate makes a huge difference!
Wow, this made the best cheesecake I’ve done yet- after plenty of disappointment with recipes that left goop or a flimsy crust that broke (sometimes both combined) this is it! Thank you!
First off, the crust was strong and actually cradled the cake… all the fixings stayed contained within its yummy barriers, even when dishing out slices (the ultimate test ).
Next up, the filling is perfect consistency and level of sweetness. I’m so glad to have learned the power of integrating melted chocolate- really gave the cake a velvety, rich texture. Looked almost like a baked cheesecake.
And lastly, this is delicious! The little boy and I were blessed to share this with hubby for his birthday, and everyone’s taste buds were in ecstasy.
Thank you for providing and easy to follow, mouth watering recipe.
Oh my gosh I love this so much!! I agree about the white chocolate, it’s a game changer!
Made this for our Oscar Party. My wife wasn’t happy as she said, “I don’t like Oreos” (how could I be married to her, right?), but that didn’t stop her from enjoying it. It was easy to make and delicious!
This comment made me LOL. Very happy to hear you coverted a non-Oreo lover (agreed, like WHAT?) to enjoy this dessert.
Delicious! Big hit with family. Used Gluten Free Oreos.
Woohoo! Thank you Suzie!!
I made the Oreo no-bake cheesecake for Thanksgiving with my extended family. It’s a good thing my guests brought some desserts because this cheesecake was wiped out! Everyone raved about it! I managed to get the last piece for myself-it was delicious!
So glad you snagged that last piece! Thank you for having my recipes as a part of your Thanksgiving!
This was my first ever cheesecake, I made it for Thanksgiving to change things up along with our traditional pies. I personally left the topping off because I felt it would be sweet enough without it, and it was perfect for my family. I have ADHD and struggle with recipes that have 986 steps. This was quick and easy. The 4 of us loved this so much, even my picky 15 year old. Will definitely make this again.
Amazing Laura!! Thank you so much for sharing. I find that even picky eaters will love Oreos haha
What about the white chocolate? I didn’t get white chocolate, can it work without that? I made this before and it turned out great! So delicious! I just don’t remember if I added the white chocolate or not
Yes this will work without the white chocolate but the texture is different and it’s a much lighter consistency
Family loved it!!
That’s wonderful Barbara, thank you!
Wow! This was amazing! I have made it twice and everyone that has eaten it has loved it. This includes my son that does not eat cheesecake and typically does not like cake. He says this is his favorite cake. My stepdad does not like cheese but loved it as well. It reminds me of cookies and cream ice cream. This cheesecake is much lighter than the typical cheesecake. I believe it is because of the folded whipped cream that is in the cheesecake mix. It is one of my top 5 favorite desserts for sure.
I am so excited to hear that Rachel! I love this recipe so much, and very happy to hear it was a hit for you too.
This is so good!! Perfect recipe!
Yeah!! That’s wonderful Tracy. I am so happy you enjoyed it