This brookie mousse cake recipe layers a fudgy brownie bottom with a creamy Oreo cheesecake layer and fluffy chocolate chip cookie mousse. It’s all your favorite desserts combined into one irresistible, seriously epic treat!
Love mousse cakes? You might also like my original chocolate mousse cake and no-bake Oreo mousse cake.

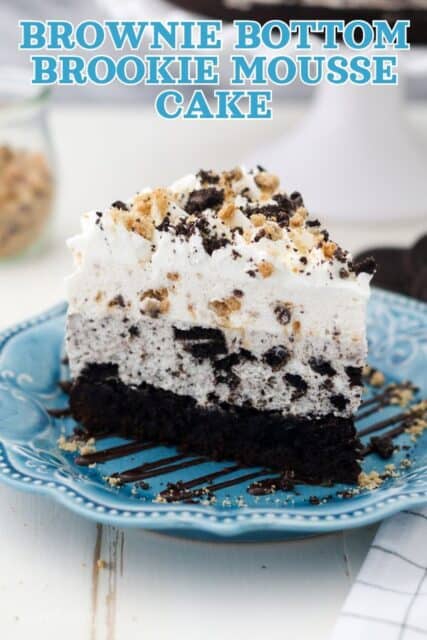
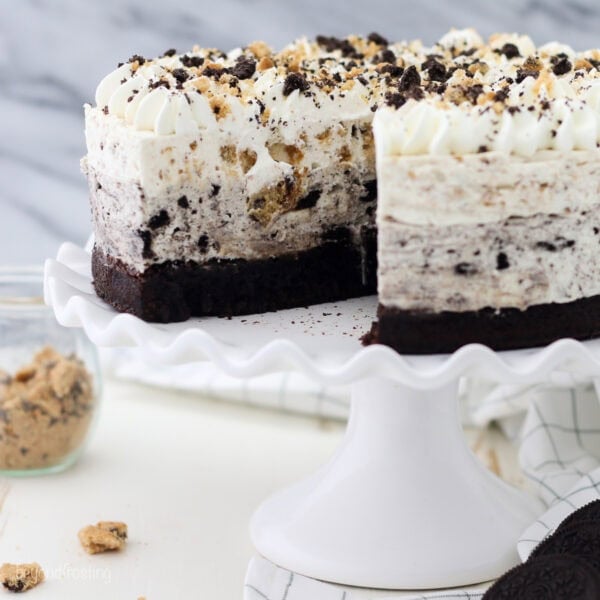
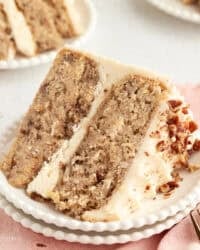
This brownie bottom brookie mousse cake is the kind of dessert that’s nearly impossible to stop eating after the first bite. It’s a triple-layered dessert that includes a rich chocolate brownie layer, an Oreo cheesecake layer, and thick, creamy cookie mousse. Gelatin helps keep the no-bake layers stabilized, and the cookies soften in the mousse, becoming almost cake-like. It’s truly a next-level treat.
A brookie is a combination of a brownie and a cookie. Once you throw in Oreos, it becomes a slutty brownie, one of my all-time favorite desserts. My slutty brookie icebox cake was a major source of inspiration for this Oreo brookie mousse cake!
What Makes This Brookie Mousse Cake So Great?
- Three desserts in one. This recipe has a chewy brownie base, a creamy white chocolate and Oreo cheesecake layer, and fluffy chocolate chip cookie mousse packed with crushed Chips Ahoy cookies. It’s a fun, cookie-filled spin on your typical mousse cake recipes.
- Made better with white chocolate. The Oreo cheesecake layer is my no-bake Oreo cheesecake. My recipe uses melted white chocolate in combination with cream cheese, which makes it taste just like the creme filling in an Oreo cookie!
- Thick, stable layers. I stabilize the mousse layers with gelatin and whipped cream and line the springform pan, so the finished cake is neat and sliceable. Garnished with swirls of whipped cream and crumbled cookies, it’s a dessert that not only tastes great, but it LOOKS great on a plate, too.

Important Notes!
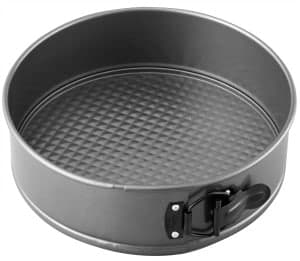
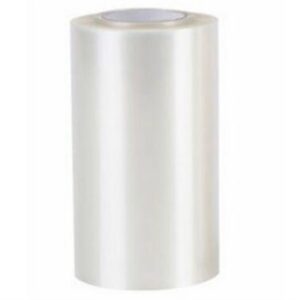
- Use the right pan. You’ll need a sturdy springform pan, one that’s at least 3 inches high and doesn’t leak. I use a 9-inch pan, but you could also use an 8- or 10-inch pan and adjust the baking times for the brownie layer accordingly. Line the bottom and sides of the pan so that the cake is easy to remove.
- Let the brownie layer cool completely. It’s super important that you allow the baked brownie base to cool fully before you add the cheesecake and mousse layers. If it’s not completely cooled, even the slightest hint of warmth can melt the no-bake cheesecake and mousse, preventing them from setting properly.
- Melt the chocolate gradually. When melting the white chocolate for the Oreo cheesecake layer, heat the chocolate in 30-second increments at 50% power. This avoids overheating the chocolate, which can make it seize. Refer to my full tutorial on how to melt chocolate for details.
- Chill the cake for long enough. This cookie mousse cake will need at least 3-4 hours to chill in the fridge before you serve it. Ideally, refrigerate it overnight! If you slice into the cake too soon, you won’t get those neat, pretty layers. It’s a good make-ahead option for parties.
More Tips for Success
- Bloom the gelatin. Sprinkle the gelatin over cold water first, and leave it to absorb and set before you microwave it. Don’t mix the gelatin right away.
- Chill your tools. The key to perfect homemade whipped cream is cold ingredients and cold tools. Chill your bowl and the mixer attachment in the freezer for 5-10 minutes before beating the cold heavy cream.
- Be gentle. Fold the whipped cream into the mousse by hand, and take care when stirring in the crushed cookies. Use a gentle hand so the mousse stays light and airy.
- Get neat, clean slices. When slicing the finished cake, run the knife under hot water and wipe it clean between slices.
- Use a no-bake crust instead. In place of the brownie layer, you can make this a fully no-bake dessert by layering your Oreo cheesecake and cookie mousse into an Oreo crust or graham cracker crust. See my guide on how to make a no-bake crust in a springform pan.

Frequently Asked Questions
Can I Use a Boxed Brownie Mix?
Yes! To make this brownie bottom mousse cake a little easier on myself, I used a boxed mix. You can choose to make the brownie from scratch if you prefer. If so, I’d recommend my cocoa powder brownies.
What If My Springform Pan Isn’t Leak-Proof?
You’ll find some watertight springform pans, but many springform pans are not leak-proof enough for liquid batters, like the brownies in this recipe. First, test your springform pan for leaks by adding water to the pan. If the water comes gushing out, it means your pan isn’t watertight. In this case, I recommend using a 9-inch round baking pan instead and transferring the baked brownie layer to your springform pan when it’s time to assemble. This way, you can still easily remove the sides from the finished mousse cake.
I find it helpful to use parchment paper or cake collars along the inside edge of the springform pan, so when you release the hinge, your edges are nice and clean.

Decorating Ideas
For the garnish, I prepare a final batch of whipped cream and use a large open star tip to pipe swirls over the top of the cake. Afterward, I sprinkle it with more Chips Ahoy cookie crumbs. Here are more ways that you can change up your brookie mousse cake:
- Add chocolate. Top with chocolate shavings or chocolate chips, or add a drizzle of melted chocolate or chocolate ganache.
- Different whipped cream. Instead of classic whipped cream, try garnishing the cake with chocolate whipped cream.
- More toppings. Add a drizzle of caramel sauce or crumble over edible cookie dough chunks (like I do for my no-bake cookie dough cheesecake).

Make Ahead and Storage
- Refrigerate. Keep this cake refrigerated airtight for up to 2 days. If you’re making this mousse cake ahead, I suggest leaving off any garnishes like whipped cream until you’re ready to serve.
- Freeze. For best results, freeze your mousse cake after it’s chilled in the fridge, while it’s still in the pan. Wrap the whole thing tightly in a double layer of plastic wrap or foil and freeze it for up to 2 months. Thaw the cake in the fridge before removing it from the pan and adding the toppings.
More Oreo Desserts to Try
Brownie Bottom Brookie Mousse Cake
- Prep Time: 4 hours
- Cook Time: 30 minutes
- Total Time: 4 hours 30 minutes
- Yield: 10-12 servings
- Category: Cake
- Method: Refrigerator
- Cuisine: American
Description
This brookie mousse cake layers a fudgy brownie bottom with creamy no-bake Oreo cheesecake and fluffy chocolate chip cookie mousse. It’s all your favorite desserts in one!
Ingredients
For the Brownie Layer:
- 1 box Chewy Fudge Brownie Mix, (19.9 ounces)
- Ingredients listed on the Box, oil, eggs, water
For the Oreo Cheesecake Layer:
- 4 ounces (113g) White Chocolate bar, melted and cooled
- 1 tablespoon (15ml) Cold Water
- 1 teaspoon Unflavored Gelatin
- 1 1/4 cups (295ml) Heavy Whipping Cream, cold
- 1/2 cup (65g) Powdered Sugar
- 8 ounces (226g) Cream Cheese, at room temperature
- 12 oreos (Oreos, crushed)
For the Chocolate Chip Cookie Mousse:
- 1 tablespoon (15ml) Cold Water
- 1 teaspoon Unflavored Gelatin
- 1 1/4 cups (295ml) Heavy Whipping Cream
- 1/2 cup + 2 tablespoons (81g)Powdered Sugar, divided
- 14 Chips Ahoy Original Chocolate Chip Cookies, crushed
For the Topping:
- 1 cup (236ml) Heavy Whipping Cream
- 1/2 cup (65g) Powdered Sugar
- Crushed Cookies, for garnish
Instructions
For the Brownie:
- Preheat the oven to 350°F. Line the bottom of a 9-inch springform pan with parchment paper.
- In a medium-sized bowl, combine the brownie mix, with the ingredients listed on the box. Stir until the batter is well combined and there are no dry ingredients left.
- Pour the batter into the springform pan and spread evenly.
- Bake at 350°F for 30-35 minutes until the center is baked but still slightly fudgy.
- Allow the brownie to cool completely.
For the Oreo Mousse:
- In a microwave-safe bowl, microwave the white chocolate at 50% power in 30-second increments until the chocolate is melted, stirring occasionally. Once melted, stir until smooth. Set aside to cool.
- In a small dish, combine 1 tablespoon of cold water with 1 teaspoon gelatin. Sprinkle the gelatin over the cold water and allow it to set to a solid. Microwave the gelatin for 8-10 seconds until it turns back to a liquid; watch closely.
- To prepare the whipped cream, place the metal mixing bowl and whisk in the freezer for 5-10 minutes. Next, using the chilled bowl, use an electric mixer to whip the heavy cream on medium-high speed until the cream starts to thicken to soft peaks. Add the powdered sugar and liquid gelatin and continue beating on high speed until stiff peaks form. Set the whipped cream aside.
- Next, beat the cream cheese on medium-high speed for 2-3 minutes, until the cream cheese is free of lumps, scraping the bowl occasionally. Then, add the melted chocolate and mix thoroughly into the cream cheese mixture.
- Finally, fold the prepared whipped cream into the cream cheese mixture and stir gently until the mixture is well combined. Halfway through, add in the crushed Oreos, then spread the mousse over the cooled brownie (in the springform pan).
For the Chocolate Chip Cookie Mousse:
- Prepare another batch of gelatin as instructed above.
- Prepare a second batch of whipped cream as instructed above, adding the crushed chocolate chip cookies into the whipped cream and spread over the layer of Oreo cheesecake.
- Cover with aluminum foil and refrigerate for 3-4 hours to allow the layers to set.
For the Topping:
- Prior to serving, prepare another batch of whipped cream as instructed above. Pipe the top of the cake with whipped cream using a large open star tip. Garnish with additional crushed cookies.
Notes
- If you’d like a homemade brownie instead of a boxed brownie mix, I recommend my cocoa powder brownie recipe. There are instructions for baking it in a springform pan as needed for this recipe.
- Keep the finished cake refrigerated airtight and enjoy leftovers within 2 days. I recommend leaving off any garnishes like whipped cream until it’s time to serve.
Nutrition
- Serving Size: 1 slice
- Calories: 924
- Sugar: 54g
- Sodium: 368mg
- Fat: 65g
- Carbohydrates: 78g
- Fiber: 1g
- Protein: 10g
- Cholesterol: 155mg


I’ve made this a handful of times. I can’t get enough of it!
OMG yes Vee!! This recipe is near and dear to my heart and it’s SO dang good!
Hi there! I was wondering how far in advance someone could make this? We’re planning on making it for my mother-in-law’s birthday!
Hi Marissa, 1-2 days should be fine! I always prefer to serve within 24 hours of making if possible so it’s the freshest!
For the oreo mousse you say melt the chocolate, what white chocolate is it listed in the ingredients? How much?
Sorry for the confusion. The recipe lists 4 ounces of white chocolate but it was listed under the brownie layer instead of the Oreo mousse
What an absolutely beautiful dessert that must make an appearance in my kitchen soon. Pinning.
That sounds wonderful! Thank you!